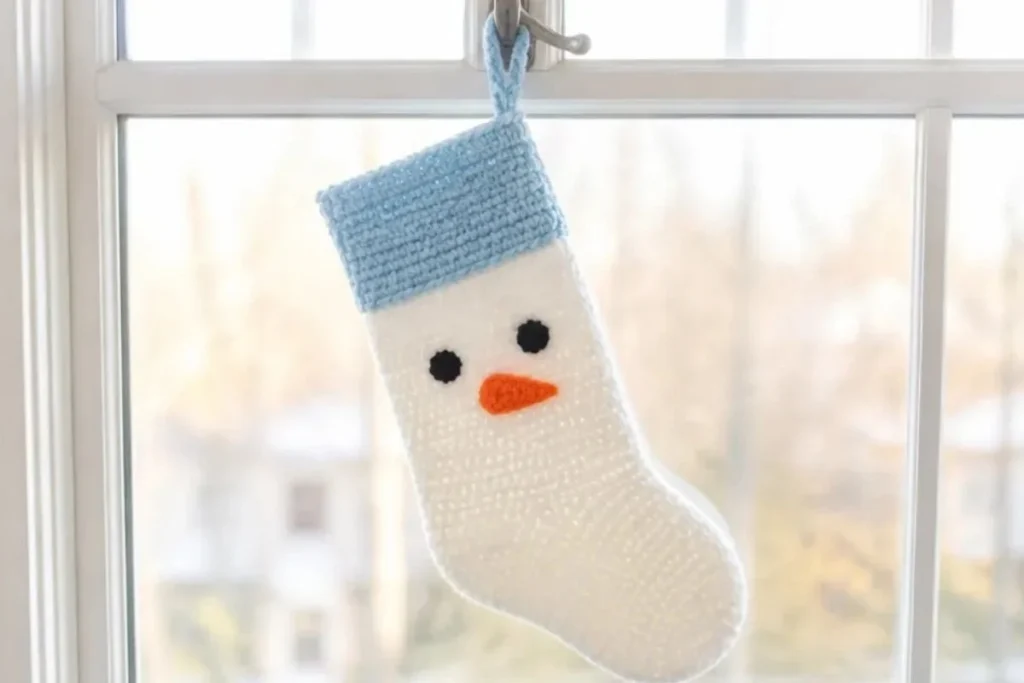
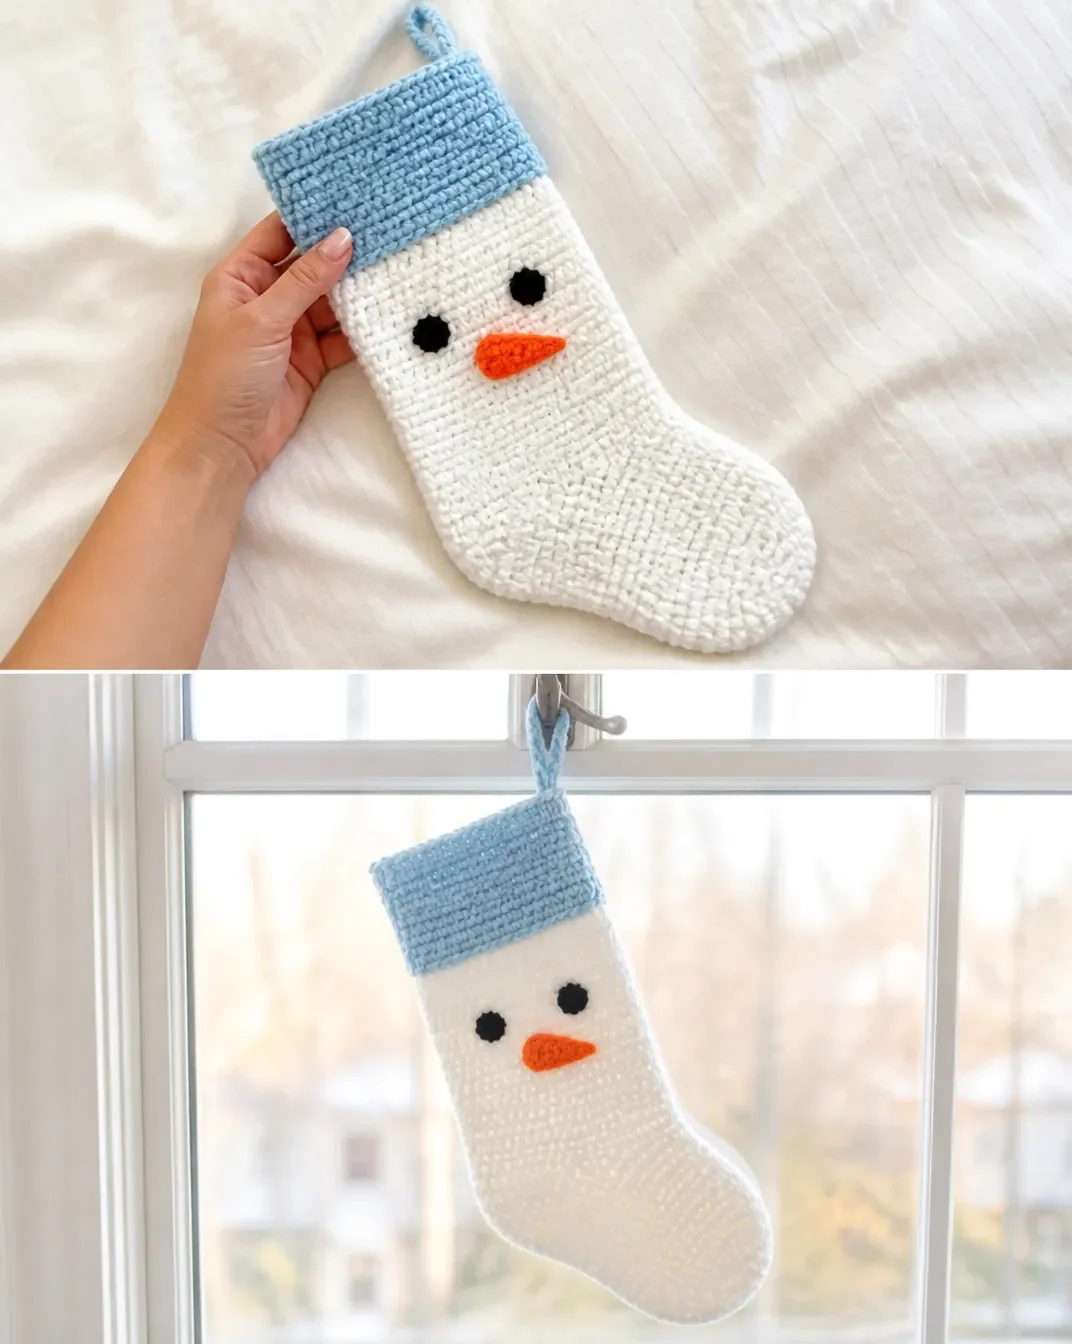
A Christmas crochet stocking is a practical seasonal project with plenty of personality. This beginner-friendly design creates a classic stocking shape and gives you two character options: a cheerful snowman or a friendly reindeer. The clear sections, simple single crochet shaping, and separate facial pieces make it approachable for learning foundational techniques. Hang the finished stocking by the fireplace, add it to a holiday display, or make one as a thoughtful handmade gift. For another small festive crochet idea, you may also enjoy these crochet blooms for hair.
Why You’ll Love This Crochet Project
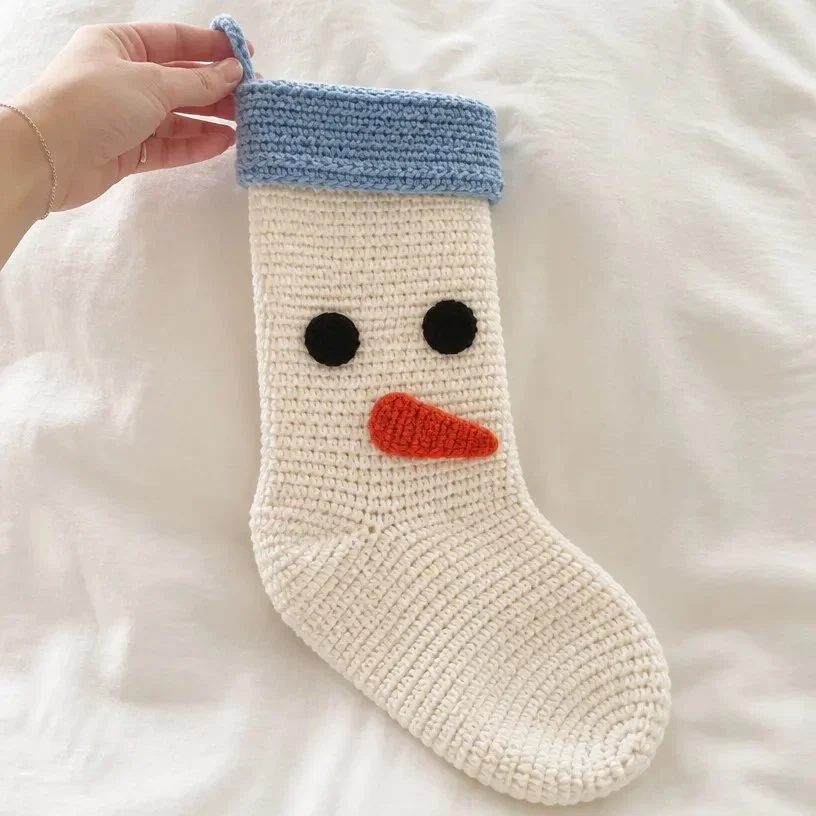
- It combines basic stitches with useful shaping. The stocking uses slip stitches, single crochet, half double crochet, and double crochet, while the heel and toe provide practice with decreases.
- The character details add instant charm. A snowman uses embroidered-style crocheted eyes and a pumpkin-colored nose, while the reindeer includes eyes, a nose, ears, and antlers.
- It is suitable for seasonal decorating. The hanging loop makes the completed stocking ready for a mantel, wall hook, staircase rail, or holiday tree display.
- It offers color flexibility. The approved color combinations create snowman and reindeer versions, but the same construction can be coordinated with your existing holiday decorations.
- It makes a personal handmade gift. A finished stocking can be used for small presents, holiday cards, treats, or keepsakes.
My Crochet Flower Tip: Keep each character’s parts together in a labeled envelope or small bag until assembly. This prevents tiny eyes, noses, and antlers from becoming separated while you work on the stocking base.
Before You Start Crocheting
The stocking is built in several stages. First, crochet a ribbed cuff with slip stitches worked through back loops only. Join the cuff into a ring, then work the leg downward in joined single crochet rounds. The heel is shaped separately in rows, after which the heel and instep are joined into a 52-stitch round.
The foot continues in rounds, with decreases around the toe until 12 stitches remain. A chain-and-slip-stitch hanging loop is added, and the stocking is finished as either a snowman or reindeer by crocheting and sewing on the character components.
The supplied measurements include a 14-inch [35.5 cm] cuff, a 9-inch [23 cm] leg measured from the bottom of the cuff, a 2-inch [5 cm] heel section, and a 5½-inch [14 cm] foot measurement from the joining round before toe shaping.
Abbreviations used
- ch: chain
- sc: single crochet
- hdc: half double crochet
- dc: double crochet
- sl st: slip stitch
- sc2tog: single crochet two together
- RS: right side
- WS: wrong side
- rem: remaining
- rnd: round
Materials You’ll Need
- Bernat® Super Value™, 7 oz / 197 g; 426 yds / 389 m:
- Snowman
- Main Color (MC): Winter White (07407) 1 ball
- Contrast A: Cool Blue (53730) 1 ball
- Contrast B: Pumpkin (53630) 1 ball
- Contrast C: Black (07421) 1 ball
- Reindeer
- Main Color (MC): Taupe (53012) 1 ball
- Contrast A: Winter White (07407) 1 ball
- Contrast B: Cherry Red (53436) 1 ball
- Contrast C: Black (07421) 1 ball
- Snowman
- Size U.S. H/8 (5 mm) crochet hook, or size needed to obtain gauge
- Stitch marker
The main color forms the stocking body and is also used for the reindeer ears. Contrast A is used for the cuff and hanging loop. Contrast B creates the character nose, and Contrast C is used for the eyes and reindeer antlers.
Crochet Pattern Instructions
Cuff
With A, ch 17.
1st row: (RS)
1 sl st in 2nd ch from hook.
1 sl st in each ch to end of chain.
Turn.
16 sl st.
2nd row:
Working in back loops only, 1 sl st in each sl st across.
Turn.
Rep 2nd row until work from beg measures 14″ [35.5 cm], ending on a WS row.
Join Cuff:
Working in back loops only, sl st last row and rem loops of foundation ch tog.
Fasten off.
Leg
Join MC with sl st to side edge of Cuff.
1st rnd:
Ch 1.
Work 46 sc evenly around side edge of Cuff.
Join with sl st to first sc.
2nd rnd:
Ch 1.
1 sc in each sc around.
Join with sl st to first sc.
Rep 2nd rnd until work from bottom of Cuff measures 9″ [23 cm].
Heel
Heel: With RS facing, join MC with sl st to first sc.
1st row:
Ch 1.
1 sc in same sp as last sl st.
1 sc in each of next 22 sc.
Turn.
Leave rem sts unworked.
2nd row:
Ch 1.
1 sc in each sc to end of row.
Turn.
Rep 2nd row for 2″ [5 cm], ending on a WS row.
Shape heel:
1st row: (RS)
Ch 1.
1 sc in each of next 15 sc.
Sc2tog.
1 sc in next sc.
Turn.
Leave rem sts unworked.
2nd row:
Ch 1.
1 sc in each of first 9 sts.
Sc2tog.
1 sc in next sc.
Turn.
3rd row:
Ch 1.
1 sc in each of first 10 sts.
Sc2tog.
1 sc in next sc.
Turn.
4th row:
Ch 1.
1 sc in each of first 11 sts.
Sc2tog.
1 sc in next sc.
Turn.
5th row:
Ch 1.
1 sc in each of first 12 sts.
Sc2tog.
1 sc in next sc.
Turn.
6th row:
Ch 1.
1 sc in each of first 13 sts.
Sc2tog.
1 sc in next sc.
Turn.
7th and 8th rows:
Ch 1.
1 sc in each of first 14 sts.
Sc2tog.
Turn.
15 sts.
Fasten off at end of 8th row.
Joining Round
With RS facing, join MC with sl st at left side of Heel Base.
Ch 1.
1 sc in each of next 23 sc of instep.
Place marker.
Work 7 sc up right side of Heel.
1 sc in each of next 15 sc across end of Heel.
and 7 sc down left side of Heel.
Join with sl st to first sc.
52 sc.
Toe Shaping and Foot
Next rnd (after 52 sc) Toe Shaping (character stocking base continuation):
The instruction text continues from “Christmas Character Stockings” base in the provided pages.
2nd rnd:
Ch 1.
1 sc in each sc to marker.
Sc2tog.
1 sc in each sc to last 2 sc.
Sc2tog.
Join with sl st to first sc.
Rep 2nd rnd until 44 sts rem.
Next rnd:
Ch 1.
1 sc in each sc around.
Join with sl st to first sc.
Rep last rnd until work from joining rnd measures 5½” [14 cm].
Shape toe:
1st rnd:
Ch 1.
(1 sc in each of next 9 sc. Sc2tog) 4 times.
Join with sl st to first sc.
2nd rnd:
Ch 1.
(1 sc in each of next 8 sc. Sc2tog) 4 times.
Join with sl st to first sc.
Cont in same manner, dec 4 sts on every rnd until 12 sts rem.
Break yarn, leaving a long end.
Draw end tightly through rem sts and fasten securely.
Hanging Loop
With A, ch 25.
Sl st in 2nd ch from hook and each ch to end of chain.
Fasten off.
Fold in half and sew in position.
Snowman
Make the snowman pieces with the snowman color assignments.
Eyes Make 2
With C, ch 2.
1st rnd:
5 sc in 2nd ch from hook.
Join with sl st to first sc.
2nd rnd:
Ch 2.
(1 dc, 1 hdc) in same sp as last sl st.
(1 hdc, 1 dc, 1 hdc) in each of next 4 sc.
Join with sl st to top of ch 2.
Fasten off.
Nose Make 1
With B, ch 3.
1st row:
3 hdc in 3rd ch from hook (counts as 4 hdc).
Turn.
2nd row:
Ch 2.
1 hdc in each of next 3 hdc.
Turn.
4 hdc.
3rd row:
Ch 2.
1 hdc in first hdc.
1 hdc in each of next 3 hdc.
Turn.
5 hdc.
4th to 7th rows:
Ch 2.
1 hdc in each of next 4 hdc.
Turn.
Fasten off after 7th row.
Snowman Sewing
Sew Eyes and Nose to Stocking as shown in picture.
Reindeer
Make the reindeer pieces with the reindeer color assignments.
Eyes Make 2
With C, ch 2.
1st row:
2 sc in 2nd ch from hook.
Turn.
2 sc.
2nd row:
Ch 1.
2 sc in each of next 2 sc.
Turn.
4 sc.
3rd row:
Ch 1.
2 sc in first sc.
1 sc in each of next 2 sc.
2 sc in last sc.
Turn.
6 sc.
4th row:
Ch 1.
2 sc in first sc.
1 hdc in each of next 4 sc.
2 sc in last sc.
Join A.
Turn.
8 sts.
5th row:
With A, ch 1.
Sc2tog.
1 sc in each of next 4 hdc.
Sc2tog.
Turn.
6 sts.
6th row:
Ch 1.
Sc2tog.
1 sc in each of next 2 sc.
Sc2tog.
Turn.
7th row:
Ch 1.
(Sc2tog) twice.
Fasten off.
Reindeer Sewing
Sew Eyes and Nose to Stocking as shown in picture.
(“Nose” for Reindeer is not given in the provided text; only the instruction line is present.)
Additional Character Components
Nose Make 1
This nose is written as the additional character component supplied in the pattern.
With B, ch 2.
1st rnd:
6 sc in 2nd ch from hook.
Join with sl st to first sc.
2nd rnd:
Ch 1.
2 sc in each sc around.
Join with sl st to first sc.
12 sc.
Fasten off.
Ears Make 2
With MC, ch 2.
1st row: (RS)
2 sc in 2nd ch from hook.
Turn.
2nd row:
Ch 1.
2 sc in each of next 2 sc.
Turn.
4 sc.
3rd row:
Ch 1.
2 sc in first sc.
1 sc in each of next 2 sc.
2 sc in last sc.
Turn.
6 sc.
4th row:
Ch 1.
2 sc in first sc.
1 sc in each of next 4 sc.
2 sc in last sc.
Turn.
8 sc.
5th to 10th rows:
Ch 1.
1 sc in each sc to end of row.
Turn.
11th row:
Ch 1.
Sc2tog.
1 sc in each of next 4 sc.
Sc2tog.
Turn.
12th row:
Ch 1.
Sc2tog.
1 sc in each of next 2 sc.
Sc2tog.
Fasten off.
Antlers Make 2
With C, ch 2.
1st row: (RS)
3 sc in 2nd ch from hook.
Turn.
2nd to 7th rows:
Ch 1.
1 sc in each sc to end of row.
Turn.
Fasten off after last row.
Reindeer Sewing
Sew Eyes, Nose, Ears and Antlers to Stocking as shown in picture.
Final Assembly and Finishing
Sew Eyes, Nose, Ears and Antlers to Stocking as shown in picture.
Sew Eyes and Nose to Stocking as shown in picture.
Sew Eyes, Nose, Ears and Antlers to Stocking as shown in picture.
Hanging loop: Fold in half and sew in position.
Finished Project Inspiration
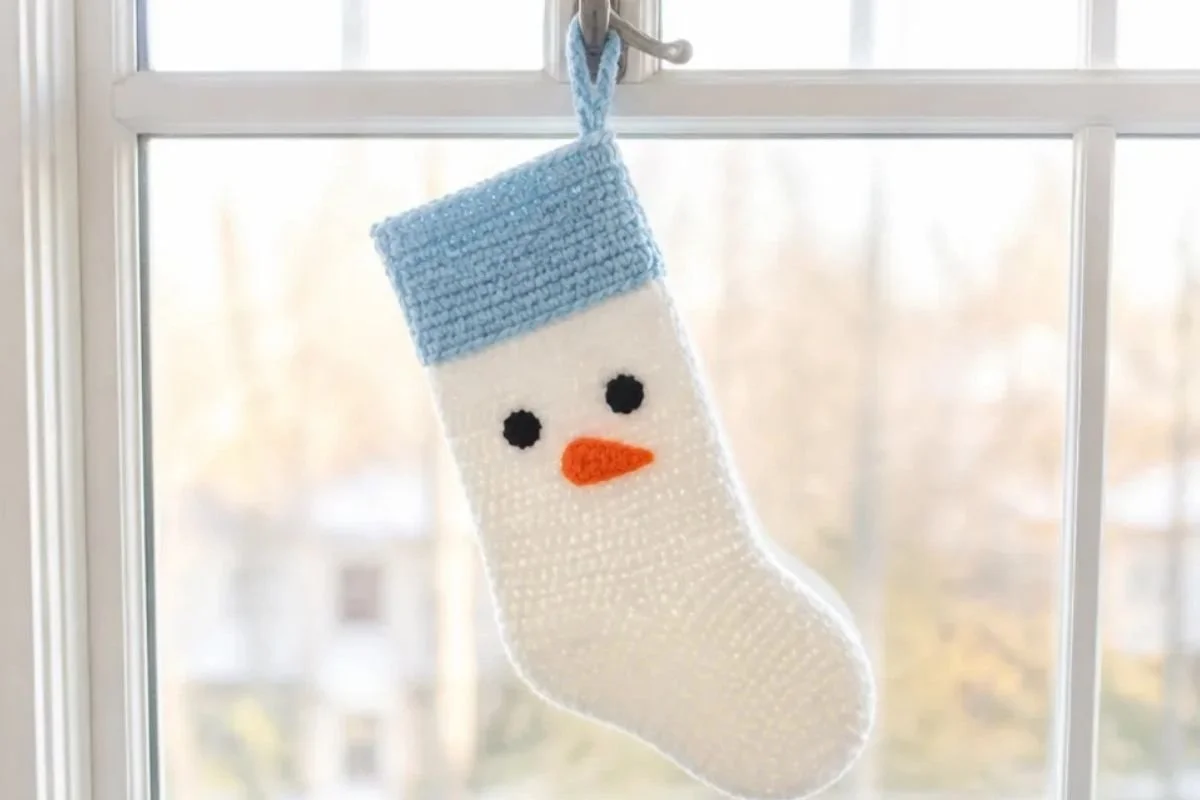
- Hang a snowman stocking beside a reindeer stocking for a coordinated pair with contrasting character colors.
- Use the stocking as a festive holder for small wrapped gifts, candy, ornaments, or handwritten notes.
- Display several finished stockings along a mantel or shelf, arranging the cuffs at an even height.
- Add a completed stocking to a holiday entryway display near a wreath, greenery, or seasonal sign.
- Give a personalized stocking to a family member, host, teacher, or friend as a reusable holiday gift.
- Coordinate the cuff and character colors with a larger handmade display; floral-inspired crochet decorations such as a three-dimensional flower granny square can complement a winter craft arrangement when used as separate décor.
Caring for Your Crochet Project
- Keep the stocking away from excessive heat, which can affect the yarn and distort the crocheted character pieces.
- Dust it gently with a soft brush or clean, dry cloth rather than pulling on the eyes, nose, ears, or antlers.
- For a small mark, use careful spot cleaning and avoid saturating the stocking.
- Reshape the cuff, heel, and toe by hand while the item is dry, taking care not to stretch the joined rounds.
- Store the stocking completely dry in a cool, dry place between seasons.
- Place delicate character pieces away from heavy decorations that could flatten or snag them.
- Follow the yarn manufacturer’s care instructions when a more thorough cleaning is needed.
Tips for Better Results
- Watch the back loops on the cuff. The ribbed texture depends on working the second row and the repeated rows in back loops only.
- Measure the cuff before joining it. Continue the repeated second row until it reaches 14″ [35.5 cm], ending on a WS row.
- Distribute the leg stitches evenly. The first round requires 46 sc around the side edge of the cuff, so avoid placing large gaps between stitches.
- Use the stitch marker at the instep. Place it exactly as directed during the 52-stitch joining round; it identifies the decrease position for the foot.
- Count after heel shaping. The heel ends with 15 sts, and the joining round should total 52 sc.
- Keep decrease rounds organized. The toe decreases remove 4 sts on every rnd until 12 sts rem, so count after each round.
- Leave a long finishing end. The remaining yarn must be drawn tightly through the final 12 sts and fastened securely.
- Arrange character pieces before sewing. Temporarily position the eyes, nose, ears, and antlers so both sides look balanced before attaching them permanently.
- Secure every sewn component well. Because the stocking may be handled when filled or stored, weave in and fasten the ends carefully.
Creative Ways to Customize Your Project
These are optional styling ideas and do not change the approved pattern instructions:
- Use the supplied snowman palette for a cool winter look or the reindeer palette for a warmer, traditional holiday appearance.
- Make a matching set with one snowman and one reindeer, keeping the cuff construction the same while changing only the character components.
- Choose which stocking receives a contrasting cuff color so family members can identify their own stockings.
- Arrange the character pieces slightly differently for individual expressions, while keeping them securely sewn to the stocking.
- If substituting yarn, choose a comparable yarn carefully and understand that a different fiber, thickness, or hook size may change gauge, texture, yarn requirements, and finished dimensions.
- If you change the hook size, make a separate gauge check and expect the stocking proportions to change unless your tension produces the intended measurements.
For wedding-inspired seasonal craft displays, a coordinated handmade accent such as this crochet bridal bouquet wrap can be styled separately alongside the stocking without altering its construction.
Frequently Asked Questions
Is this Christmas crochet stocking pattern suitable for beginners?
It is designed with approachable stitches and clearly divided construction stages. Beginners should be comfortable with chains, slip stitches, single crochet, working in rounds, and simple decreases. The heel and toe require careful counting.
What yarn is recommended?
The supplied pattern uses Bernat® Super Value™ in the listed snowman or reindeer color combinations. Use the stated main and contrast colors for the intended character designs.
What hook size should I use?
Use a U.S. H/8 (5 mm) crochet hook, or the size needed to obtain gauge.
How many character components are included?
The snowman includes two eyes and one nose. The reindeer includes two eyes, one additional nose component, two ears, and two antlers, with sewing instructions for attaching the pieces to the stocking.
Can I change the colors?
Yes, color changes are an optional customization. Keep the color roles in mind: MC forms the stocking body, A is used for the cuff and hanging loop, B forms the nose, and C is used for eyes and, for the reindeer, antlers.
How is the stocking assembled?
The cuff is made first and joined, followed by the leg, heel, foot, toe, and hanging loop. Character pieces are crocheted separately and sewn to the completed stocking as directed.
How do I keep the stocking’s shape?
Avoid overfilling it, handle the heel and toe gently, and reshape the piece by hand during storage. Keeping the stocking dry and away from heat also helps protect its form.
Can I use another yarn?
A substitute may be possible, but a different yarn can affect tension, dimensions, stitch definition, drape, and the amount of yarn required. A hook adjustment may also be necessary.
Conclusion
This Christmas crochet stocking pattern for beginners combines a sturdy stocking base with playful snowman and reindeer details. The project offers useful practice with ribbing, joined rounds, heel shaping, toe decreases, and appliqué-style assembly. Display the finished stocking, fill it with small gifts, or customize the colors for a coordinated family set. For another stocking variation, see this basic crochet stocking free pattern.