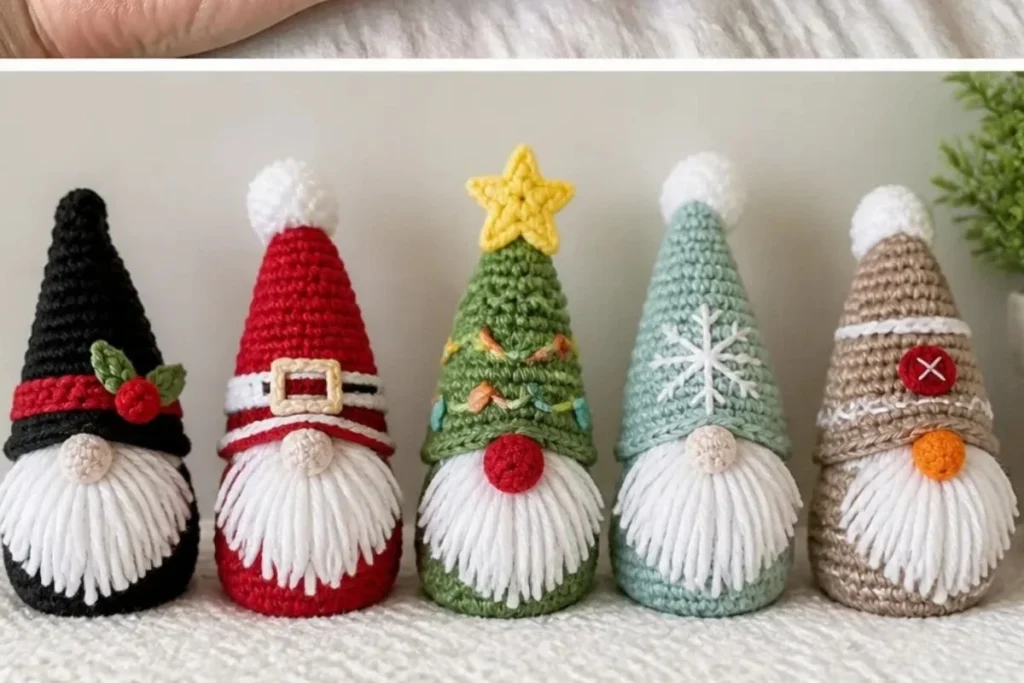
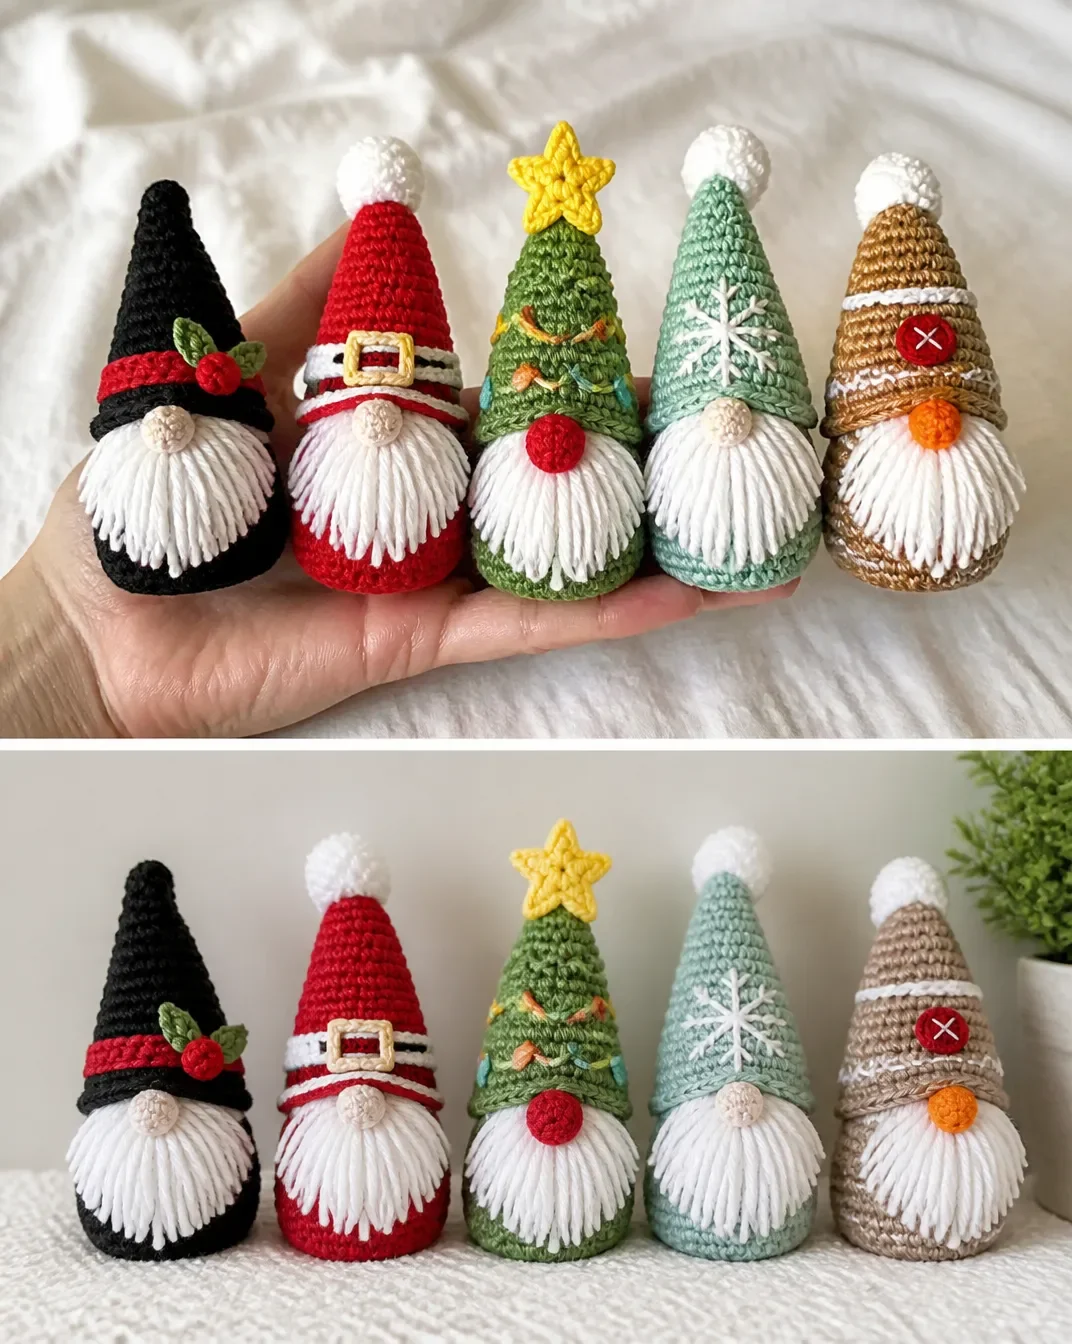
Five cheerful holiday characters come together in this Crochet Gnomes Pattern: Family of Five: a Christmas tree gnome, snowflake gnome, gingerbread gnome, snowman gnome, and Santa gnome. Each begins with the same shaped body, hat, nose, and beard, then receives its own seasonal details. They make charming mantel decorations, festive table accents, handmade gifts, or a coordinated holiday display. For another colorful crochet project to pair with seasonal décor, explore this 3D flower granny square color chart.
Why You’ll Love This Crochet Project
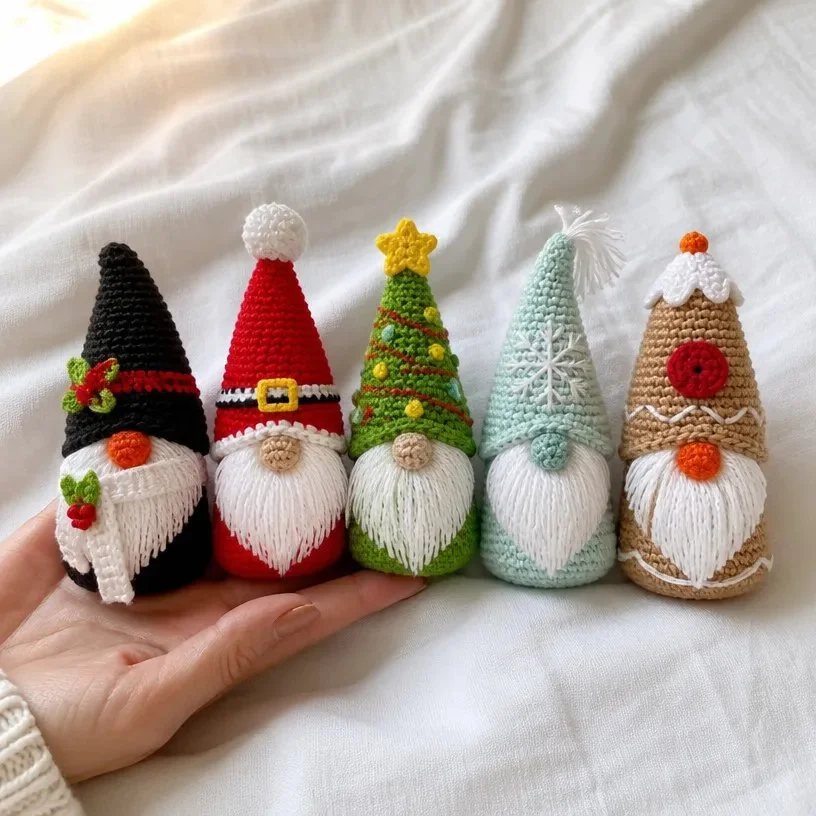
- Five coordinated designs: The shared construction makes it easier to create a matching family while the embellishments give every gnome a distinct personality.
- Practice useful shaping: The body, hat, and nose are worked in continuous rounds with increases and decreases, providing practice with three-dimensional crochet.
- Flexible seasonal display: Arrange the completed gnomes together on a shelf, mantel, centerpiece, or entryway table.
- Gift-friendly handmade décor: Individual gnomes can be given as small holiday gifts, or the full family can become a thoughtful seasonal set.
- Creative finishing practice: Embroidery, fringe, tassels, appliqué-style pieces, and sewn details add texture without requiring complicated crochet stitches.
My Crochet Flower Tip: Make and stuff the body, hat, and nose before beginning the decorative details so you can judge placement accurately as you assemble each character. You may also find Crochet Bear Bunny Crossbody Bags Kids useful.
Before You Start Crocheting
The pattern creates five gnomes using the same basic components: one body, one hat, one nose, and one beard for each character. The body and hat are crocheted in continuous rounds, while the beard is made from cut yarn lengths. After the common pieces are assembled, each gnome receives its themed finishing details.
The basic color assignments are:
- Christmas Tree Gnome: Body and hat with MC; nose with B.
- Snowflake Gnome: Body and hat with MC; nose with A.
- Gingerbread Gnome: Hat with MC, body with A, and nose with B.
- Snowman Gnome: Hat with MC; body and nose with A.
- Santa Gnome: Body, nose, and hat with MC.
The pattern uses a magic loop, single crochet, increases, single crochet decreases, slip stitches, double crochet, chain stitches, and embroidery stitches. Work in continuous rounds unless otherwise stated, and use a stitch marker to identify the beginning of a round where instructed.
Abbreviations used
- ch: chain
- sc: single crochet
- dc: double crochet
- sl st: slip stitch
- sc2tog: single crochet two together
- RS: right side
- PM: place marker
- rep: repeat
- st/sts: stitch/stitches
- MC: main color
- yoh: yarn over hook
Materials You’ll Need
Christmas Tree Gnome
- Main Color (MC): Mod Green (01223) 1 ball or 120 yds/109 m
- Contrast A: Red (00095) 1 ball or 6 yds/5 m
- Contrast B: Jute (00082) 1 ball or 6 yds/5 m
- Contrast C: White (00001) 1 ball or 17 yds/15 m
- Contrast D: Yellow (00010) 1 ball or 17 yds/15 m
- Contrast E: Beach Glass (01132) 1 ball or 6 yds/5 m
- Contrast F: Hot Orange (01628) 1 ball or 6 yds/5 m
Snowflake Gnome
- Main Color (MC): Beach Glass (01132) 1 ball or 60 yds/55 m
- Contrast A: Jute (00082) 1 ball or 60 yds/55 m
- Contrast C: White (00001) 1 ball or 17 yds/15 m
Gingerbread Gnome
- Main Color (MC): Jute (00082) 1 ball or 120 yds/109 m
- Contrast A: White (00001) 1 ball or 17 yds/15 m
- Contrast B: Red (00095) 1 ball or 11 yds/10 m
- Contrast C: Hot Orange (01628) 1 ball or 6 yds/5 m
Snowman Gnome
- Main Color (MC): Black (00002) 1 ball or 60 yds/55 m
- Contrast A: White (00001) 1 ball or 60 yds/55 m
- Contrast B: Orange (01628) 1 ball or 6 yds/5 m
- Contrast C: Red (00095) 1 ball or 11 yds/10 m
- Contrast D: Mod Green (01223) 1 ball or 6 yds/5 m
Santa Gnome
- Main Color (MC): Red (00095) 1 ball or 120 yds/109 m
- Contrast A: Jute (00082) 1 ball or 6 yds/5 m
- Contrast B: White (00001) 1 ball or 22 yds/20 m
- Contrast C: Black (00002) 1 ball or 17 yds/15 m
- Contrast D: Yellow (00010) 1 ball or 6 yds/5 m
General tools and notions
- Size U.S. F/5 [3.75 mm] Susan Bates® Silvalume® crochet hook or size needed to obtain gauge
- Susan Bates® stitch markers
- Polyfil Fiber Stuffing
- Susan Bates® yarn needle
Step-by-Step Crochet Instructions
Stitch and construction concepts
Magic loop: “Make a magic loop, demonstrated here.”
Work in continuous rnds unless otherwise stated. Use PM for beg of rnd where instructed.
Body make 1
Make a magic loop, demonstrated here.
- 1st rnd (RS): Ch 1. 6 sc in magic loop. Do not join, work in continuous rnds. 6 sc. PM for beg of rnd.
- 2nd rnd: 2 sc in each sc around. 12 sc.
- 3rd rnd: *1 sc in next sc. 2 sc in next sc. Rep from * around. 18 sc.
- 4th rnd: *1 sc in each of next 2 sc. 2 sc in next sc. Rep from * around. 24 sc.
- 5th rnd: *1 sc in each of next 3 sc. 2 sc in next sc. Rep from * around. 30 sc.
- 6th rnd: *1 sc in each of next 4 sc. 2 sc in next sc. Rep from * around. 36 sc.
- 7th rnd: *1 sc in each of next 5 sc. 2 sc in next sc. Rep from * around. 42 sc.
- 8th rnd: *1 sc in each of next 6 sc. 2 sc in next sc. Rep from * around. 48 sc.
- 9th rnd: *1 sc in each of next 7 sc. 2 sc in next sc. Rep from * around. 54 sc.
- 10th to 14th rnds: 1 sc in each sc around.
- 15th rnd: *Sc2tog. 1 sc in each of next 7 sc. Rep from * around. 48 sts.
- 16th and 17th rnds: 1 sc in each st around.
- 18th rnd: *Sc2tog. 1 sc in each of next 6 sc. Rep from * around. 42 sts.
- 19th rnd: As 16th rnd.
- 20th rnd: *Sc2tog. 1 sc in each of next 5 sc. Rep from * around. 36 sts.
- 21st rnd: As 16th rnd.
- 22nd rnd: *Sc2tog. 1 sc in each of next 4 sc. Rep from * around. 30 sts.
- 23rd rnd: *Sc2tog. 1 sc in each of next 3 sc. Rep from * around. 24 sts.
- Fasten off. Stuff Body.
Hat make 1
Make a magic loop.
- 1st rnd (RS): 4 sc in magic loop. Do not join, work in continuous rnds. 4 sc. PM for beg of rnd.
- 2nd rnd: *1 sc in next sc. 2 sc in next sc. Rep from * around. 6 sc.
- 3rd rnd: *1 sc in each of next 2 sc. 2 sc in next sc. Rep from * around. 8 sc.
- 4th rnd: 1 sc in each sc around.
- 5th rnd: *1 sc in each of next 3 sc. 2 sc in next sc. Rep from * around. 10 sc.
- 6th rnd: As 4th rnd.
- 7th rnd: 2 sc in next st. 1 sc in each sc to end of rnd. 11 sc.
- 8th to 14th rnds: As 7th rnd. 18 sc.
- 15th rnd: *2 sc in next sc. 1 sc in each of next 8 sc. Rep from * around. 20 sc.
- 16th rnd: *2 sc in next sc. 1 sc in each of next 9 sc. Rep from * around. 22 sc.
- 17th rnd: *2 sc in next sc. 1 sc in each of next 10 sc. Rep from * around. 24 sc.
- 18th rnd: *2 sc in next sc. 1 sc in each of next 11 sc. Rep from * around. 26 sc.
- 19th rnd: *2 sc in next sc. 1 sc in each of next 12 sc. Rep from * around. 28 sc.
- 20th rnd: *2 sc in next sc. 1 sc in each of next 13 sc. Rep from * around. 30 sc.
- 21st rnd: *2 sc in next sc. 1 sc in each of next 4 sc. Rep from * around. 36 sc.
- 22nd rnd: As 4th rnd.
- 23rd rnd: *2 sc in next sc. 1 sc in next 5 sc. Rep from * around. 42 sc.
- 24th rnd: As 4th rnd.
- 25th rnd: *2 sc in next sc. 1 sc in each of next 6 sc. Rep from * around. 48 sc.
- 26th rnd: *2 sc in next sc. 1 sc in each of next 7 sc. Rep from * around. 54 sc.
- 27th rnd: *2 sc in next sc. 1 sc in each of next 8 sc. Rep from * around. 60 sc.
- Fasten off at end of last rnd. Stuff Hat.
Nose make 1
Ch 2.
- 1st rnd: 4 sc in 2nd ch from hook. Do not join, work in continuous rnds. 4 sc. PM for beg of rnd.
- 2nd rnd: 2 sc in each sc around. 8 sc.
- 3rd and 4th rnds: 1 sc in each sc around.
- 5th rnd: (Sc2tog) 4 times. 4 sts.
- Fasten off. Stuff Nose.
Beard make 1
Cut one 6” [15 cm] length of White and tie end in a knot to form a circle.
Cut 20 – 5” [12.5 cm] lengths of White and add as fringe to the circle at the opposite end of knot.
Main assembly
- Pin Hat on Body to find placement for Nose.
- Stitch Nose in place.
- Pull the Beard ‘ring’ under the nose and stitch knot in place to hold beard in place under Nose.
- Trim Beard.
- Sew Hat to Body over top of Nose.
Christmas Tree Gnome
Hat trim
With RS facing, join A with sl st to any back sc of Hat.
1st rnd: *Ch 3. Skip next sc. Sl st in next sc. Rep from * around. Join with sl st in same sl as first sl st.
Fasten off.
Star
With D, ch 4.
1st rnd: Ch 3 (counts as dc). 9 dc in 4th ch from hook. Join with sl st to top of ch-3. 10 dc.
2nd rnd: Ch 1. 1 sc in same sp as sl st. *(2 dc. Ch 2. Sl st to top of last dc. 2 dc) in next dc. 1 sc in next dc. Rep from * around, ending at .
Join with sl st to first sc. Fasten off.
Light bulbs embroidery
With A, D, E and F using Satin St, embroider ‘light bulbs’ as shown in picture.
Santa Gnome
Hat trim
With RS facing, join B with sl st to any back sc.
1st rnd: Ch 1. 2 sc in same sp as sl st. *1 sc in each of next 9 sc. 2 sc in next sc. Rep from * around, ending at .
Join with sl st to first sc. 66 sc.
Hat belt
With C, ch 56. Join with sl st to first ch to form a ring.
1st rnd: Ch 1. 1 sc in same sp as sl st. 1 sc in each ch around. Join with sl st to first sc. 56 sc.
2nd to 4th rnds: Ch 1. 1 sc in each sc around. Join with sl st to first sc.
Fasten off leaving a long end for sewing.
Sew Hat Belt on Hat.
Buckle embroidery
With D and Straight St, embroider a ‘buckle’ over Hat Belt as shown in picture.
Snowman Gnome
Hat stripe
With C, ch 56. Join with sl st to first ch to form a ring.
1st rnd: Ch 1. 1 sc in same sp as sl st. 1 sc in each ch around. Join with sl st to first sc. 56 sc.
Fasten off leaving a long end for sewing.
Holly make 2
With D, ch 7.
1st rnd: Sl st in 2nd ch from hook. (Sl st in next ch. Ch 2. Sl st in next st) twice. Sl st in next ch. (Sl st. Ch 3. Sl st) in last ch.
Working on opposite side of ch, (Sl st in next ch. Ch 2. Sl st in next ch) twice. Sl st in last ch.
Join with sl st to first sl st. Fasten off, leaving a long end for sewing.
Berry
With C, ch 4. Join with sl st to first ch to make a ring.
1st rnd: Ch 2. (Yoh and draw up a loop. Yoh and draw through 2 loops on hook) twice. Yoh and draw through all 3 loops on hook – beg cluster made. Ch 1. [(Yoh and draw up a loop. Yoh and draw through 2 loops on hook) 3 times. Yoh and draw through all 4 loops on hook – cluster made. Ch 1] twice.
Join with sl st to first cluster. Fasten off leaving a long end for sewing.
Scarf
With C, ch 111.
1st row: 1 dc in 5th ch from hook (counts as dc and ch 1). *Ch 1. Skip next ch. 1 dc in next ch. Rep from * to end of chain.
Fasten off.
Sew Hat Stripe on Hat.
Sew Holly over Hat Stripe.
Sew Berry over ends of Holly.
Tie Scarf behind Beard.
Snowflake Gnome
Tassel
With C, using Straight St:
Wrap C around a 3” [7.5 cm] piece of cardboard 20 times.
Tie securely at one end.
Cut across other end.
Wrap yarn twice around tassel ¼” [1 cm] from tied end, and fasten securely.
Attach Tassel to tip of Hat.
Snowflake embroidery
With C, using Straight St, embroider snowflake as shown in picture.
Gingerbread Gnome
Button
With B, ch 2.
1st rnd: 6 sc in 2nd ch from hook. Join with sl st to first sc. 6 sc.
2nd rnd: Ch 1. 2 sc in each sc around. Join with sl st to first sc. 12 sc.
3rd rnd: Ch 1. *1 sc in next st. 2 sc in next sc. Rep from * around. Join with sl st to first sc. 18 sc.
4th rnd: Ch 1. *1 sc in each of next 2 sc. 2 sc in next sc. Rep from * around. Join with sl st to first sc. 24 sc.
Fasten off leaving a long end for sewing.
Icing
With A, work 1st to 11th rnds as given for Hat.
12th rnd: *Sl st in next sc. 3 dc in next sc. Skip next sc. Rep from * around. Join with sl st to first sl st.
Fasten off.
Gingerbread embroidery and finishing
With A, using Running St embroider details on Body along 8th and 9th rnds of Body as shown in picture.
With A, using Running St, embroider button details along last rnd as shown in picture.
With A, sew Button to Hat using Cross stitch.
With C, using Running St, embroider details on Icing as shown in picture.
Sew Icing on Top of Hat.
With C, using Straight St, embroider zig-zags over 24th and 25th rnds of Hat as shown in picture.
Stitch reference
- Straight St
- Running St
- Satin St
- Cross stitch (used for sewing Button to Hat)
Ways to Display Your Finished Crochet
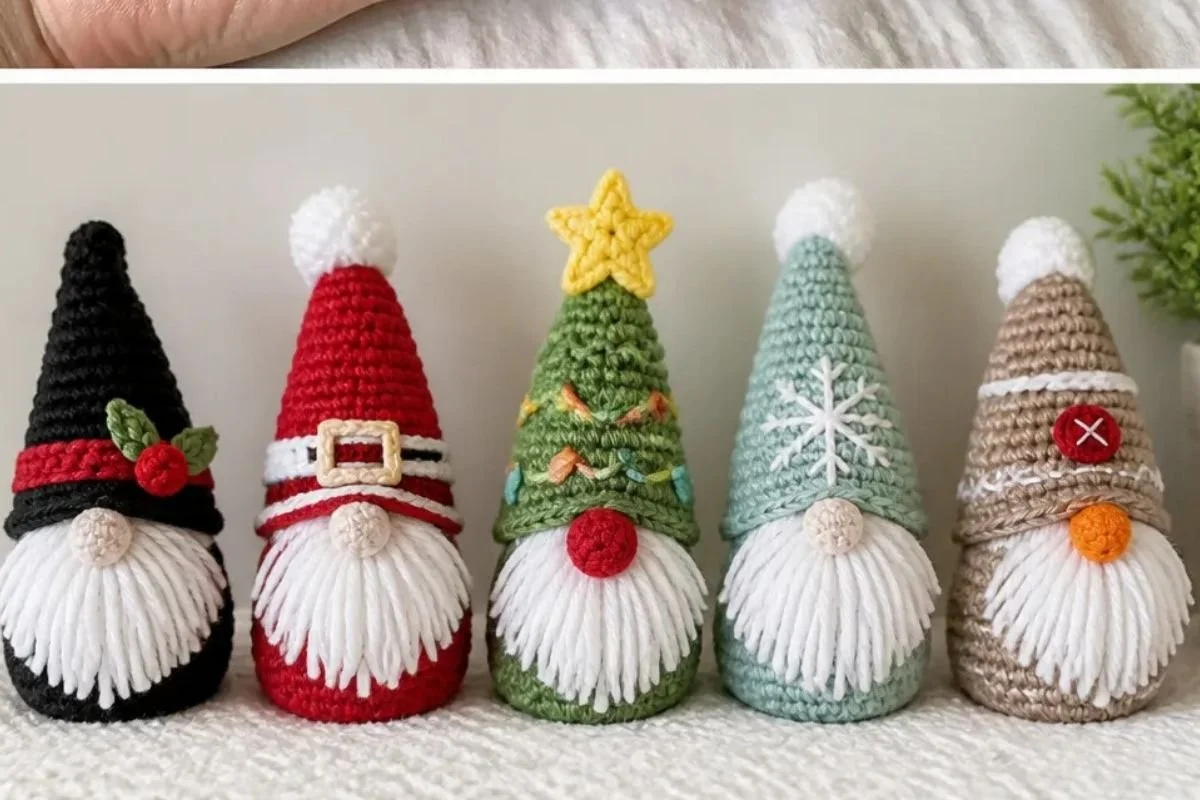
- Create a holiday shelf grouping: Place all five gnomes together with the taller hats angled in slightly toward the center.
- Make a table centerpiece: Arrange them in a shallow tray, adding seasonal greenery or ornaments around the base without attaching anything permanently to the crochet.
- Display them by character: Use the Christmas tree, snowflake, gingerbread, snowman, and Santa gnomes as separate accents in different rooms.
- Give individual handmade gifts: A single gnome makes a compact seasonal present for a host, teacher, neighbor, or family member.
- Build a yearly collection: Crochet one or more characters at a time and add them to your holiday decorations as your collection grows.
For a different seasonal handmade display, you can also browse this crochet flower wreath pattern for inspiration about arranging decorative motifs.
Caring for Your Crochet Project
Keep the finished gnomes dry and dust them gently with a soft brush, microfiber cloth, or the cool air of a hair dryer held at a distance. The stuffed forms and embroidered details can be distorted by rough handling, so avoid pulling on the beard, tassel, scarf, holly, or sewn embellishments.
For a small mark, use careful spot cleaning rather than soaking the entire gnome. Test any damp cleaning method on an inconspicuous area first, then allow the gnome to dry completely away from direct heat. Do not place the stuffed decorations near radiators, fireplaces, or strong sunlight for long periods.
Store the gnomes upright or in a roomy box with tissue paper around delicate details. Avoid compressing the hats, beard fringe, and snowflake tassel under heavy decorations.
Tips for Better Results
- Mark every continuous round. Place the stitch marker at the beginning where instructed and move it as you work. This makes it easier to identify the end of each round.
- Count after shaping rounds. The body increases from 6 sc to 54 sc before decreasing, while the hat ultimately reaches 60 sc. Checking counts prevents a small error from affecting the fit of the pieces.
- Keep stuffing balanced. Add Polyfil gradually after fastening off the body and hat. Firm, even stuffing helps the gnomes stand neatly without making the fabric overly stretched.
- Use the hat to position the nose. The approved assembly sequence specifically places the hat on the body first so the nose can be centered in relation to the brim and beard.
- Trim the beard after stitching the ring. Secure the beard beneath the nose before trimming so the fringe remains attached and can be shaped evenly.
- Leave long sewing ends where requested. The hat belt, holly, berry, and other appliqué-style details need enough yarn for secure attachment.
- Embroidery can be adjusted visually. For details described as “shown in picture,” keep the stitches neat and balanced on both sides while preserving the specified stitch type and yarn color.
- Work one character at a time. Complete the common pieces and assembly for one gnome before beginning its embellishments; this helps keep each color group organized.
Creative Ways to Customize Your Project
The approved color combinations create recognizable holiday characters, but you can make optional decorative changes after completing the pattern:
- Use a coordinated palette of deep green, burgundy, cream, and gold for a traditional display.
- Choose icy blue, silver, white, and charcoal for a winter-themed family.
- Replace the contrast colors for the hat trim, belt, stripe, or embroidery while keeping the same stitch instructions.
- Arrange the five gnomes in height order, by color, or according to a favorite holiday scene.
- Add a small fabric or crochet backdrop behind the group rather than attaching extra pieces directly to the stuffed figures.
- Make each character in a different palette for a playful mismatched collection.
Changing yarn type, yarn thickness, or hook size is optional, but it can affect gauge, finished dimensions, stuffing firmness, stitch definition, and yarn requirements. If you substitute materials, make a small sample and expect the completed gnomes to differ in size or texture.
Frequently Asked Questions
Is this crochet gnome pattern suitable for a newer crocheter?
It includes basic stitches but also requires continuous-round shaping, stuffing, sewing, and embroidery. A newer crocheter who is comfortable with single crochet, increases, decreases, and a magic loop can work through it carefully.
Do all five gnomes use the same body and hat?
Yes. The body, hat, nose, beard, and main assembly are shared. The character-specific sections add the decorations and color placement that distinguish each gnome.
Which hook size is used?
Use a size U.S. F/5 [3.75 mm] Susan Bates® Silvalume® crochet hook or the size needed to obtain gauge.
Can I change the colors?
Yes. Color changes are an optional customization, but they may alter the recognizable appearance of the Christmas tree, Santa, snowman, snowflake, or gingerbread designs. Keep the color placement organized so you know which yarn is MC and which is each contrast.
How should I stuff the pieces?
The approved instructions say to stuff the Body, Hat, and Nose after fastening off. Add Polyfil gradually and distribute it evenly so the pieces retain their rounded shape.
How are the hats attached?
First pin the Hat on the Body to find the Nose placement. After stitching the Nose and securing the Beard, sew the Hat to the Body over the top of the Nose.
What is the beard made from?
The beard uses one 6” [15 cm] length of White tied in a knot to form a circle, plus 20 lengths of White measuring 5” [12.5 cm], added as fringe.
Can I make only one of the five designs?
Yes. The characters are presented as a family, but each themed finishing section can be completed independently after making the common components in its designated color arrangement.
How should I store the finished gnomes?
Store them dry in a roomy container with tissue paper around the beard, tassel, scarf, and other delicate details. Avoid stacking heavy items on top of the stuffed pieces.
Conclusion
This family of five crochet gnomes combines approachable shaping with colorful seasonal finishing details. Make the full collection for a coordinated holiday display, or choose one character for a smaller handmade gift. Once your gnomes are complete, you may also compare them with this free easy Lily Gnomes family of five crochet pattern for another festive interpretation.