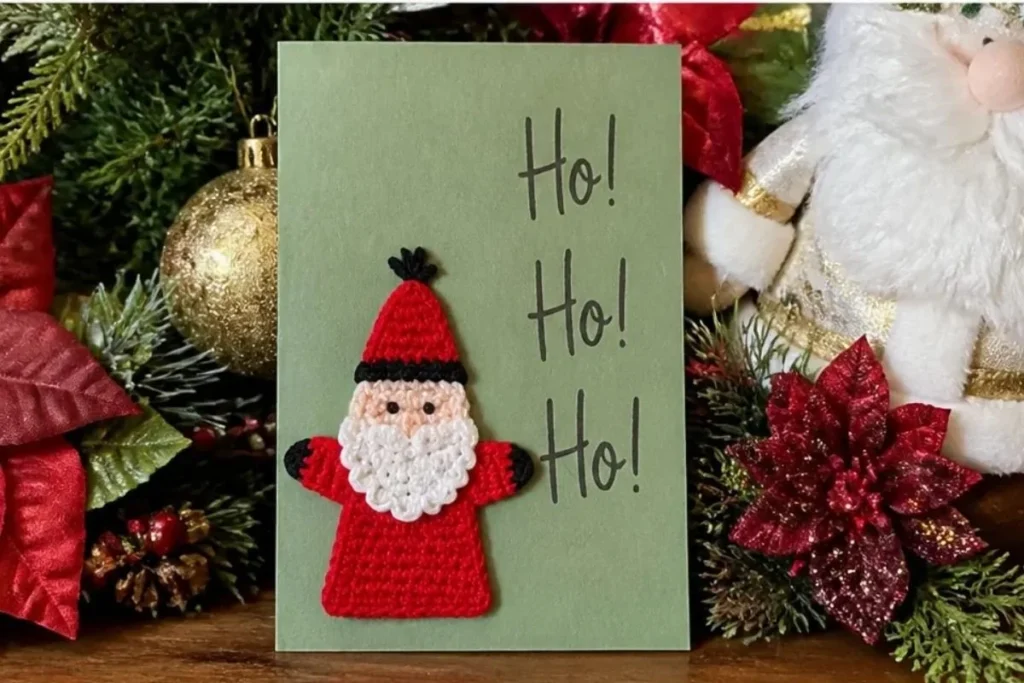
A handmade Santa adds instant holiday character to a blank greeting card. This Crochet Santa Motif Pattern for Christmas Cards creates a cheerful appliqué from red, black, peach, and metallic white thread, with shaping that gives the figure a recognizable body, hat, face, arms, and beard. It is a practical project for crocheters who enjoy small seasonal makes, and the finished motif can personalize cards, gift tags, or holiday stationery. For another small decorative idea, you may also enjoy these crochet blooms for hair.
Why You’ll Love This Crochet Project
- It creates a meaningful handmade card. A crocheted Santa turns an ordinary blank card into a keepsake with texture and dimension.
- It practices shaping. The body and hat use decreases, while the face and beard introduce circular increases and textured stitches.
- It uses small, clearly defined components. You will make a body, two arms, face, hat, and beard before assembling the figure.
- It adds festive texture. The metallic white thread gives the beard a bright finish, while the red and black details establish Santa’s classic color palette.
- It is easy to customize visually. Once assembled, the motif can be paired with different card colors, paper styles, or additional drawn details.
My Crochet Flower Tip: Keep a small ruler or measuring guide nearby while making the face. Its stated 1-inch diameter helps you maintain proportions between the face, hat, beard, and body.
Before You Start Crocheting
This project is made from six crocheted components: one body, two arms, one face, one hat, and one beard. The pieces are worked separately, with the body and arms formed mainly in rows. The face is crocheted continuously without joining, and the finishing instructions use craft glue to attach the pieces and secure the completed Santa to a blank card.
The pattern uses US crochet terminology and a 1.5 mm steel hook with size 10 crochet thread. Pay particular attention to color changes on the arms and hat, the decreases in the body and hat, and the instruction not to join while crocheting the face.
Special abbreviation
dc2tog (worked over 2 sts): [Yarn over and draw up a loop in next st, yarn over and draw through 2 loops] twice, yarn over and draw through all 3 loops on hook.
Materials You’ll Need
- AUNT LYDIA’S® Classic Crochet Thread, Size 10: 1 ball each of:
- 494 Victory Red A
- 12 Black B
- 424 Peach C
- AUNT LYDIA’S® Metallic Crochet Thread, Size 10: 1 ball of:
- 1P White/Pearl D
- Susan Bates® Steel Crochet Hook: 1.5 mm [US 7]
- Tapestry needle: for weaving in yarn ends
- Craft glue: for attaching the crocheted pieces and finished Santa
- Blank card: for the finished motif
Color A forms the body and most of the hat and arms. Color B creates the dark arm cuffs and hat trim, color C makes the face, and color D creates the beard.
Step-by-Step Crochet Instructions
Work each component in the order below. Keep the right side facing as specified, and preserve the stitch counts at the end of each row so the shaped pieces assemble correctly.
Body
With A, ch 17.
Row 1 (Right Side): Hdc in 2nd ch from hook and each ch across; turn – 16 hdc.
Row 2: Ch 2, skip first st, dc in next st (counts as dc2tog), dc in each st to last 2 sts, dc2tog; turn – 14 dc.
Rows 3–7: Repeat Row 2 – 4 dc.
Row 8: Ch 1, skip first dc, hdc in next 2 dc, ch 1, slip st in last dc – 2 hdc.
Fasten off.
Left Arm
With right side facing, join A in end of Row 5 of Body.
Row 1: Ch 1, 3 hdc around post of dc on Row 5 of Body; turn – 3 hdc.
Rows 2–4: Ch 1, hdc in each hdc; turn. At end of Row 4 change to B.
Row 5: With B, ch 1, hdc in each hdc; turn.
Row 6: Ch 2, skip first hdc, 2 dc in next hdc, ch 2, slip st in last hdc. Fasten off.
Right Arm
With right side facing, join A in end of Row 5 of Body opposite Left Arm. Repeat Rows 1–6 of Left Arm.
Face
With C, ch 4; join with slip st to form ring; ch 1, 8 sc in ring; do NOT join.
Sc in each sc around without joining until circle measures 1” in diameter, working 2 sc in next sc whenever needed to increase to keep circle flat; slip st in next sc.
Fasten off.
Hat
With A, ch 10.
Row 1 (Right Side): Hdc in 2nd ch from hook and in each ch across; turn – 9 hdc.
Row 2: Ch 2, skip first st, dc in next st, dc in each st to last 2 sts, dc2tog; turn – 7 dc.
Rows 3 and 4: Repeat Row 2 – 3 dc.
Row 5: Ch 2, skip first dc, dc2tog; turn; turn – 2 dc.
Row 6: Ch 3, dc in next dc; turn – 2 dc.
Row 7: Ch 3, dc in next dc changing to B; turn.
Row 8: With B, ch 3, 2 dc in first dc, ch 1, turn, slip st in top of ch-3. Fasten off.
Beard
With D, ch 11.
Row 1 (Right Side): Sc in 2nd ch from hook and each ch across; turn – 10 sc.
Row 2: Ch 1, 2 hdc in each sc across; turn – 20 hdc.
Row 3: Ch 1, skip first hdc, slip st in next 5 hdc, skip next hdc, [3 hdc in next hdc] twice, tr in next 3 hdc, [3 hdc in next hdc] twice, skip next hdc, slip st in last 5 hdc. Fasten off.
Finishing and Assembly
Weave in ends. Block if pieces won’t lie flat.
With right side facing on all pieces and following photo for placement, glue Arms to Body, glue Face to tip of Body, glue Beard and Hat on Face.
Glue assembled Santa to front of card.
Let the glue dry fully on a flat surface before handling or mailing the card. Keep the components aligned while the adhesive sets so the small pieces do not shift.
Finished Project Inspiration
- Holiday greeting cards: Attach one Santa to the front of a blank card for a personal Christmas greeting.
- Gift tags: Use a sturdy cardstock tag and add the assembled motif as a festive package decoration.
- Place cards: Glue a small Santa to folded cardstock for a cheerful seasonal table setting.
- Scrapbook pages: Incorporate the motif into a Christmas memory book or handmade holiday album.
- Coordinated stationery: Make several cards with the same red, black, peach, and white palette for a matching set.
- Seasonal paper displays: Mount the motif on contrasting green, cream, or kraft-colored card stock to emphasize its shape.
If you enjoy building seasonal handmade collections, you can pair these cards with fresh floral crochet motifs for a broader collection of handmade paper decorations throughout the year.
Caring for Your Crochet Project
Because the Santa is glued to a card, handle it as paper craft rather than as a washable crochet item.
- Dust the surface gently with a soft, dry brush or a clean, dry cloth.
- Avoid soaking, machine washing, or rubbing the motif.
- Keep the card away from excessive humidity, heat, and direct sunlight.
- Store it flat in a protective envelope, box, or scrapbook sleeve.
- If a thread end becomes visible, avoid pulling it; carefully trim only the loose excess.
- Protect the metallic beard from snagging against rough paper or other decorations.
For cards kept from one holiday season to the next, place a sheet of clean tissue paper around the motif before storing it flat.
Tips for Better Results
- Count after every shaped row. The body and hat narrow through decreases, so checking the stated stitch counts helps prevent proportion changes.
- Watch the right side. The body, hat, beard, and first rows of the other pieces identify a right side. Keep the pieces oriented consistently during assembly.
- Work the body decreases carefully. In Row 2 of the body, the dc in the next stitch counts as dc2tog, followed by the separately written dc2tog at the opposite end.
- Do not join the face rounds. The face is worked continuously, and the pattern specifically says not to join. Use a removable marker if needed to track the beginning of the round.
- Keep the face flat. Add 2 sc in the next sc whenever needed to maintain a flat circle until it measures 1” in diameter.
- Change colors at the stated locations. The arms change to B at the end of Row 4, while the hat changes to B during Row 7.
- Block only when necessary. The finishing instructions call for blocking if pieces will not lie flat. Use gentle shaping so the small thread pieces retain their proportions.
- Test placement before gluing. Arrange both arms, the face, beard, and hat on the body first. Once the placement looks balanced, apply craft glue.
- Use a light amount of glue. Excess adhesive can spread beyond the thread and stiffen the paper card.
- Weave in ends before assembly. Concealing the ends first keeps the back of each component neater and reduces the chance of loose threads showing around the glued edges.
Creative Ways to Customize Your Project
The approved instructions create the classic Santa color combination, but the finished card can still be personalized without changing the construction.
- Choose a different card color. Cream, forest green, navy, or kraft-colored cardstock can create a different background while allowing the red and white motif to remain prominent.
- Coordinate the paper and message. Match the inside greeting to the card stock and use a simple handwritten message so the crocheted Santa remains the focal point.
- Make a collection. Create several motifs for a set of cards, keeping the approved component instructions the same for consistent sizing.
- Try a seasonal palette carefully. Optional color substitutions can change the mood, but replacing the supplied thread may affect the appearance, texture, and finished dimensions.
- Use a different hook only with awareness. A larger or smaller hook can change the size and density of every component, so it may also alter how the pieces fit together on the card.
- Add paper details around the motif. Optional stars, snowflakes, or borders can be drawn or cut from paper, but keep them flat enough that the card can close comfortably.
For another handmade celebration project, a crochet bridal bouquet wrap pattern offers inspiration for coordinating handcrafted details around a special occasion.
Frequently Asked Questions
Is this crochet Santa motif beginner-friendly?
It is suitable for crocheters who are comfortable with basic chains, single crochet, half double crochet, double crochet, slip stitches, color changes, and fastening off. The shaped body and hat require attention to decreases, while the face uses continuous rounds and increases.
What yarn is recommended?
The pattern specifies AUNT LYDIA’S® Classic Crochet Thread, Size 10 in 494 Victory Red A, 12 Black B, and 424 Peach C, plus AUNT LYDIA’S® Metallic Crochet Thread, Size 10 in 1P White/Pearl D. Use the listed colors and quantities when following the approved pattern.
What hook size should I use?
Use a Susan Bates® Steel Crochet Hook measuring 1.5 mm [US 7].
How many crochet pieces are made?
You will make one body, two arms, one face, one hat, and one beard. The arms are made separately but use the body as the joining location for their first row.
How is the face made?
The face begins with a chain-4 ring and 8 sc worked into the ring. Continue working sc around without joining, increasing with 2 sc in the next sc whenever needed to keep the circle flat until it measures 1” in diameter.
How are the pieces attached?
The finishing instructions say to weave in ends, block pieces if they will not lie flat, and then glue the Arms to the Body, the Face to the tip of the Body, and the Beard and Hat onto the Face. Finally, glue the assembled Santa to the front of the card.
Can the colors be changed?
Yes, color changes are an optional styling choice. However, changing the thread can affect the motif’s color balance, texture, and dimensions, so compare the new colors before assembling the pieces.
How should the completed card be stored?
Store it flat in a dry, protected place, preferably in an envelope, box, or scrapbook sleeve. Avoid moisture, excessive heat, and pressure that could flatten or shift the glued components.
Conclusion
This Crochet Santa Motif Pattern for Christmas Cards combines small-scale shaping, festive thread colors, and simple assembly into a memorable holiday project. Make one card or a coordinated set, then personalize the paper and greeting to suit your recipient. For a printable version of the design, see the free Aunt Lydia’s Santa Christmas Card Motif crochet pattern.