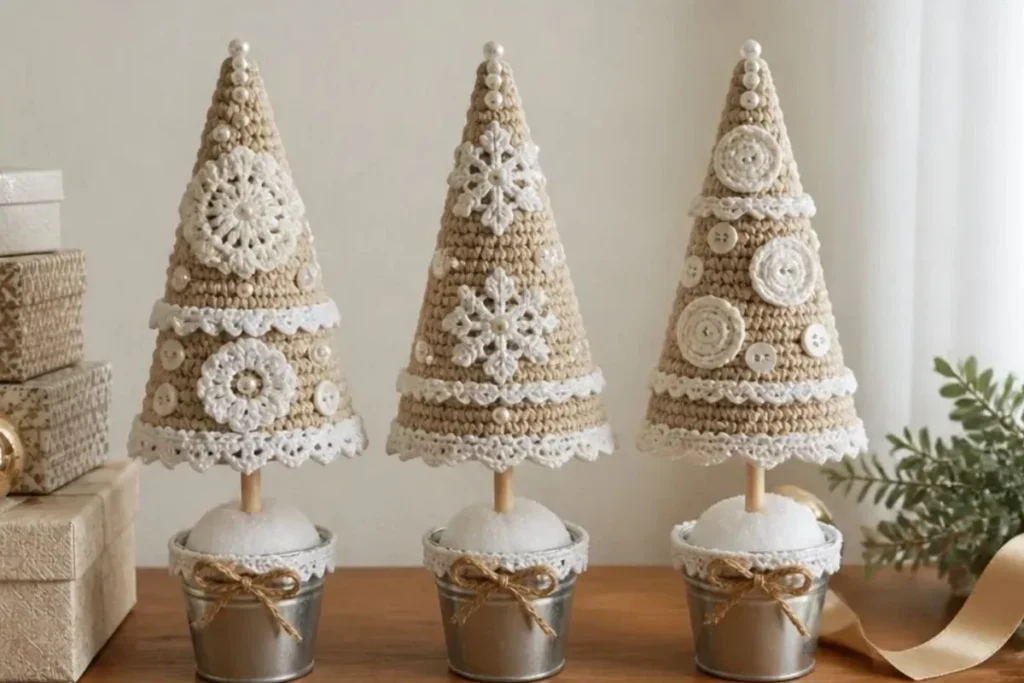
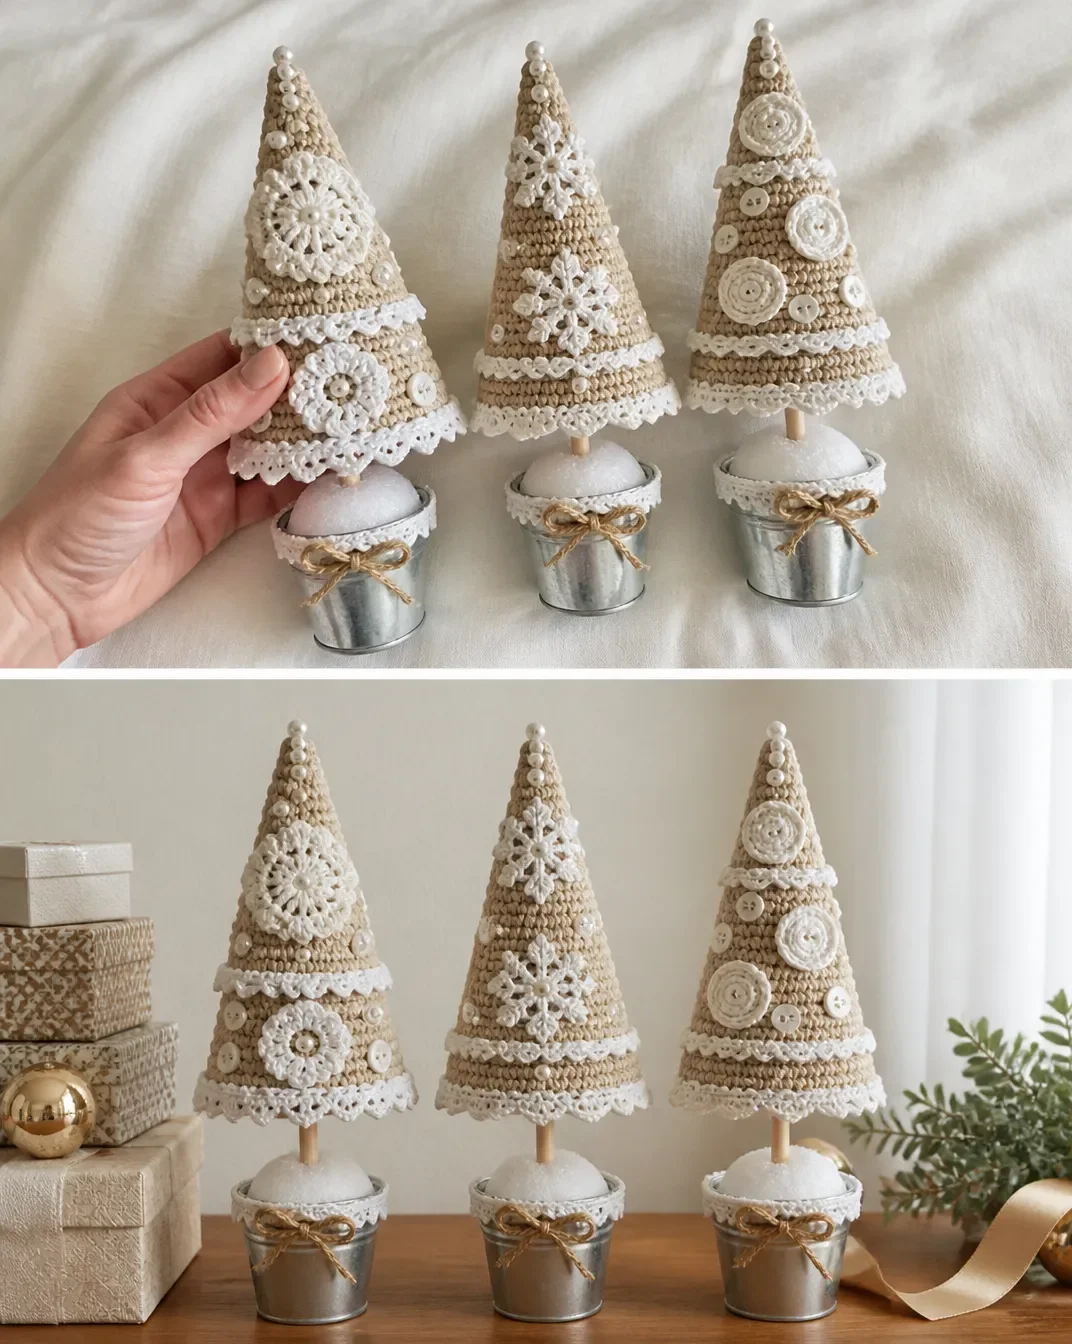
A festive trio of crocheted triangle trees brings handmade charm to a holiday mantel, tabletop, or seasonal display. This Crochet Triangle Christmas Tree Pattern for Festive Decor includes three coordinated tree designs, each decorated with its own motifs, trims, beads, and buttons. The finished trees stand in small buckets for a stable, dimensional arrangement that can be displayed year after year. Crocheters who enjoy shaping, surface decoration, and creative assembly may also enjoy these crochet blooms for hair as another small decorative project.
Why You’ll Love This Crochet Project
- Make a coordinated set: The pattern creates three trees with matching triangle construction but different decorative styles.
- Practice simple shaping: Each triangle is formed with single crochet rows and regular decreases, making the silhouette easy to follow.
- Explore decorative crochet: Circle motifs, snowflakes, swirls, scallops, and bands add plenty of texture without changing the basic tree shape.
- Create a sturdy seasonal display: Dowel stems, Styrofoam balls, tin buckets, stuffing, and glue help the trees stand upright.
- Give a handmade holiday gift: The completed trio can be displayed together or separated into smaller gifts for friends, family, teachers, or hosts.
My Crochet Flower Tip: Complete and weave in the ends of all decorative motifs before beginning assembly. This keeps the triangles flat while you sew on beads, buttons, and appliqués.
How This Crochet Project Comes Together
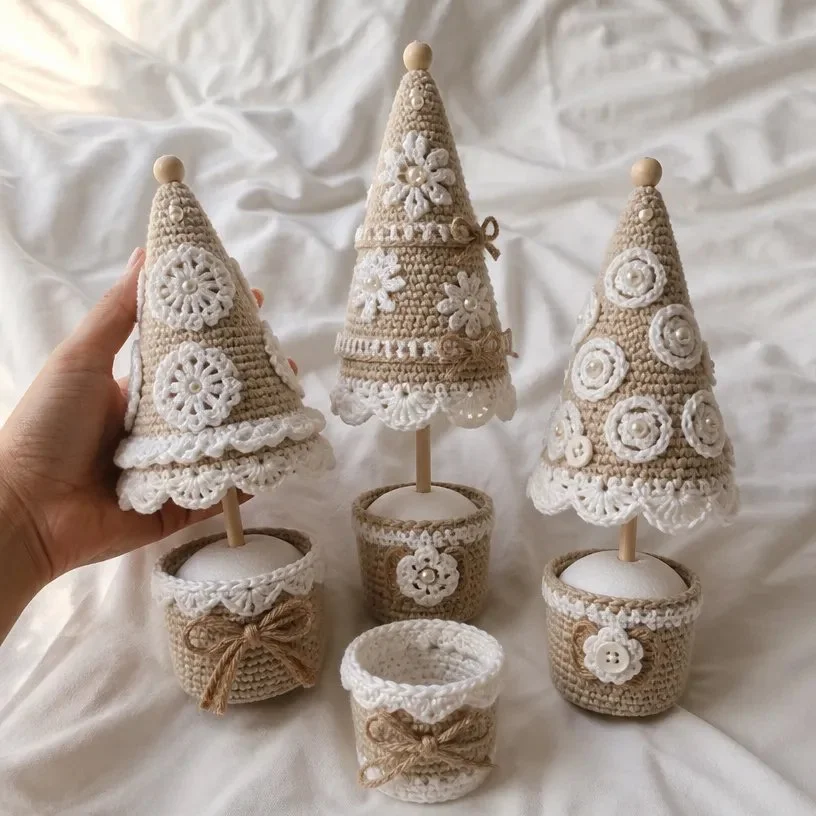
The project makes three trees, and each tree uses two crocheted triangles worked in color A. The triangles are sewn together, lightly stuffed, and mounted on a 12-inch dowel. A crocheted skirt sits around the dowel above a 3-inch Styrofoam ball placed inside a 3-inch tin bucket.
Each tree has a distinct decorative treatment:
- Tree 1 uses circle motifs, pearl beads, scalloped trims, and a bucket bow.
- Tree 2 uses large and medium snowflakes, pearl beads, upper and lower bands, and a flower on the bucket trim.
- Tree 3 uses large, medium, and small swirls, beads, buttons, a curved trim, and a small swirl on the bucket trim.
The construction sequence is important: crochet the triangle pairs first, add the decorations while the pieces are flat, sew the triangles together, attach the trims, insert the dowels, and then secure each tree in its bucket.
Useful Abbreviations
- ch: chain
- sc: single crochet
- sc2tog: single crochet two together
- dc: double crochet
- slip st: slip stitch
- beg 3-dc Cl: beginning three-double-crochet cluster
Materials You’ll Need
- RED HEART® Super Saver® 1 skein each color:
- A: 334 Buff
- B: 316 Soft White
- Susan Bates® Crochet Hook: 4 mm [US G-6]
- Yarn needle
- 24 ¼-inch (6 mm) pearl beads, used for decoration
- Three ⅝-inch (15 mm) wood beads
- 12 ¼–½-inch (6–12 mm) white buttons, used for decoration
- Three 15/16-inch (23 mm) diameter × 12-inch (30.5 cm) long dowels
- Three 3-inch (7.5 cm) tin buckets
- Three 3-inch (7.5 cm) Styrofoam® balls
- Sewing needle and white thread
- Polyester fiberfill
- Craft glue
The dowels provide the stems, while the Styrofoam balls help anchor the trees inside the buckets. Use the fiberfill sparingly so the crocheted trees remain softly rounded without becoming overstuffed.
Before You Start Crocheting
Complete Crochet Tutorial
Special Technique
Join with sc: Use the join with single crochet technique as defined in the supplied pattern.
Tree Base Make 3
Triangle Make 2 for Each Tree
With A, ch 32.
Row 1 (right side): Sc in 2nd ch from hook and in each ch across, turn 31 sc.
Row 2: Ch 1, sc in each st, turn.
Row 3: Ch 1, sc2tog, sc in each st across to last 2 sts, sc2tog, turn 29 sc.
Rows 4 and 5: Repeat Row 2.
Row 6: Repeat Row 3 27 sc.
Rows 7–36: Repeat Rows 4–6 ten times 7 sc.
Rows 37–40: Repeat Rows 2 and 3 twice 3 sc.
Row 41: Ch 1, sc2tog, sc in last st, turn 2 sc.
Row 42: Ch 1, sc2tog 1 sc. Fasten off.
Skirt
With B, ch 7; join with slip st in first ch to form a ring.
Round 1 (right side): Ch 3, which counts as the first dc here and throughout; 15 dc in ring; join with slip st in top of beginning ch 16 dc.
Round 2: Ch 3, dc in next st, *ch 3, dc in next 2 dc; repeat from * around, ch 3; join with slip st in top of beginning ch 16 dc and 8 ch-3 spaces.
Round 3: Slip st in next st, 4 sc in each ch-3 space; join with slip st in first sc 32 sc. Fasten off.
Tree 1 Decorations
Circle Motif Make 2
With B, ch 7; join with slip st in first ch to form a ring.
Round 1 (right side): Ch 1, 12 sc in ring; join with slip st in first sc 12 sc.
Round 2: Ch 3, dc in next sc, *ch 3, dc in next 2 sc; repeat from * around, ch 3; join with slip st in top of beginning ch 12 dc and 6 ch-3 spaces.
Round 3: Slip st in next st, (slip st, beg 3-dc Cl, ch 4, 3-dc Cl) in first ch-3 space, [ch 4, 3-dc Cl] twice in each ch-3 space, ch 4; join with slip st in top of beginning Cl 12 Cls and 12 ch-4 spaces.
Round 4: Work [(2 sc, ch 3, 2 sc)] in each ch-4 space; join with slip st in first sc. Fasten off.
Scallop Trim #1
With B, ch 72.
Row 1 (right side): Sc in 2nd ch from hook, *skip next 2 ch, 5 dc in next ch; repeat from * across to last ch, sc in last ch. Fasten off.
Scallop Trim #2
With B, ch 63. Work the same as Scallop Trim #1.
Bucket Trim
With B, work an even number of ch as needed to fit around the top edge of the bucket.
Row 1: Dc in 2nd ch from hook and in each ch across, turn odd number of dc.
Row 2: Ch 3, skip next dc, sc in next st, *ch 3, skip next dc, sc in next dc; repeat from * across. Fasten off.
Bow
With 2 strands of A held together, work as many ch as needed to wrap around the bucket and tie a bow. Fasten off.
Tree 1 Assembly
Weave in ends.
- Sew a circle motif on each triangle.
- At the top of each triangle, sew 3 pearl beads in a vertical row.
- With right sides held together, sew triangle sides together. Turn the tree right side out and stuff lightly; do not overstuff.
- With sewing needle and thread, sew the short edges of Scallop Trim #1 together, then sew the trim to the bottom edge of the tree. Sew the short edges of Scallop Trim #2 together, place the trim on the tree, and sew it to the nearest round.
- With sewing needle and thread, sew the bottom edges together, leaving a ½-inch (1.5 cm) opening in the center for the dowel.
- Apply glue to ⅔ of the dowel and insert it into the tree, leaving the remainder of the dowel for the bucket. Allow the glue to dry thoroughly throughout all assembly and finishing steps before handling.
- Apply glue to the outside of the bucket near the top edge and glue the bucket trim in place around it. Allow it to dry, then tie the bow around the trim. You may want to apply glue to an inconspicuous area of the knot to prevent it from unraveling and to the loops to prevent drooping.
Finishing Tree 1
Insert a Styrofoam ball in the bucket.
Apply glue around the ball where it meets the inside of the bucket and allow it to dry.
With a pin, mark the center of the ball.
Lightly mark 1½ inches (4 cm) from the bottom edge of the dowel and insert the dowel into the ball up to this mark.
Carefully remove the dowel and fill the hole with glue.
With the right side facing the tree, slide the skirt onto the dowel, then reinsert the dowel into the hole.
Ensure that the tree is standing straight, slide the skirt down to the ball, and allow the glue to dry thoroughly.
Tree 2 Decorations
Large Snowflake Make 2
With B, ch 6; join with slip st in first ch to form a ring.
Round 1 (right side): Ch 4, which counts as dc, ch 1; dc in ring, *ch 1, dc in ring; repeat from * 11 times, ch 1; join with slip st in 3rd ch of beginning ch-4 14 dc and 14 ch-1 spaces.
Round 2: Ch 1, sc in first ch-1 space, *ch 5, sc in next 2 ch-1 spaces, repeat from * 5 times, ch 5, sc in last ch-1 space; join with slip st in first sc 7 ch-5 spaces. Fasten off.
Medium Snowflake Make 2
With B, ch 6; join with slip st in first ch to form a ring.
Round 1 (right side): Ch 1, 12 sc in ring; join with slip st in first sc 12 sc.
Round 2: Ch 1, (sc, ch 5, sc) in same st as join, *sc in next sc, (sc, ch 5, sc) in next sc; repeat from * 4 times, sc in last sc; join with slip st in first sc 6 ch-5 spaces. Fasten off.
Lower Band Trim
With B, ch 7.
Row 1 (right side): Dc in 3rd ch from hook, *ch 1, skip next ch, dc in next ch; repeat from * once, turn 3 dc and 2 ch-1 spaces.
Row 2: Ch 1, sc in first dc, *ch 1, skip next dc, sc in next dc; repeat from * once, turn 3 sc and 2 ch-1 spaces.
Row 3: Ch 3, dc in first sc, *ch 1, skip next sc, dc in next sc; repeat from * once, turn 3 dc and 2 ch-1 spaces.
Repeat Rows 2 and 3 until the trim fits around the lower rounds of the tree. Fasten off.
Upper Band Trim
Work the same as the lower band trim, repeating Rows 2 and 3 until the trim fits around the upper section of the tree.
Bow Make 2
With 2 strands of A held together, work as many ch as needed to weave in and out of each band and tie a bow. Fasten off.
Bucket Trim for Tree 2
With A, work as many ch as needed to fit around the outside of the bucket near the top edge plus 2 ch.
Row 1 (right side): Dc in 3rd ch from hook and in each ch across. Fasten off.
Flower
With B, ch 6; join with slip st in first ch to form a ring.
Round 1 (right side): Ch 1, 12 sc in ring; join with slip st in first sc 12 sc.
Round 2: Ch 1, sc in same st as join, *ch 5, sc in next 2 sc; repeat from * 4 times, ch 5, sc in last sc; join with slip st in first sc 6 ch-5 spaces. Fasten off.
Tree 2 Assembly
Weave in ends.
- Sew 1 medium and 1 large snowflake on each triangle. Do not sew through the outer ch-spaces of the large snowflake.
- Sew a pearl bead in the center of each snowflake. Sewing through the triangle, sew a bead on the 3rd ch of each ch-5 of the large snowflake, pulling outward slightly to create a point.
- Repeat Step 3 of Tree 1 Assembly.
- Sew the short ends of each band together to form a ring. Weave the appropriate bow through the upper and lower bands. Place the upper band on the tree.
- Repeat Steps 5 and 6 of Tree 1 Assembly.
- Apply glue around the outside of the bucket near the top edge and glue the bucket trim in place.
- Apply glue to the outside of the bucket near the top edge and glue the bucket trim in place.
- Sew a pearl bead in the center of the flower and glue the flower onto the front of the trim.
Finishing Tree 2
See the instructions for Finishing Tree 1.
Tree 3 Decorations
Large Swirl Make 4
With B, ch 6; join with slip st in first ch to form a ring.
Round 1 (right side): Ch 5, which counts as dc, ch 2; dc in ring, *ch 2, dc in ring; repeat from * 5 times; join with slip st in 3rd ch of beginning ch 8 dc and 8 ch-2 spaces.
Round 2: Slip st in next ch, (sc, ch 3, sc) in each ch-2 space around, petal made; join with slip st in first sc 8 ch-3 spaces. Fasten off.
Medium Swirl Make 2
Work the same as Round 1 of the large swirl. Fasten off.
Small Swirl Make 5
With B, ch 6; join with slip st in first ch to form a ring.
Round 1: *Ch 3, sc in ring; repeat from * 7 times; join with slip st in base of beginning ch 8 ch-3 spaces. Fasten off.
Curved Trim
With B, ch 3.
Row 1 (right side): Work 2 sc in 2nd ch from hook, *ch 3, 2 sc in 2nd ch from hook; repeat from * as needed to fit around the lower edge of the tree. Fasten off.
Bucket Trim for Tree 3
With A, ch 4.
Row 1 (right side): Sc in 2nd ch from hook, sc in next 2 ch, turn 3 sc.
Row 2: Ch 1, working in back loops only, sc in each st, turn.
Working an odd number of rows, repeat Row 2 until the trim fits around the top of the bucket. Fasten off. Sew short edges together.
Edging Round
With the right side of either edge facing, join B with sc at the seam, working in the ends of rows.
Ch 1, skip first row, sc in next row, *ch 1, skip next row, sc in next row; repeat from * around to last row, ch 1, skip last row; join with slip st in first sc. Fasten off.
Repeat on the opposite edge.
Tree 3 Assembly
Weave in ends.
- Sew 2 large swirls, 1 medium swirl, and 2 small swirls on each triangle. Sew beads and buttons as shown or where desired.
- Repeat Step 3 of Tree 1 Assembly.
- Sew the short ends of the curved band together to form a ring. Position the band at the lower edge of the tree and, with sewing needle and thread, sew it in place.
- Repeat Steps 5 and 6 of Tree 1 Assembly.
- Apply glue around the outside of the bucket near the top edge and glue the bucket trim in place.
- Sew a button to the center of the remaining small swirl. Glue the swirl to the front of the bucket trim.
Finishing Tree 3
See the instructions for Finishing Tree 1.
Finished Project Inspiration
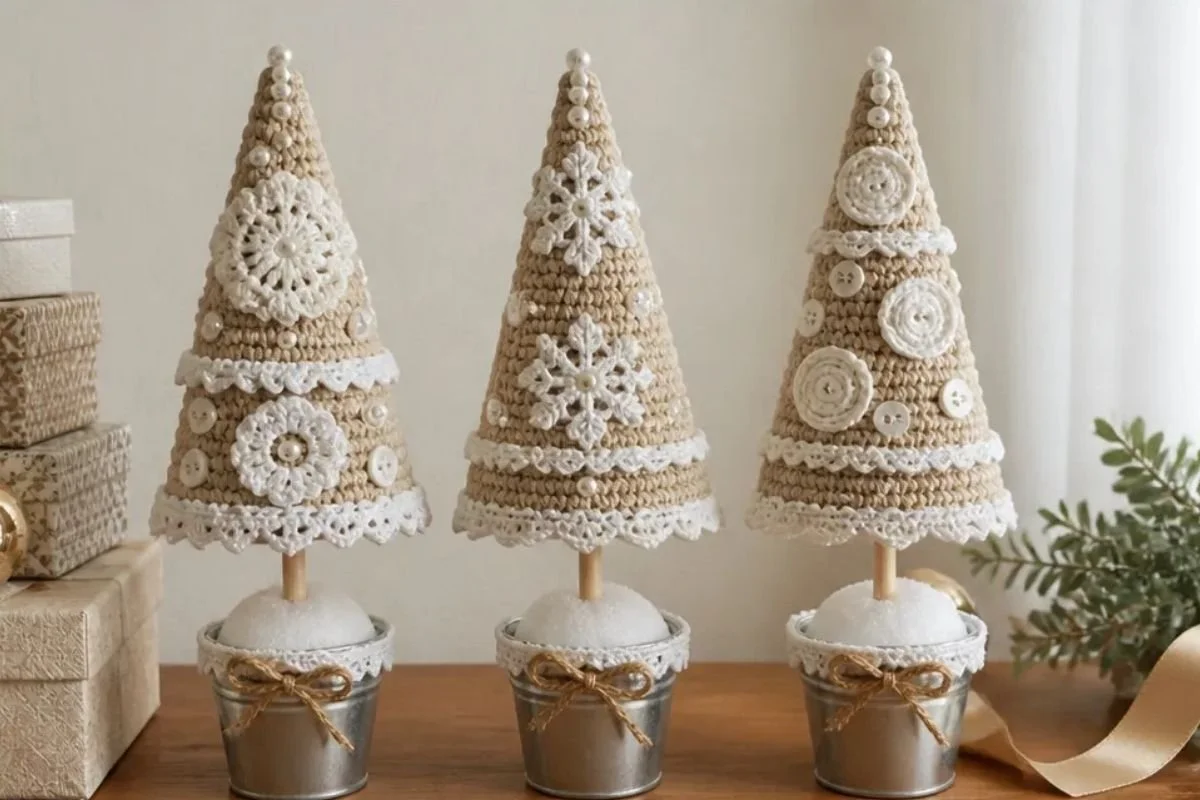
- Arrange all three bucket trees together as a holiday centerpiece on a dining table, entry table, or mantel.
- Display the trees at different positions so the snowflake, circle, and swirl decorations can all be seen.
- Give one finished tree to each of three recipients as coordinated handmade seasonal gifts.
- Place the trio near a wreath, garland, or other neutral holiday decorations for a layered display.
- Use the bucket trees as festive accents on a craft-room shelf or a covered porch table.
- For another handmade seasonal arrangement idea, compare the finished display with a crochet bouquet wrap pattern and adapt the same coordinated-color approach to non-holiday décor.
Caring for Your Crochet Project
Dust the trees gently with a soft brush, microfiber cloth, or cool air from a hand blower. Avoid pulling on the pearl beads, wood beads, buttons, and crocheted trims.
Because the trees contain dowels, Styrofoam balls, fiberfill, beads, buttons, and glued bucket components, do not machine wash, soak, or submerge them. For a small mark, use a barely damp cloth and spot-clean the affected area carefully, keeping moisture away from the bucket interior and glued sections.
Store the trees upright or in a roomy container so the triangles are not crushed. Keep them away from excessive heat, direct moisture, and strong pressure that could bend the dowels or loosen the decorations.
Tips for Better Results
- Count the triangle rows carefully. The shaping depends on the specified decrease rows, especially Rows 7–36 and Rows 37–40.
- Keep the decreases even. On decrease rows, work sc2tog at both ends as written so the triangle remains balanced.
- Mark the right side. A removable stitch marker can help you identify the right side while working the triangle and attaching motifs.
- Check trim fit before sewing. The scallop, band, curved, and bucket trims are fitted around different pieces, so place each one before securing it permanently.
- Do not overstuff the tree. Light stuffing creates shape while leaving enough flexibility for the dowel opening and bottom seam.
- Let glue dry fully. Keep the trees stationary during every gluing step, especially while the dowel and Styrofoam ball are being positioned.
- Pull snowflake points gently. When adding beads to the large snowflake, pull outward slightly as instructed rather than tightening the chain spaces excessively.
- Work back loops carefully. Tree 3’s bucket trim specifically uses back-loop-only single crochet, which creates the ribbed texture.
Creative Ways to Customize Your Project
These suggestions are optional and do not change the approved pattern.
- Use a different two-color combination while keeping color A for the triangles and color B for the motifs, or reverse the contrast for a lighter tree with darker decorations.
- Choose coordinated button colors for Tree 3, such as pearl, silver, gold, or muted red, while keeping the bead placement and assembly sequence the same.
- Use different bucket finishes, such as painted metal or a fabric-covered container, provided the container remains compatible with the 3-inch Styrofoam ball and dowel structure.
- Arrange the three trees in a single color palette for a minimalist display, or use separate accent colors for each tree.
- Add the optional handmade floral aesthetic of a 3D flower granny square color chart as inspiration for future seasonal color planning.
- If substituting yarn, remember that a different yarn weight or hook size can change the triangle dimensions, trim fit, texture, stuffing requirements, and the amount of yarn needed.
Frequently Asked Questions
How many trees does this pattern make?
The pattern makes three trees. Each tree requires two crocheted triangles, for a total of six triangles.
What yarn and hook are recommended?
The pattern uses RED HEART® Super Saver®, with one skein each of color A, 334 Buff, and color B, 316 Soft White. The specified hook is a Susan Bates® 4 mm [US G-6] crochet hook.
Are the three trees made the same way?
The basic triangle, skirt, stuffing, dowel, bucket, and finishing process is shared across the set. The decorative components differ: Tree 1 uses circle motifs and scallops, Tree 2 uses snowflakes and bands, and Tree 3 uses swirls and a curved trim.
Can the colors be changed?
Yes, color changes are an optional styling choice. Keep track of which shade is used for A and B, since the pattern assigns those colors to specific sections.
How do I keep the trees upright?
The approved assembly uses a glued dowel inserted into the lightly stuffed tree and then anchored in a 3-inch Styrofoam ball inside a 3-inch tin bucket. Allow the glue to dry thoroughly before moving the tree.
Can I wash the finished trees?
No soaking or machine washing is recommended for this assembled project because it contains glued parts, dowels, Styrofoam balls, beads, buttons, stuffing, and tin buckets. Dust gently and spot-clean only when needed.
Can I use another yarn?
A substitution is possible, but a different yarn weight or fiber may change the size, stitch definition, trim fit, shape, and amount of yarn required. The hook size may also need adjustment.
What is the best way to attach the decorations?
Sew the motifs and beads to the flat triangles before sewing the triangle sides together. This provides easier access and helps keep the finished tree’s surface neat.
Conclusion
This crochet triangle Christmas tree pattern creates a charming three-piece holiday display with textured trims, snowflakes, swirls, beads, and buttons. The bucket bases make the trees easy to stand and arrange, while the repeated triangle construction keeps the set coordinated. Display the finished trio together, gift the trees individually, or use the decorative details as inspiration for a broader handmade holiday collection, including a crochet Christmas tree garland.