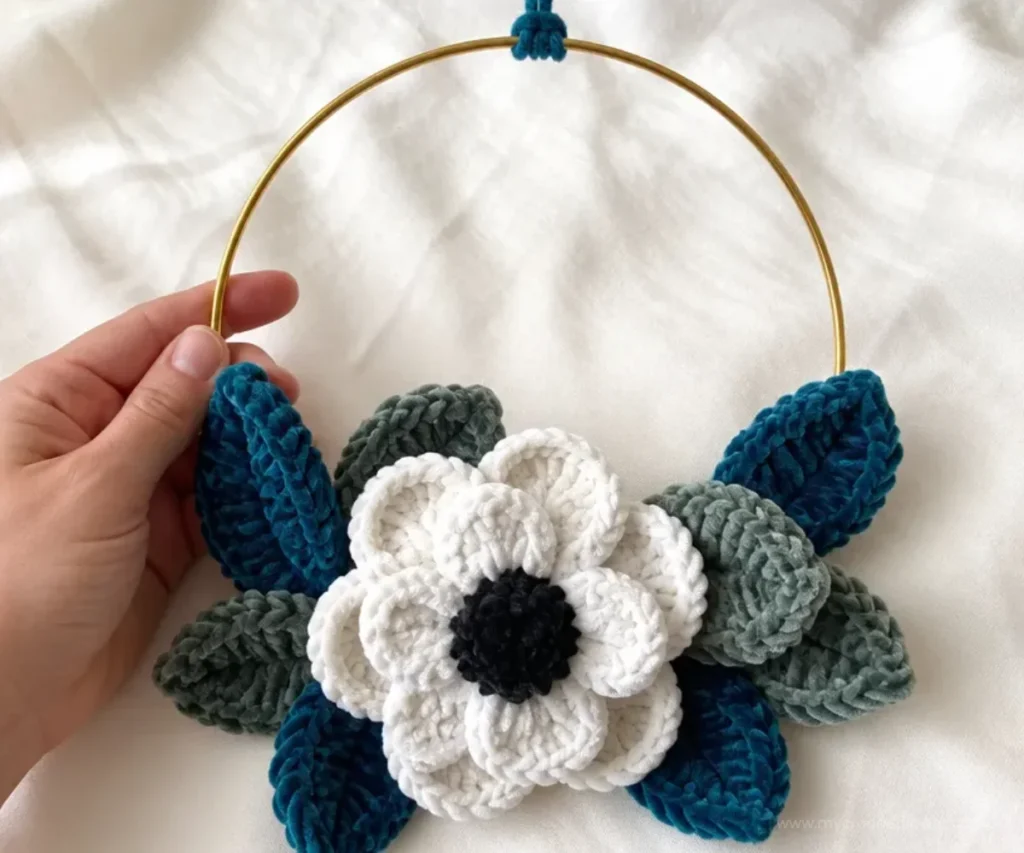
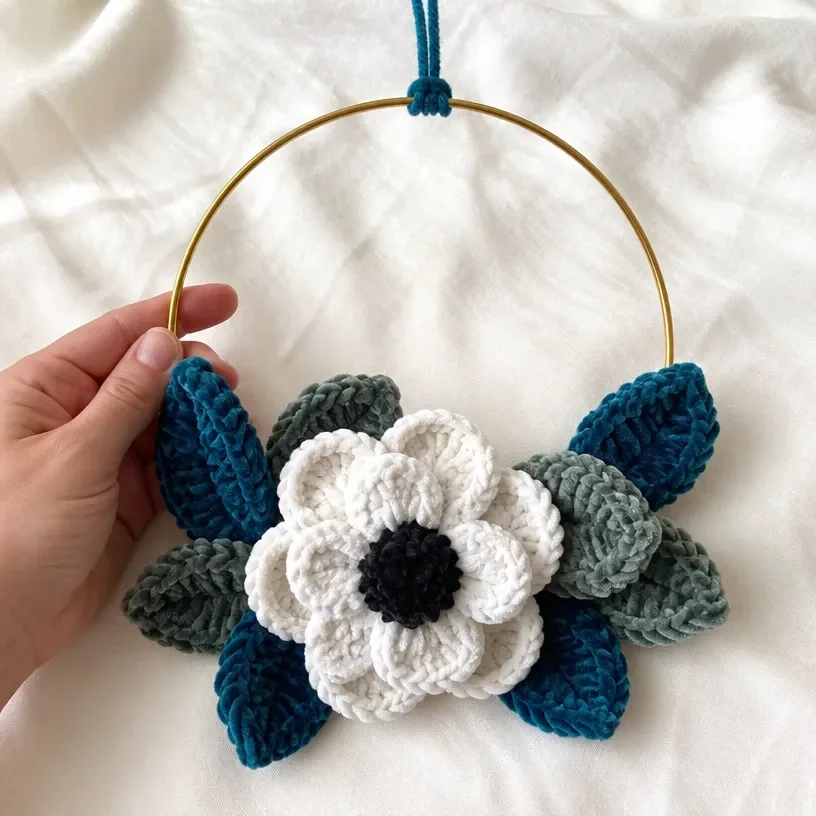
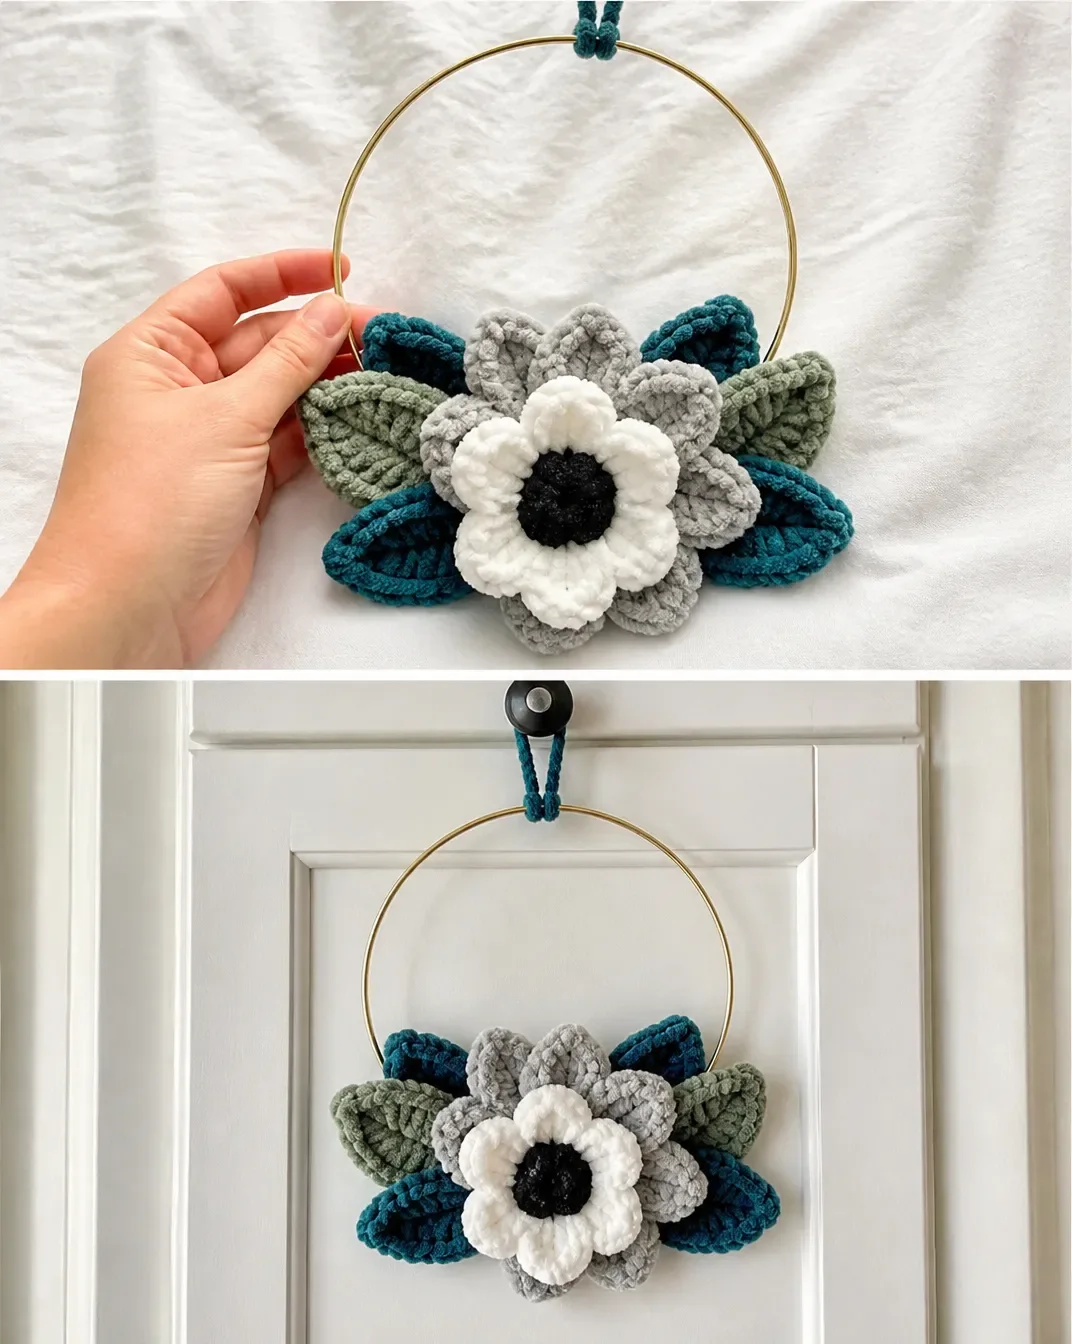
A soft velvet wreath brings a cozy, polished touch to a door, wall, shelf, or seasonal display. This Velvet Crochet Wreath Pattern combines a five-petal flower, textured center, and six two-color leaves on a 6-inch metal craft ring. The plush Bernat Velvet Minis yarn gives the design a rich finish while the compact size makes it approachable for focused crochet sessions. It also pairs beautifully with other handmade floral decorations, such as an April flowers wreath, for a coordinated botanical display.
Why You’ll Love This Crochet Project
- It creates a dimensional floral decoration. Two petal rounds are layered and offset, giving the flower a fuller appearance than a single crocheted motif.
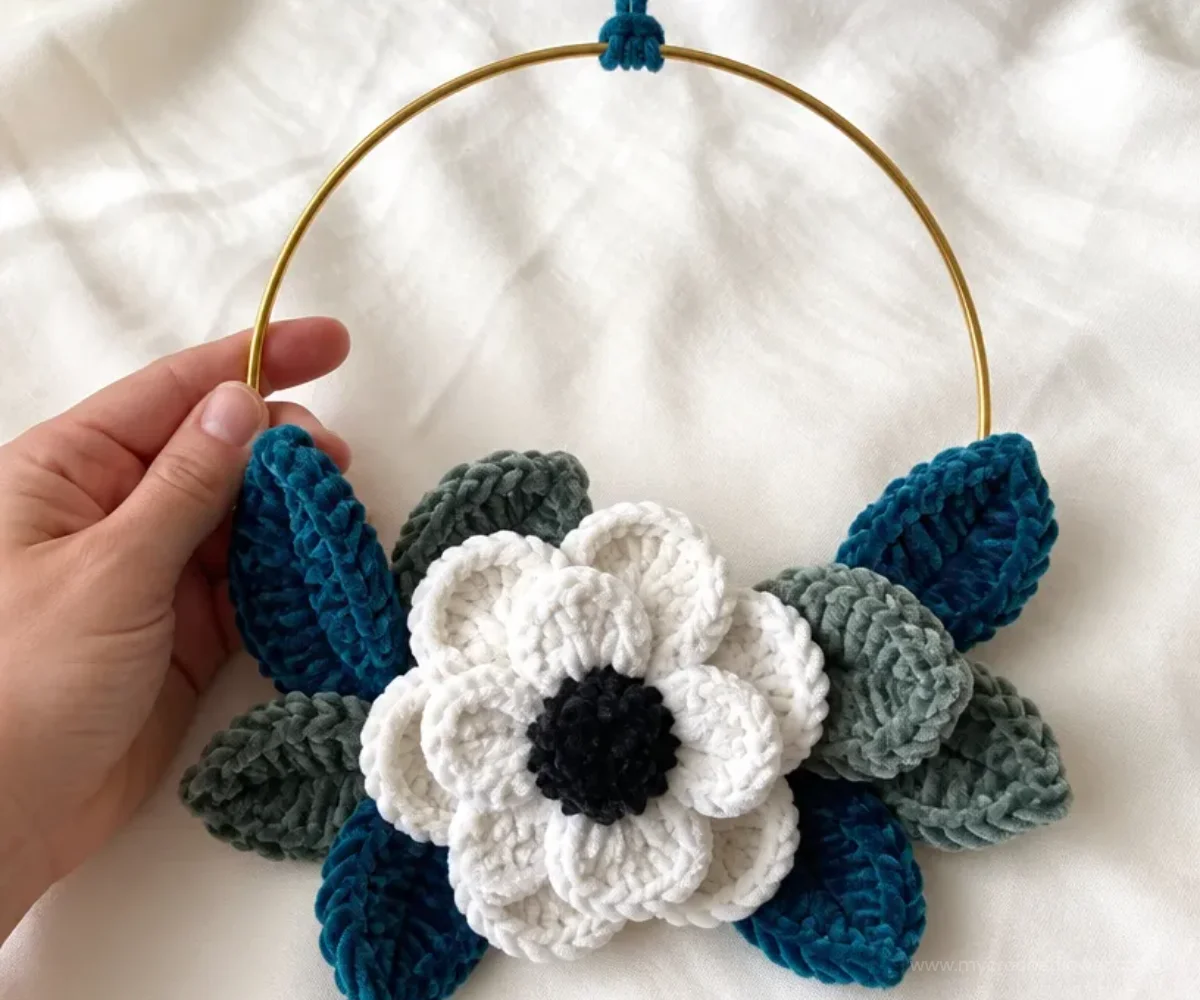
- The color palette is built into the pattern. Snowy White petals, a Blackbird center, Velveteal leaves, and Smokey Green leaves create a balanced botanical look.
- It practices useful shaping techniques. You will work short chains, increases, slip-stitch joins, treble stitches, and loop stitches.
- It makes a thoughtful handmade gift. The finished wreath can decorate a door, wall, nursery, craft room, or seasonal vignette.
- The felt backing adds stability. Gluing the crocheted pieces to felt and the metal ring helps the wreath hold its shape.
My Crochet Flower Tip: Arrange the flower and leaves on the ring before applying glue. This lets you adjust spacing and direction while every component is still movable.
How This Crochet Project Comes Together
The wreath is assembled from:
- Two five-petal rounds in Contrast A Snowy White
- One textured flower center in Contrast D Blackbird
- Three leaves in Contrast B Velveteal
- Three leaves in Contrast C Smokey Green
- One 6-inch metal craft ring
- One felt backing
- One 20-inch hanging strand in Contrast B
The flower is made first. Each petal round begins with a 10-chain ring, and the last two rows create one petal. Those two rows are repeated four more times to produce five petals total. The two finished rounds are layered with their petals offset, then the center is sewn on top.
The leaves are worked individually from a 5-chain foundation. Each leaf has a treble-stitch first round and a shaped single crochet, half double crochet, double crochet, and treble stitch second round.
For finishing, the flower and leaves are tied to the metal craft ring. Felt is positioned behind the ring and decorations, and hot glue secures the crochet pieces to both the ring and the felt. A Lark’s Head Knot attaches the hanging string at the top.
Helpful abbreviations used in the instructions include:
- ch: chain
- sc: single crochet
- sl st: slip stitch
- dc: double crochet
- hdc: half double crochet
- tr: treble crochet
- RS: right side
- WS: wrong side
- Lp st: loop stitch
Materials You’ll Need
- Bernat® Velvet Minis™ Classic (68001): 1 kit includes 20 balls, each 1.2 oz/35 g and 41 yds/38 m, for a total of 25 oz/700 g
- Contrast A Snowy White: 1 ball or 18 yds/16 m
- Contrast B Velveteal: 1 ball or 15 yds/14 m
- Contrast C Smokey Green: 1 ball or 15 yds/14 m
- Contrast D Blackbird: 1 ball or 3 yds/3 m
- Crochet hook: U.S. E/4 (3.5 mm) Susan Bates® Silvalume® crochet hook, or size needed to obtain gauge
- Yarn needle: Susan Bates®
- Metal craft ring: One 6-inch [15 cm] ring per wreath
- Felt: One 6 x 8-inch [15 x 20.5 cm] piece per wreath
- Hot glue gun and glue sticks
- Hanging string yarn: Contrast B, 20 inches [51 cm] long
One ball of each of Contrasts A, B, C, and D will make two wreaths. The yarn needle is used to sew the flower pieces together, while the hot glue and felt provide the structural backing for the finished decoration.
Step-by-Step Crochet Instructions
Flower
Petal Rounds Make 2
See diagram on page 3.
With A, ch 10. Join with sl st to first ch to form a ring, taking care not to twist ch.
1st row (WS)
- Ch 6.
- 1 sc in 2nd ch from hook.
- Working back down ch-6 toward ch-10 ring, 1 sc in each of next 4 ch.
- Sl st in next ch of ch-10 ring.
- Turn.
2nd row (RS)
- Ch 3.
- 1 dc in each of first 4 sc.
- 2 sc in next sc.
- Ch 2.
- Working back down opposite side of last ch-6 toward ch-10 ring, 2 sc in next rem loop.
- 1 dc in each of next 4 rem loop.
- Ch 3.
- Sl st in same rem loop as last dc.
- Sl st in each of next 2 ch of ch-10 ring.
- Turn.
The last 2 rows form one Petal.
Rep 1st and 2nd rows 4 times more to complete 4 more Petals, for a total of 5 Petals, ending with sl st in same rem loop as last dc.
Fasten off.
Make a second Petal Round using the same instructions.
Flower Center
With D, ch 2.
1st rnd (RS)
- 5 sc in 2nd ch from hook.
- Join with sl st to first sc of rnd.
- Turn.
2nd rnd (WS)
- Ch 1.
- 2 Lp st in each sc around.
- Join with sl st to first st of rnd.
There are 10 Lp sts.
Fasten off.
Flower Finishing
Place two Petal Rounds RS up, aligning Ch-10 rings and offsetting Petals.
Place Center RS up on top of Petal Rounds and sew all three pieces tog to form Flower, as shown in the photo.
When aligning the rounds, check that the center rings sit directly together and that the petals are staggered rather than stacked exactly on top of one another.
Leaves Make 3 Each With B and C
Make three leaves with Contrast B Velveteal and three leaves with Contrast C Smokey Green.
Ch 5. See diagram on page 3.
1st rnd
- (5 tr, ch 1, 5 tr) all in 5th ch from hook.
- This counts as ch 4, 5 tr, ch 1, 5 tr.
- Ch 4.
- Sl st in same 5th ch from hook.
2nd rnd
- Ch 1.
- 5 sc in first ch-4 sp.
- Working around first ch-4 along bottom edge of Leaf, 1 sc in next tr.
- 2 sc in next tr.
- 2 hdc in next tr.
- 2 dc in next tr.
- 1 dc in next tr.
- (2 tr, ch 2, 2 tr) all in next ch-1 sp.
- 1 dc in next tr.
- 2 dc in next tr.
- 2 hdc in next tr.
- 2 sc in next tr.
- 1 sc in last tr.
- 5 sc in next ch-4 sp.
- Working around last ch-4 along bottom edge of Leaf, join with sl st in first ch-1.
Fasten off.
Repeat the complete leaf instructions until you have three leaves in B and three leaves in C.
Attaching Flower and Leaves to the Craft Ring
Tie Flower and Leaves to metal craft ring as shown in photo.
Center piece of felt behind metal craft ring, Flower, and Leaves.
Using hot glue gun and glue sticks, glue WS of Flowers and Leaves in place along metal ring at the same time also gluing them to felt piece to secure in place and create a sturdy backing for the decorations.
Trim edges of felt close to Flower and Leaves so it is hidden behind decorations when viewed from RS, as shown in the photo.
Work carefully with the hot glue, especially around the edges of the velvet yarn. Apply enough adhesive to secure the components without allowing glue to spread beyond the felt or crochet pieces.
Hanging String
Cut strand of B 20″ [51 cm] long.
Attach with Lark’s Head Knot to top of metal craft ring, as shown in diagram.
Tie tail ends tog to desired length for hanging and trim ends.
Attach Hanging String with Lark’s Head Knot.
Finished Project Inspiration
- Front-door decoration: Hang the wreath on an interior or sheltered exterior door where the velvet flower can be seen clearly.
- Wall accent: Display it above a small shelf, beside framed art, or in a craft room.
- Seasonal arrangement: Pair the white flower and green leaves with neutral textiles, wood tones, or winter decorations.
- Gift presentation: Use the wreath as a handmade housewarming, birthday, or holiday gift.
- Table display: Rest the wreath flat as part of a centerpiece, keeping the flower and leaves facing upward.
- Floral grouping: Combine it with other handmade pieces, such as everlasting crochet flowers, to create a longer-lasting botanical arrangement.
Caring for Your Crochet Project
Because the wreath includes velvet yarn, felt, hot glue, and a metal ring, avoid machine washing, soaking, or submerging it in water.
- Dust the surface gently with a soft, dry cloth or a clean, soft brush.
- For a small mark, use minimal moisture on a cloth and spot-clean carefully without saturating the felt or glued areas.
- Keep the wreath away from radiators, fireplaces, direct heat, and hot vehicles, as excessive heat may soften the adhesive or affect the velvet texture.
- Store it flat or hang it in a dry location where the flower and leaves will not be crushed.
- If storing it in a container, place lightweight tissue around the raised flower rather than pressing anything directly against it.
- Check the hanging string and glued areas occasionally before rehanging the wreath.
Tips for Better Results
- Avoid twisting the foundation chain. When joining the 10-chain foundation for each Petal Round, make sure the chain lies flat.
- Track the right and wrong sides. The pattern alternates WS and RS rows, so turning at the specified points helps the petals form correctly.
- Use the remaining loops as written. In the second petal row, the instructions work back down the opposite side of the last ch-6 toward the ring.
- Count all five petals. After the first two rows, repeat the 1st and 2nd rows four more times. The completed round has five petals.
- Keep the two Petal Rounds aligned at the center. The Ch-10 rings should line up while the petals are offset.
- Shape each leaf symmetrically. Follow the stitch sequence across the bottom edge and place the center increases in the ch-1 space.
- Secure components before gluing. Tying the flower and leaves to the metal ring first makes it easier to test the arrangement.
- Trim the felt after gluing. Waiting until the decorations are secure helps you cut the backing close to the shapes without leaving visible gaps.
For another small floral project that can help you practice working with decorative crochet motifs, consider these crochet flower shoe appliques.
Color and Styling Variations
These ideas are optional styling choices and do not change the approved instructions.
- Change the petal color: Substitute another velvet shade for Contrast A while keeping the same quantity of 1 ball or 18 yds/16 m. A darker petal color will create a more dramatic wreath, while a pale shade will keep it airy.
- Coordinate the leaves: Use one green shade for all six leaves or retain two shades for added depth.
- Create a seasonal palette: Soft cream and sage can suit spring, while deep jewel tones can create a fall or holiday look.
- Highlight the center: A contrasting dark center makes the flower stand out; a related neutral creates a softer effect.
- Style the hanging loop: Adjusting the tied length changes how low the wreath hangs, but the pattern’s cut length remains B, 20 inches [51 cm].
- Try another yarn carefully: A different yarn may change the flower’s texture, leaf definition, finished size, and yarn requirements. If the replacement does not match the original yarn, use the specified hook size or the size needed to obtain gauge and expect the result to vary.
A bridal-inspired arrangement can also provide color inspiration; for example, the delicate placement ideas in this crochet bridal nosegay pattern may help when planning a formal display.
Frequently Asked Questions
Is this wreath suitable for a beginner?
It is a compact project with repeated floral components, but beginners should be comfortable with basic chains, single crochet, double crochet, half double crochet, treble crochet, slip stitches, turning, and sewing.
How many flowers does the wreath include?
The wreath includes one finished flower made from two Petal Rounds and one Center. Each Petal Round has five petals.
How many leaves should I make?
Make three leaves in Contrast B Velveteal and three leaves in Contrast C Smokey Green, for six leaves total.
What hook size does the pattern use?
Use a U.S. E/4 (3.5 mm) Susan Bates® Silvalume® crochet hook or the size needed to obtain gauge.
Can I change the yarn colors?
Yes. Color changes are optional, but keep the component quantities and stitch instructions the same. Different yarns or colors may affect texture, appearance, and yarn usage.
How is the flower attached to the wreath?
Tie the Flower and Leaves to the metal craft ring, position the felt behind the ring and crochet pieces, then use hot glue to secure the wrong sides of the decorations to the ring and felt.
How do I hang the finished wreath?
Cut a 20-inch [51 cm] strand of Contrast B, attach it to the top of the metal craft ring with a Lark’s Head Knot, tie the tail ends together to the desired hanging length, and trim the ends.
Can the wreath be washed?
Do not machine wash, soak, or submerge this assembled wreath because it contains felt, hot glue, and a metal ring. Dust it gently and spot-clean only when necessary.
Conclusion
This velvet crochet wreath combines plush texture, layered petals, and colorful leaves in a compact handmade decoration. Follow the component sequence carefully, arrange the pieces before gluing, and customize the palette when you want a different seasonal look. For additional wreath inspiration, compare the braided velvet wreath tutorial or browse Christmas wreath crochet patterns.