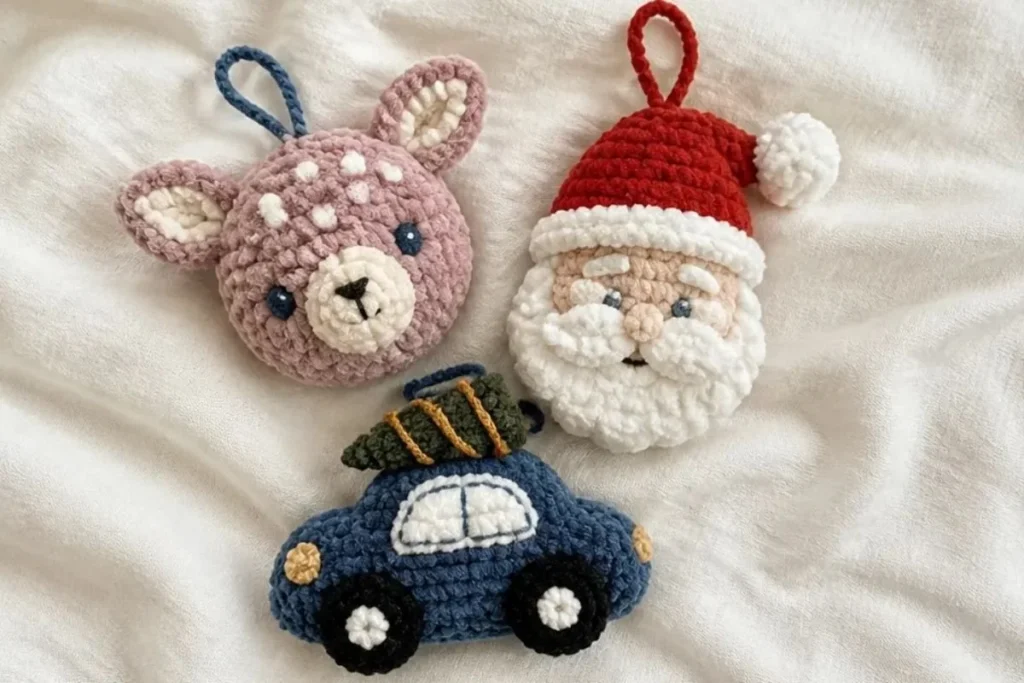
Vintage Whimsy Crochet Christmas Ornaments Tutorial brings three charming holiday motifs together: Santa, a deer, and a festive car carrying a Christmas tree. Made with plush Bernat Velvet Minis™, these ornaments have a soft vintage-inspired look and built-in hanging loops for decorating a tree, garland, mantel, or gift package. The pattern is especially enjoyable for crocheters who like small projects, colorwork, shaping, and embroidered details. For another seasonal handmade decoration, you may also enjoy this crochet wreath pattern.
Why You’ll Love This Crochet Project
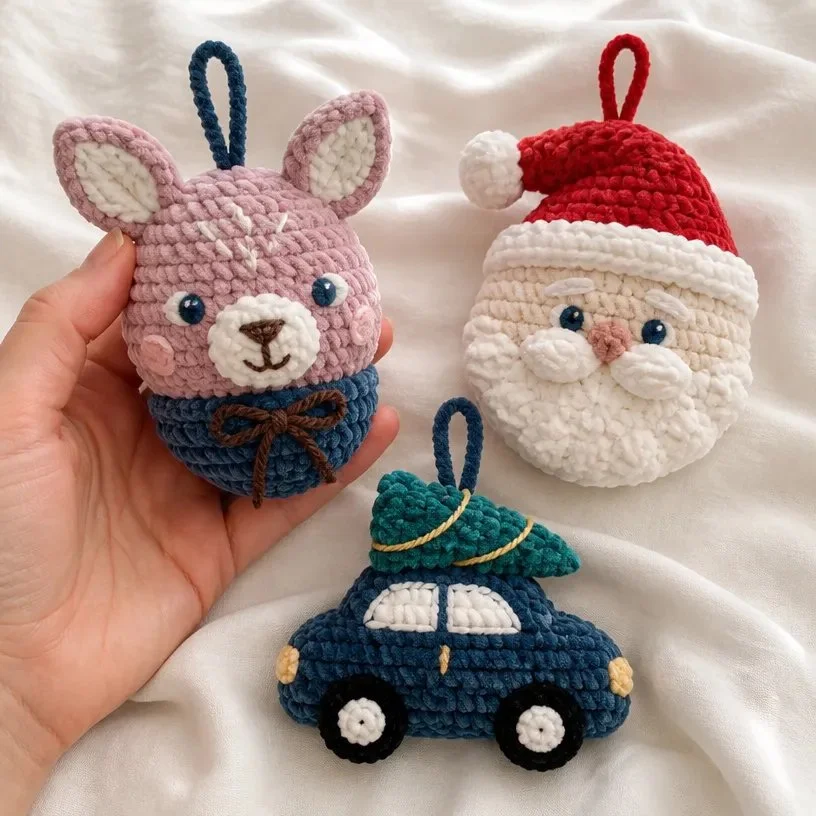
- Three ornaments in one project: Make Santa, a deer, and a car, each with its own distinctive colors and details.
- Soft, dimensional texture: Bernat Velvet Minis™ gives the ornaments a plush surface that feels especially cozy for holiday decorating.
- Great stitch practice: The project includes increases, decreases, joined rounds, back-loop stitching, reverse single crochet, and embroidery.
- Easy to personalize: You can keep the supplied color combinations or create a coordinated ornament collection in your favorite holiday palette.
- Useful handmade gifts: Finished ornaments can be gifted individually, added to a wrapped present, or used as keepsakes.
My Crochet Flower Tip: Make and finish one ornament at a time, including its hanging loop, so small pieces do not become mixed together. You may also find Easy Daisy Granny Square Crochet Tutorial useful.
Before You Start Crocheting
The project includes one Santa, one deer, and one car ornament. Santa is built from a crocheted head, hat, brim, pompom, mustache pieces, embroidered facial features, and a hanging loop. The deer includes a shaped head, muzzle, cheek, ears, eye, embroidered markings, and a loop. The car is made from two crocheted body pieces, an edging, window, wheels, tree, embroidered lights, door details, and a loop.
Work each ornament in the order given: crochet the main shapes, add the smaller components, embroider the details, then sew the pieces together. The pattern uses US crochet terminology. Pay close attention to the specified color changes and stitch counts, especially in the Santa head and deer head, where different stitch heights create the facial shape.
Helpful abbreviation notes
- ch: chain
- sc: single crochet
- hdc: half double crochet
- dc: double crochet
- tr: treble crochet
- sl st: slip stitch
- sc2tog: single crochet two together
- dc2tog: double crochet two together
- sc3tog: single crochet three together
- WS: wrong side
- RS: right side
Materials You’ll Need
- Bernat® Velvet Minis™ 1 Kit: 20 balls, each 1.2 oz/35 g and 41 yds/38 m; 25 oz/700 g and 820 yds/750 m total.
- Santa
- Contrast A Mushroom: 1 ball or 4 yds/3.5 m
- Contrast B Snowy White: 1 ball or 10 yds/9 m
- Contrast C Red: 1 ball or 8 yds/7.5 m
- Contrast D Smokey Blue: 1 ball or 1 yd/1 m
- Deer
- Contrast A Orchid Hush: 1 ball or 15 yds/2 m
- Contrast B Sandy Cream: 1 ball or 4 yds/3.5 m
- Contrast C Rich Blue: 1 ball or 2 yds/2 m
- Contrast D Chocolate: 1 ball or 1 yds/1 m
- Contrast E Twilight: 1 ball or 2 yds/2 m
- Car
- Contrast A Twilight: 1 ball or 10 yds/9 m
- Contrast B Snowy White: 1 ball or 4 yds/3.5 m
- Contrast C Velveteal: 1 ball or 4 yds/3.5 m
- Contrast D Blackbird: 1 ball or 3 yds/2.5 m
- Contrast E Joyful Gold: 1 ball or 1 yd/1 m
- Size U.S. H/8 (5 mm) Susan Bates® Silvalume® crochet hook, or size needed to obtain gauge
- Susan Bates® yarn needle
Step-by-Step Crochet Instructions
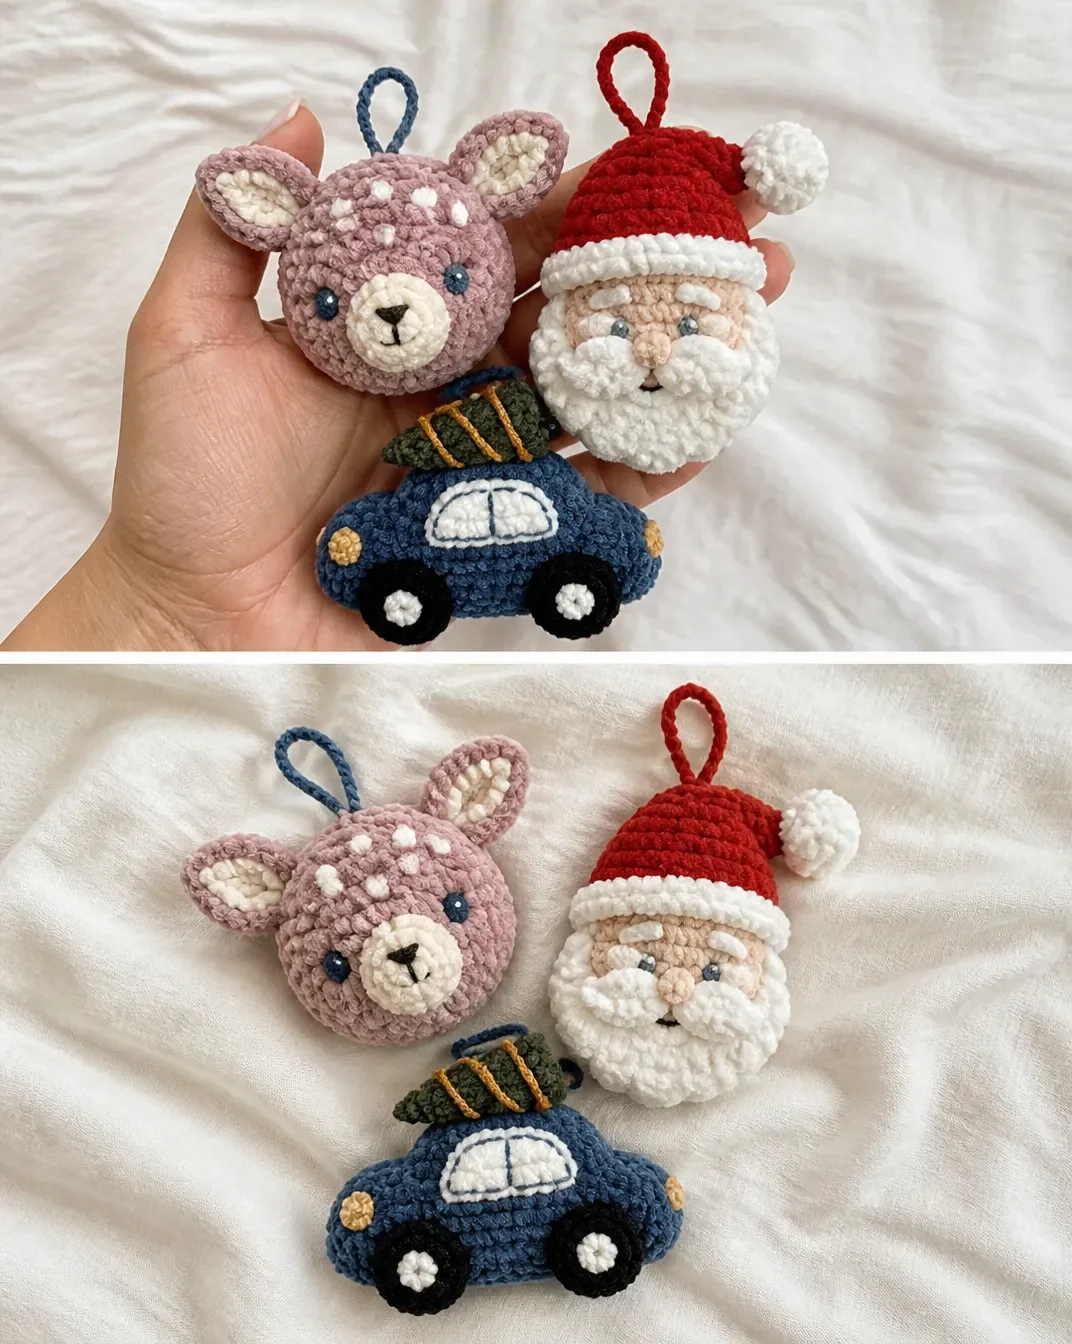
Santa
Santa Head
With A, ch 3.
- 1st rnd: 10 hdc in 3rd ch from hook. Join. 10 hdc.
- 2nd rnd: Ch 2. 2 hdc in each of next 4 hdc. Break A. Join B. With B, 2 hdc in each hdc to end of rnd. Join. 20 hdc.
- 3rd rnd: Ch 2. *1 hdc in next hdc. 2 hdc in next hdc. Rep from * around. Join. 30 hdc.
- 4th rnd: Ch 1. (1 sc in each of next 4 hdc. 2 sc in next hdc) 4 times. 1 hdc in each of next 2 hdc. 2 dc in next hdc. 1 dc in each of next 2 hdc. 2 dc in next hdc. 1 hdc in each of next 2 hdc. 1 sc in each of last 2 hdc. Join.
- 5th rnd: Ch 1. Working from left to right, instead of right to left as usual, work 1 reverse sc in each of next 11 sc. Fasten off.
Reverse sc: Reverse sc is worked as indicated in the 5th round, in the opposite direction from the usual right-to-left direction.
Santa Hat
With C, ch 2.
- 1st row (WS): 1 sc in 2nd ch from hook. Turn. 1 sc.
- 2nd row: Ch 1. 2 sc in first sc. Turn. 2 sc.
- 3rd row: Ch 1. 1 sc in first sc. 2 sc in last sc. Turn. 3 sc.
- 4th row: Ch 1. 2 sc in first sc. 1 sc in each of next 2 sc. Turn. 4 sc.
- 5th row: Ch 1. 1 sc in each of first 3 sc. 2 sc in last sc. Ch 10. Turn. 14 sts. 5 sc and ch-10.
- 6th row: 1 sc in 2nd ch from hook. 1 sc in each of next 8 ch. 1 sc in each sc to end of row. Turn. 14 sc.
- 7th row: Ch 2. 1 hdc in each of first 4 sc. 1 sc in each sc to end of row. Turn.
- 8th row: Ch 1. 1 sc in each of first 7 sc. 1 hdc in each st to end of row. Turn.
- 9th row: Ch 2. 1 hdc in each of next 7 hdc. 1 sc in each of next 4 sc. Sl st in each of last 3 sc. Turn.
- 10th row: Skip first sl st. Sl st in each of next 3 sts. 1 sc in each of next 2 sc. 1 hdc in each of next 4 sts. 1 dc in each of next 2 hdc. Dc2tog. Fasten off.
Santa Hat Brim
With B, ch 12.
- 1st row (WS): 1 hdc in 3rd ch from hook. 1 hdc in each ch to end of chain. Turn. 10 hdc.
- 2nd row: Ch 1. Sc2tog. 1 sc in each hdc to last 2 hdc. Sc2tog. 8 sts. Fasten off.
Sew Hat Brim to 6th row of Hat.
Santa Pompom
With B, ch 3.
- 1st rnd: 10 hdc in 3rd ch from hook. Join. 10 hdc. Fasten off.
Sew Pompom to 1st row of Hat. Sew Hat to Head as shown in photo.
Santa Mustache
Make 2.
With B, ch 5.
- 1st row: 1 sc in 2nd ch from hook. 1 sc in next ch. 1 sl st in each of last 2 ch. 4 sts. Fasten off.
Sew Mustache to Head as shown in photo.
Santa Facial Details and Hanging Loop
- Nose: With A, embroider nose between Mustache pieces using bullion st.
- Eyes and eyebrows: With B, embroider whites of Eyes and Eyebrows with straight st as shown in photo.
- With D, embroider pupils with satin st as shown in photo.
- Hanging loop: With C, ch 12. Fasten off. Sew Hanging Loop to top of Hat as shown in photo.
Deer
Deer Head
With A, ch 2.
- 1st rnd: 6 sc in 2nd ch from hook. Join. 6 sts.
- 2nd rnd: Ch 1. 2 sc in each sc around. Join. 12 sts.
- 3rd rnd: Ch 1. *1 sc in next sc. 2 sc in next sc. Rep from * around. Join. 18 sts.
- 4th rnd: Ch 1. *1 sc in each of next 2 sc. 2 sc in next sc. Rep from * around. Join. 24 sts.
- 5th rnd: Ch 1. 1 sc in next sc. 2 sc in next sc. *1 sc in each of next 3 sc. 2 sc in next sc. Rep from * to last 2 sc. 1 sc in each of last 2 sc. Join. 30 sts.
- 6th rnd: Ch 2 (does not count as hdc). (1 hdc in each of next 2 sc. 2 hdc in next sc) 3 times. 1 sc in each of next 2 sc. Sl st in each of next 2 sc. 1 sc in each of next 2 sc. (2 hdc in next sc. 1 hdc in each of next 2 sc) 4 times. Join. 38 sts. Fasten off.
The pattern provides bullion stitch, straight stitch, and satin stitch references for the embroidery steps below. Use them as indicated.
Deer Muzzle
With B, ch 6.
- 1st row: 1 hdc in 3rd ch from hook. 1 hdc in each of next 2 ch. 5 hdc in last ch. Working into opposite side of foundation ch, 1 hdc in each of next 3 ch. Fasten off.
Using straight st, embroider nose and mouth on Muzzle.
Deer Cheek
With A, ch 3.
- 1st rnd: 10 hdc in 3rd ch from hook. Join. 10 hdc. Fasten off.
Sew Muzzle to Head as shown in photo. Sew Cheek on top of Muzzle as shown in photo.
Deer Ears
Make 2.
With B, ch 5.
- 1st row (WS): 1 sc in 2nd ch from hook. 1 sc in each of next 2 ch. 3 sc in last ch. Working into opposite side of foundation ch, 1 sc in each of next 3 ch. Break B, join A. Turn. 9 sts.
- 2nd row: With A, ch 1. 1 sc in each of next 3 sc. 2 hdc in next sc. (1 dc. 1 tr. 1 dc) all in next sc. 2 hdc in next sc. 1 sc in each sc to end of row. 13 sts.
Fasten off.
Sew one Ear to front of Head as shown in photo. Sew one Ear to back of Head as shown in photo.
Deer Eye and Finishing
With E, ch 2.
- 1st rnd: 6 sc in 2nd ch from hook. Join. 6 sc. Fasten off.
Sew Eye to Head as shown in photo. Using B, embroider spots on Head and whites of Eye as shown in photo.
For the hanging loop, with C, ch 12. Fasten off. Sew Hanging Loop to top of Head as shown in photo.
Car
Car Notes
When changing colors, hold color not in use at WS of work. Join all rnds with sl st to first st.
Car Body
Make 2.
With A, ch 17.
- 1st row (RS): 1 sc in 2nd ch from hook. 1 sc in each ch to end of chain. Turn. 16 sts.
- 2nd row: Ch 1. 1 sc in each sc to end of row. Turn.
- 3rd row: Ch 1. Sc2tog. 1 sc in each sc to last 2 sc. Sc2tog. Turn. 14 sts.
- 4th row: As 3rd row. 12 sts.
- 5th row: Ch 1. Sc2tog. 1 sc in each of next 7 sc. Turn. Leave rem sts unworked. 8 sts.
- 6th row: Ch 1. 1 sc in each st to end of row. Turn.
- 7th row: Ch 1. Sc2tog. 1 sc in each sc to last 2 sc. Sc2tog. Fasten off.
Car Body Edging
Hold WS together and join A with sl st at any point around Car Body.
- 1st rnd: Ch 1. Working through both thicknesses, work sc evenly around Car Body. Join. Fasten off.
Car Window
With B, ch 8.
- 1st row: 1 sc in 2nd ch from hook. 1 sc in each ch to end of chain. Turn. 7 sc.
- 2nd row: Ch 1. Sc2tog. 1 sc in each sc to last 2 sc. Sc2tog. 5 sts. Fasten off.
Sew Window to Car Body as shown in photo. Using A, embroider line in middle of Window.
Car Wheels
Make 2.
With B, ch 2.
- 1st rnd: 6 sc in 2nd ch from hook. Break B. Join with D. 6 sc.
- 2nd rnd: With D, ch 1. 2 sc in each sc around. Join.
Fasten off.
Sew Wheels to Car Body as shown in photo.
Car Tree
With C, ch 10.
- 1st row: 1 sc in 2nd ch from hook. 1 sc in each ch to end of chain. Turn. 9 sc.
- 2nd row: Ch 1. Working in back loops only, 1 sc in each of next 3 sc. Sc3tog. 1 sc in each sc to end of row. Turn. 7 sts.
- 3rd and alt rows: Ch 1. Working in back loops only, 1 sc in each st to end of row. Turn.
- 4th row: Ch 1. Working in back loops only, 1 sc in each of next 2 sc. Sc3tog. 1 sc in each sc to end of row. Turn. 5 sts.
- 6th row: Ch 1. Working in back loops only, 1 sc in next sc. Sc3tog. 1 sc in last sc. Turn. 3 sts.
- 8th row: Ch 1. Working in back loops only, Sc3tog. Fasten off.
Sew Tree to top of Car Body as shown in photo. Using a length of E, wrap and embroider yarn around Tree as shown in photo.
Car Lights, Door Details, and Hanging Loop
Using B, embroider Car Lights with satin st as shown in photo. Using same length, embroider door details.
For the hanging loop, with A, ch 12. Fasten off. Sew Hanging Loop to top of Car Body.
Ways to Display Your Finished Crochet
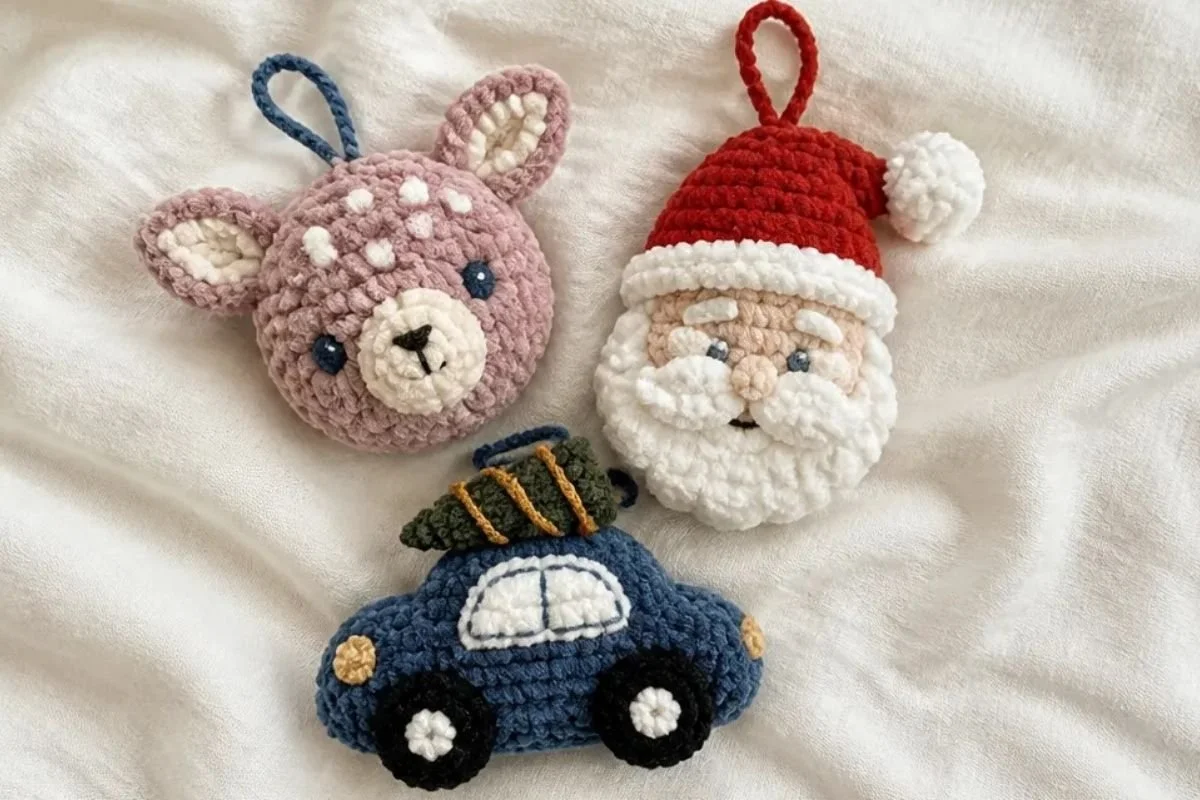
- Hang all three ornaments together on a Christmas tree for a coordinated vintage-style collection.
- Use Santa, the deer, and the car as separate decorations on a mantel garland or staircase greenery.
- Tie one ornament to a wrapped gift as a reusable holiday package accent.
- Arrange the ornaments in a shallow basket or bowl as part of a seasonal tabletop display.
- Create a personalized ornament set by making the trio in complementary colors that match your existing decorations.
- Pair the ornaments with other handmade holiday pieces; a floral-inspired seasonal project such as a three-dimensional flower granny square can add a soft handmade contrast to winter décor.
Caring for Your Crochet Project
- Dust the ornaments gently with a soft, dry cloth or a clean, soft brush.
- For a small mark, spot-clean carefully rather than soaking the ornament.
- Avoid pulling on the embroidered eyes, brows, facial features, tree, or hanging loops.
- Keep the ornaments away from excessive heat, which may affect the soft velvet texture.
- Store them in a clean, dry container between seasons, with tissue paper around delicate components if needed.
- Avoid placing heavy objects on top of the ornaments, since the crocheted shapes and sewn details can become flattened.
- Check the attachment points of the hanging loops before displaying the ornaments each year.
Tips for Better Results
- Track each color separately. The three ornaments use different contrast-color assignments, so label small yarn balls before beginning.
- Count every increase and decrease. The Santa and deer heads depend on their specific stitch counts to create the intended facial shapes.
- Watch the working direction. Santa’s reverse single crochet is worked from left to right rather than in the usual direction.
- Use the correct side of the work. Follow the WS and RS notes for the hat, ears, and car body.
- Keep unused car colors at the WS. When changing car colors, hold the color not in use at the wrong side of the work.
- Work the car tree in back loops only. This detail is repeated throughout the tree instructions and helps create its textured shape.
- Sew components gradually. Pin the muzzle, cheek, ears, hat, wheels, and tree in place before making permanent stitches.
- Secure embroidery ends carefully. Facial features, spots, lights, and door details are small but important to the finished appearance.
- Use even stuffing pressure only if needed for shaping. The supplied pattern does not call for stuffing, so do not add it unless you are making an optional construction adjustment.
- Finish each loop securely. The ch-12 loops are what allow the ornaments to hang, so sew them firmly to the specified top area.
Creative Ways to Customize Your Project
These are optional styling ideas and do not change the approved pattern instructions:
- Keep the original color assignments for a softly coordinated trio, or choose a traditional palette of red, white, green, and brown.
- Use one consistent background color for all three motifs to make them look like a matching ornament collection.
- Create a cool winter palette with icy blues, snowy white, and silver-inspired shades.
- Make several cars in different body colors while keeping the white window and dark wheels for visual consistency.
- Add a simple paper or fabric gift tag to each ornament when giving them as handmade presents.
- If substituting yarn, remember that a different yarn weight or fiber can change the ornament’s size, stitch definition, drape, and finished texture. A different hook may also affect the result, so use the supplied hook size or adjust only with the desired outcome in mind.
Frequently Asked Questions
Is this ornament project suitable for beginners?
It is approachable for beginners who are comfortable with basic crochet stitches, joined rounds, increases, decreases, and sewing pieces together. The reverse single crochet and embroidery details may require additional practice.
How many ornaments does the pattern make?
The pattern includes one Santa, one deer, and one car. The car body and deer ears are made in multiples as specifically stated within their instructions.
What yarn is recommended?
The supplied pattern uses Bernat® Velvet Minis™ 1 Kit. Its plush texture gives the ornaments a soft, cozy appearance.
What hook size should I use?
Use a U.S. H/8 (5 mm) Susan Bates® Silvalume® crochet hook, or the size needed to obtain gauge.
Can I change the ornament colors?
Yes. Color changes are an optional design choice. Keep the contrast assignments in the instructions clear, and remember that changing colors does not change the stitch sequence.
How are the ornaments assembled?
Each ornament is assembled by sewing its smaller crocheted parts to the main shape, embroidering the facial or decorative details, and attaching a ch-12 hanging loop to the specified location.
Can I use another yarn?
A different yarn may be used as an optional substitution, but it can affect size, texture, stitch definition, and yardage requirements. Velvet yarn is part of the original design’s soft appearance.
How should I store the finished ornaments?
Store them in a clean, dry container away from excessive heat and pressure. Protect the embroidered and sewn details from snagging.
Conclusion
This Vintage Whimsy Crochet Christmas Ornaments Tutorial creates a charming trio of soft, characterful decorations with Santa, a deer, and a festive car. The project combines small crocheted shapes with expressive embroidery, making each ornament feel special. Display the finished pieces, give them as keepsakes, or customize the colors for your own holiday style. For more seasonal inspiration, explore these free crochet Christmas ornament patterns.