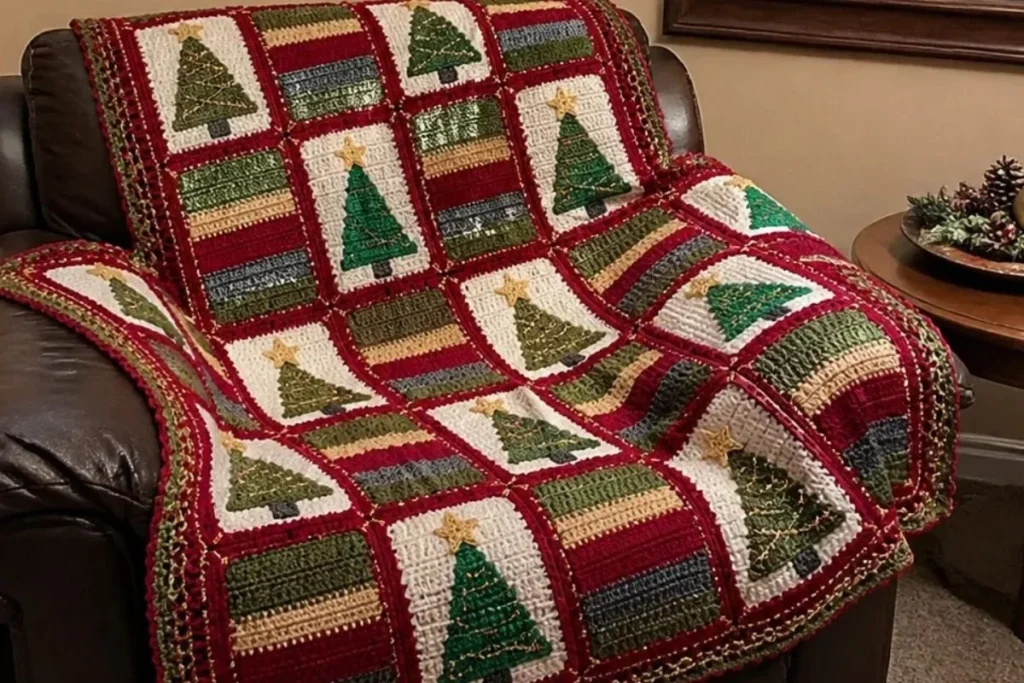
A festive DIY Crochet Christmas Tree Throw Pattern brings together textured blocks, appliquéd trees, five-point stars, and a richly layered edging. The finished throw is ideal for a holiday sofa, seasonal guest room, or handmade gift. Crocheters who enjoy assembling motifs and experimenting with color will appreciate the step-by-step construction. For another motif-based project, compare the color planning approach in this 3D flower granny square pattern before choosing your own holiday palette.
Why You’ll Love This Crochet Project
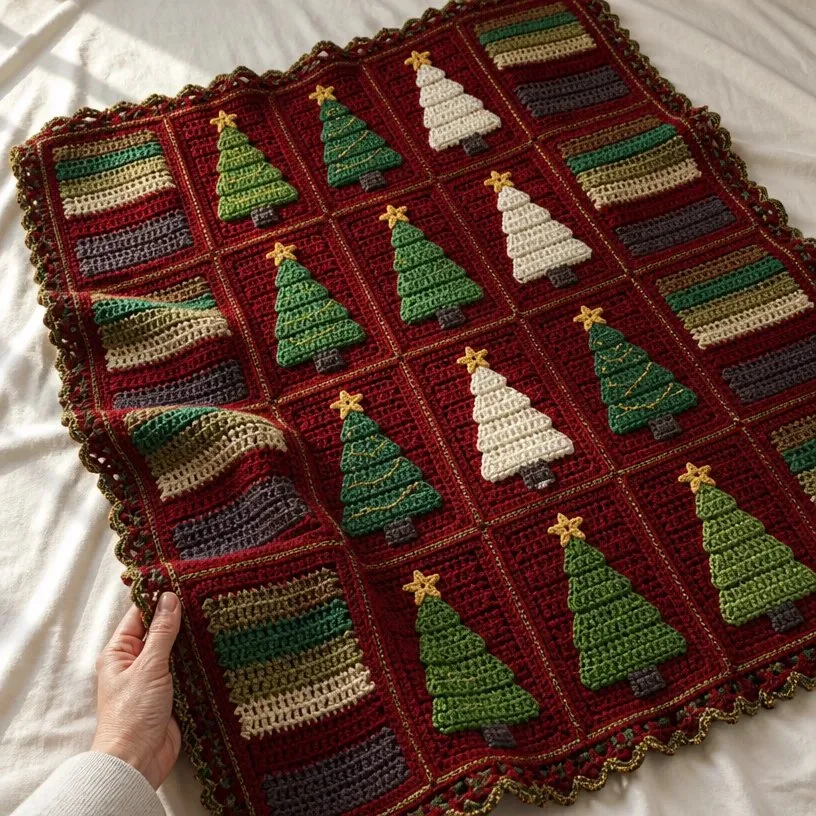
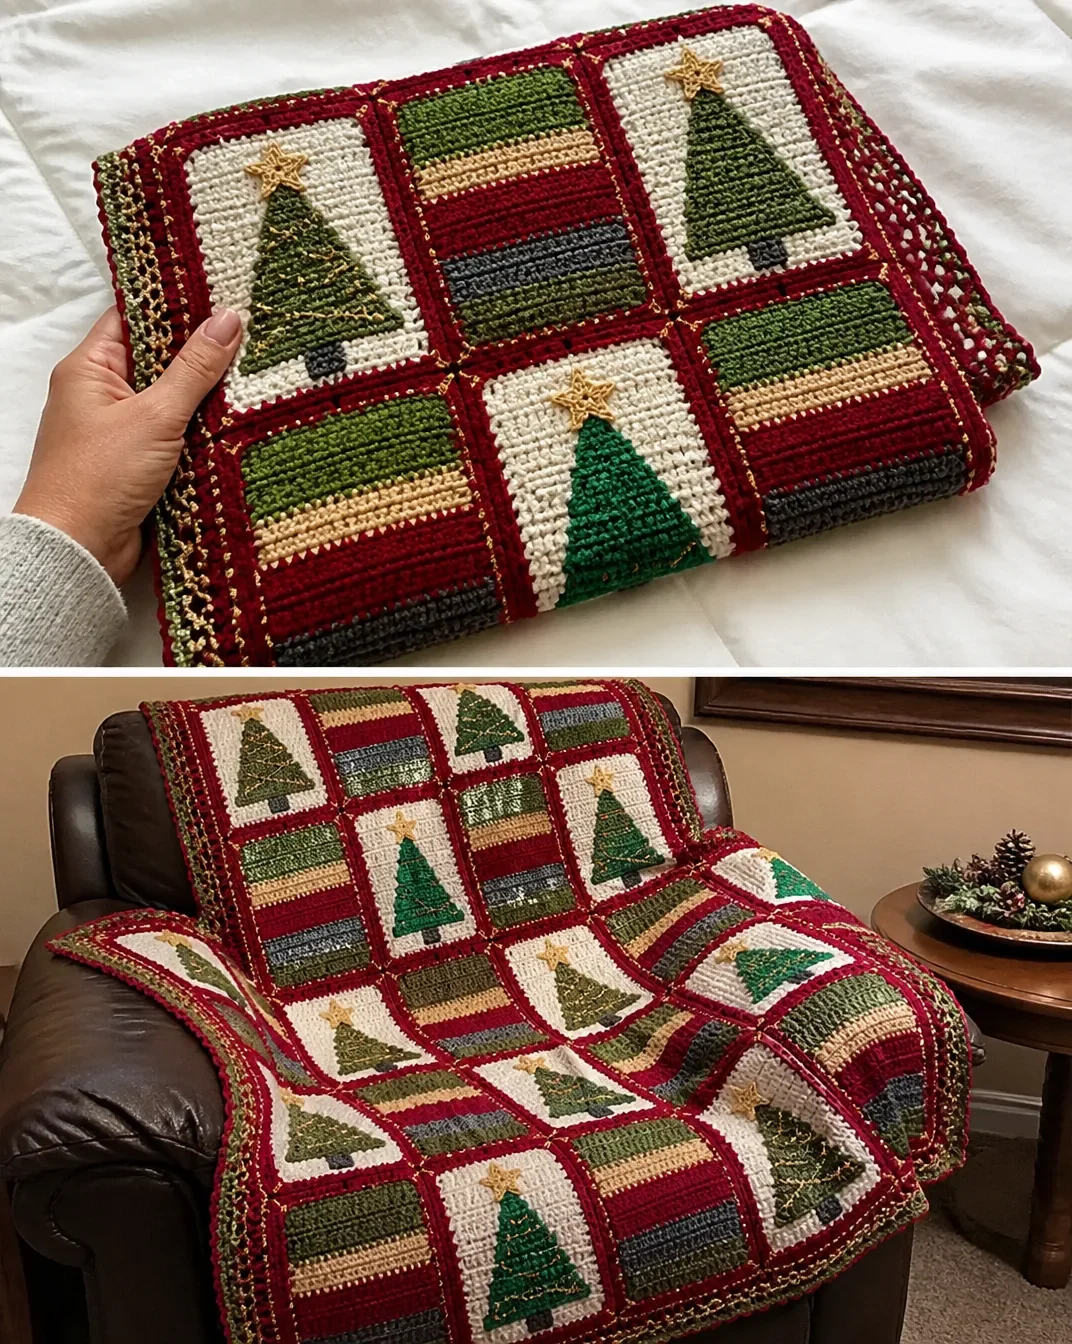
- It creates a classic holiday scene. Twelve tree appliqués are arranged across textured tree blocks, while striped blocks add contrast and visual rhythm.
- It develops several useful skills. You will practice textured stitch, increases, appliqué sewing, whip stitching, cross-stitch embellishment, and decorative edging.
- The colorwork is organized. Each component has a defined color assignment, making it easier to prepare yarn before beginning.
- It makes a meaningful handmade gift. A seasonal throw can become a keepsake for a family member, new homeowner, or anyone who enjoys traditional Christmas décor.
- The construction is manageable in stages. Completing blocks and appliqués separately lets you make steady progress without handling the entire blanket at once.
My Crochet Flower Tip: Make and label one sample of each component before producing the full set. This helps you confirm your tension and keeps the assembly process organized. You may also find Crochet Bloomin Shoe Appliques Pattern useful.
Before You Start Crocheting
The throw includes 12 tree blocks, four striped blocks, 12 trees, 12 trunks, and 12 stars. The tree blocks use Contrast A for the centers and Contrast B for their decorative borders. Six trees are worked with Contrast C and six with Contrast E. Four of the Contrast C trees receive gold cross-stitch embellishment.
The construction sequence is:
- Work the textured stitch pattern.
- Make and border the 12 tree blocks.
- Make the trees, trunks, and stars.
- Make and border the four striped blocks.
- Sew the appliqués to the tree blocks.
- Arrange and whip stitch the blocks together.
- Add the 16-round edging and weave in the ends.
The pattern uses US crochet terminology. Helpful abbreviations include:
- ch: chain
- sc: single crochet
- dc: double crochet
- sl st: slip stitch
- RS: right side
- WS: wrong side
- Lsc: long single crochet
- dc2tog: double crochet two together
Materials You’ll Need
Yarn
- Caron® Simply Soft®, 6 oz / 170.1 g; 315 yds / 288 m
- Contrast A Off White (9702): 2 balls
- Contrast B Autumn Red (9730): 4 balls
- Contrast C Dark Sage (9707): 1 ball
- Contrast D Bone (9703): 1 ball
- Contrast E Kelly Green (9769): 1 ball
- Contrast F Burgundy (9762): 3 balls
- Caron® Simply Soft® Heathers, 5 oz / 141.7 g; 250 yds / 228 m
- Contrast G Charcoal Heather (9508): 1 ball
- Contrast H Woodland Heather (9503): 1 ball
Tools and additional supplies
- Size U.S. H/8 (5 mm) crochet hook, or size to obtain gauge
- Gold thread for cross-stitch embellishment, stars, and edging
- Yarn needle for sewing appliqués, cross-stitching, joining, and weaving in ends
Step-by-Step Crochet Instructions
Pattern Stitch: Textured Stitch
The textured stitch is worked over a multiple of 2 stitches plus 1.
Row 1 (RS):
*(sc, dc) in second ch from hook, skip next ch, (sc, dc) in next ch, skip next ch; repeat from * to last ch, sc in last ch, turn.
Row 2:
Ch 1, (sc, dc) in next st, skip next st; repeat from * to last st, sc in last st, turn.
Repeat Row 2 for the textured stitch pattern.
Tree Blocks
Make 12.
With A, chain 16. Work 27 rows in textured stitch pattern. Fasten off.
Border for Each Tree Block
With RS facing, join B with slip st in lower corner of block, to work along long edge.
Round 1:
Ch 1, *3 sc in corner, work 25 sc evenly along long edge, 3 sc in next corner, work 13 sc evenly across short edge; repeat from * once more; join with slip st in first sc.
Round 2:
Slip st in next sc, ch 3, 4 dc in same sc, skip next sc, dc in next sc, skip next sc,
[[3 dc in next sc, skip next sc, dc in next sc, skip next sc] to next corner sc,
*5 dc in next corner sc, skip next sc, dc in next sc, skip next sc,
[[3 dc in next sc, skip next sc, dc in next sc, skip next sc] to next corner sc; repeat from * around; join with slip st in top of beginning ch.
Round 3:
Slip st in next dc, ch 3, *5 dc in corner dc, dc in next dc,
[skip next dc, 3 dc in next dc, skip next dc, dc in next dc, skip next dc?] to next corner dc;
repeat from * around; join with slip st in top of beginning ch.
Round 4:
Ch 3, 2 dc in same st as join, skip next dc, dc in next dc,
*5 dc in corner dc, dc in next dc,
[skip next dc, 3 dc in next dc, skip next dc, dc in next dc] to next corner dc;
repeat from * around; join with slip st in top of beginning ch.
Round 5:
Slip st in next st, ch 3, skip next st, 3 dc in next st, skip next st, dc in next st,
*5 dc in corner dc, dc in next st,
[skip next st, 3 dc in next st, skip next st, dc in next st] to next corner dc;
repeat from * around, join with slip st in top of beginning ch.
Rounds 6 and 7:
Ch 1, [sc in each st to corner, 3 sc in corner st] 4 times, sc in each remaining st; join with slip st in first sc 160 sts consisting of 45 sts along each long side, 33 sts along each short side, and 4 corner sts. Fasten off.
Trees
Make 12 6 each with C and E.
Chain 4.
Row 1 (RS): 4 dc in 4th ch from hook, turn.
Row 2: Ch 1, sc in each st across, turn.
Row 3 (increase row): Ch 3 (counts as first dc), dc in first sc (increase made), dc in each sc to last sc, 2 dc in last sc, turn 6 sts.
Rows 4–21: Repeat Rows 2 and 3 nine more times 24 sts.
Row 22: Repeat Row 2. Fasten off.
Using gold thread and yarn needle, work cross-stitch across the 6th, 10th, 14th, and 18th rows of four of the color C trees.
Trunks
Make 12.
With G, chain 6.
Row 1 (RS): Sc in second ch from hook and in each remaining ch across, turn 5 sc.
Row 2: Ch 1, sc in each sc across, turn.
Row 3: Ch 1, sc in first sc, [Lsc in next sc 2 rows below, sc in next sc] twice, turn.
Row 4: Ch 1, sc in first 2 sts, Lsc in next sc 2 rows below, sc in last 2 sts, turn.
Row 5: Repeat Row 3. Fasten off.
Stars
Make 12.
With one strand each of D and gold thread held together, chain 2.
Round 1: Work 10 sc in second ch from hook; join with slip st in first sc.
Round 2: *3 sc in next sc, skip next sc; repeat from * around five 3-sc groups.
Round 3: *Slip st in next sc, ch 3, dc2tog, ch 3, slip st in back loop of third ch from hook, ch 3, slip st in same st as last dc worked; repeat from * 4 more times 5 points. Fasten off.
Striped Blocks
Make 4.
With E, chain 24.
Work 25 rows in textured stitch pattern in the following color sequence: work 5 rows with E, 5 rows with D, 5 rows with B, 5 rows with G, and 5 rows with H. Fasten off.
Border for Each Striped Block
With RS facing, join B with slip st in lower corner of block, to work along long edge.
Round 1:
Ch 1, *3 sc in corner, work 33 sc evenly along long edge, 3 sc in next corner, work 23 sc evenly across short edge; repeat from * once more; join with slip st in first sc 124 sts consisting of 35 sts along each long side, 25 sts along each short side, and 4 corner sts. Fasten off.
Sewing the Appliqués
Using the photograph and assembly diagram as a guide to placement, sew trees, stars, and trunks to the tree blocks.
When sewing, place the appliqués consistently on all 12 tree blocks. Use the yarn needle to secure the pieces firmly without pulling the block out of shape.
Joining the Blocks
Arrange the blocks according to the assembly diagram.
Join blocks by holding RS together and whip stitching the edges together.
Edging
With RS facing and holding one strand each of gold thread and C together, join yarn with slip st in any corner st.
Round 1 (RS):
Ch 3 (counts as first dc here and throughout), 4 dc in same st, [dc in each st to next corner st, 5 dc in corner st] 3 times, dc in each remaining st around; join with slip st in top of beginning ch 612 sts consisting of 140 sts along each short edge, 164 sts along each long edge, and 4 corner sts. Fasten off.
Join F with slip st in any corner st.
Round 2 (RS):
Ch 3, 4 dc in same st, *skip next st, [3 dc in next st, skip next 2 sts] to next corner st, 5 dc in corner st; repeat from * around; join with slip st in top of beginning ch, turn.
Round 3 (WS):
Slip st in next 2 sts, ch 1, (sc, ch 3, sc) in same st (corner st), ch 2,
[sc in next space between 3-dc groups, ch 2] to corner st,
*(sc, ch 3, sc) in corner st, ch 2, [sc in next space between 3-dc groups, ch 2] to next corner st; repeat from * around; join with slip st in first sc, turn.
Round 4 (RS):
(Slip st, ch 3, 4 dc) in corner ch-3 space, 3 dc in each ch-2 space to corner,
*5 dc in corner ch-3 space, 3 dc in each ch-2 space to next corner ch-3 space; repeat from * around; join with slip st in top of beginning ch.
Rounds 5–16: Repeat Rounds 3 and 4 six times. Fasten off.
Using yarn needle, weave in ends.
Ways to Display Your Finished Crochet
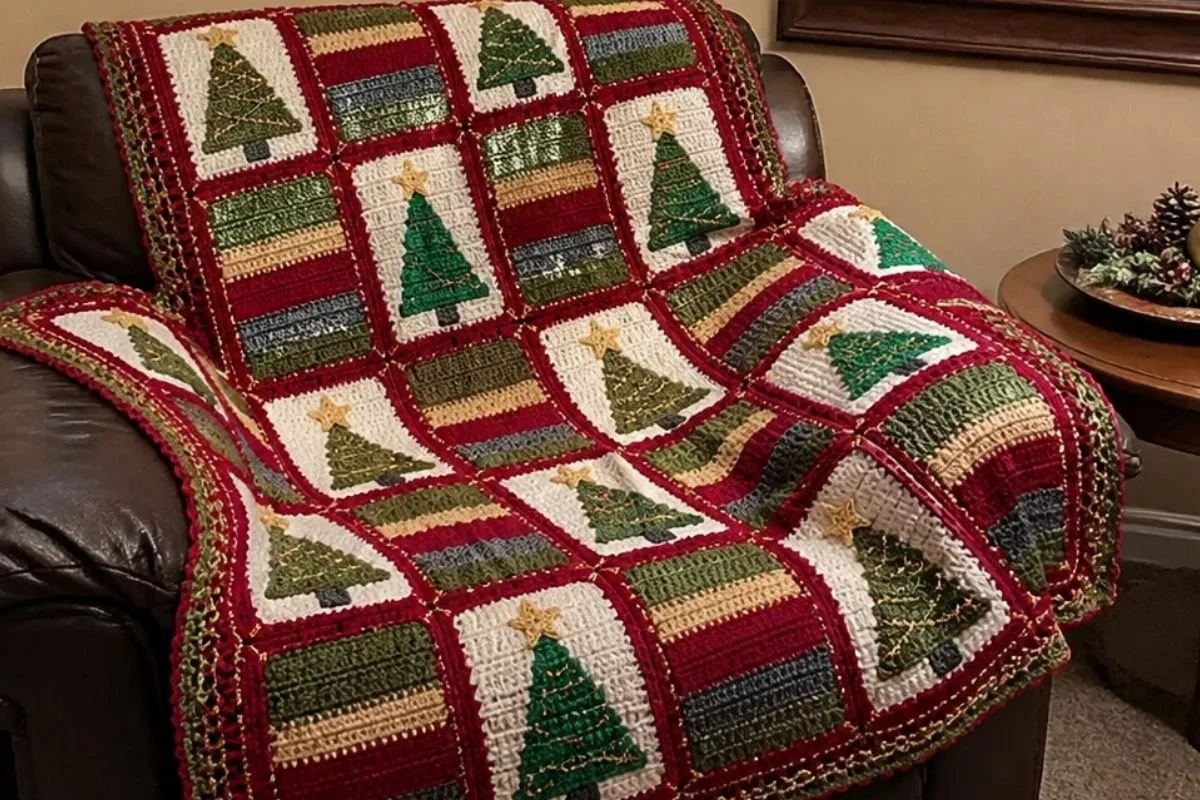
- Drape the throw across a sofa or reading chair for a traditional Christmas accent.
- Fold it at the foot of a guest bed to add seasonal color without covering the entire bed.
- Use it as a holiday photo backdrop for gifts, ornaments, or a tabletop display.
- Give it as a handmade Christmas gift to someone who appreciates heirloom-style crochet.
- Pair it with coordinating pillows, stockings, or a tree skirt in autumn red, sage, bone, and burgundy.
- Display the appliqué details by folding the throw so several tree blocks remain visible rather than stacking them tightly.
For another seasonal crochet display idea, the color layering and decorative arrangement in this crochet flower wreath pattern can provide useful inspiration for arranging handmade holiday décor.
Caring for Your Crochet Project
- Follow the yarn manufacturer’s care instructions for the Caron® Simply Soft® and Caron® Simply Soft® Heathers yarns.
- Dust the throw gently with a soft brush or by shaking it outdoors carefully.
- For a small mark, spot clean cautiously with a clean cloth rather than aggressively rubbing the appliqués or edging.
- Avoid excessive heat, which may distort the textured stitch, appliqués, or decorative edging.
- Store the throw clean and completely dry in a breathable container or folded on a shelf.
- Avoid hanging it for long periods if the weight could stretch the stitched joins.
- Fold the throw with the appliqué side protected from rough surfaces, and avoid placing heavy objects on the stars or trees.
Tips for Better Results
- Check your tension early. The hook is size U.S. H/8 (5 mm), or size to obtain gauge. If your fabric feels unusually tight or loose, adjust before making all components.
- Count the textured stitch carefully. The stitch is based on a multiple of 2 sts + 1, and the skipped stitches are essential to the raised texture.
- Mark the right side. The tree blocks, trees, and edging include RS and WS instructions, so a removable marker can prevent accidental reversals.
- Track each component. Make a checklist for 12 tree blocks, 12 trees, 12 trunks, 12 stars, and four striped blocks.
- Watch the increase rows on the trees. Row 3 increases at both ends, and Rows 4–21 repeat Rows 2 and 3 nine more times to reach 24 sts.
- Use consistent spacing when sewing. Place each trunk, tree, and star according to the photograph and assembly diagram, then secure them with small, even stitches.
- Protect stitch counts at the borders. Each tree block border ends with 160 sts, while each striped block border ends with 124 sts. These counts help identify mistakes before assembly.
- Join blocks with the RS together. Whip stitching in this position keeps the join aligned with the specified assembly method.
- Treat the edging as a separate stage. Count the 612 sts after Round 1 before beginning the Burgundy edging rounds.
- Weave in ends securely. The blanket contains many color changes and sewn pieces, so finish each end neatly before the throw is handled or displayed.
Color and Styling Variations
The approved pattern uses a coordinated Christmas palette, but the following options are optional and should be treated as design changes rather than part of the original instructions.
- Replace the traditional red and green emphasis with navy, cream, silver, and deep cranberry for a cooler winter palette.
- Use one tree color throughout instead of dividing the trees between Contrast C and Contrast E.
- Reserve gold thread for the stars and edging while using a contrasting metallic shade for the cross-stitch embellishment.
- Arrange the completed blocks with the striped blocks forming a border, or follow the assembly diagram for the original layout.
- Choose a neutral display setting so the red, green, and gold details become the focal point.
- If substituting yarn or changing hook size, make a tension sample first. Different yarns can alter the fabric thickness, stitch definition, finished dimensions, and amount of yarn required.
Frequently Asked Questions
Is this project suitable for a newer crocheter?
It includes basic stitches such as single crochet, double crochet, chains, slip stitches, and increases, but it also involves multiple components, appliqué sewing, cross-stitch, and a large edging. A newer crocheter may enjoy it by working one section at a time and checking stitch counts carefully.
What hook size does the pattern use?
Use a size U.S. H/8 (5 mm) crochet hook, or choose the size needed to obtain gauge.
How many tree blocks are required?
Make 12 tree blocks. Each receives a Contrast B border and is decorated with one tree, one trunk, and one star.
How many trees use each green color?
Make 12 trees total: six with Contrast C and six with Contrast E.
Which trees receive cross-stitch embellishment?
Using gold thread and a yarn needle, work cross-stitch across the 6th, 10th, 14th, and 18th rows of four of the color C trees.
How are the blocks joined?
Arrange the blocks according to the assembly diagram, then join them by holding the RS together and whip stitching the edges together.
Can the colors be changed?
Yes, color changes are an optional customization. Keep the original color assignments if you want to follow the approved pattern exactly. Substituting yarn or changing colors can affect contrast, stitch definition, and the quantity needed.
How should the finished throw be stored?
Store it clean and fully dry, folded in a breathable space away from excessive heat, rough surfaces, and heavy objects that could flatten the appliqués.
What is the purpose of the gold thread?
Gold thread is used for cross-stitch embellishment, the stars, and the edging. In the stars, it is held together with one strand of Contrast D.
Conclusion
This DIY Crochet Christmas Tree Throw Pattern combines textured crochet, colorful blocks, appliquéd trees, sparkling stars, and a substantial decorative border in one memorable seasonal project. Work the components steadily, follow the assembly sequence, and enjoy adapting the finished throw to your holiday décor. For a related vintage-inspired seasonal design, browse this Christmas tree afghan crochet pattern.