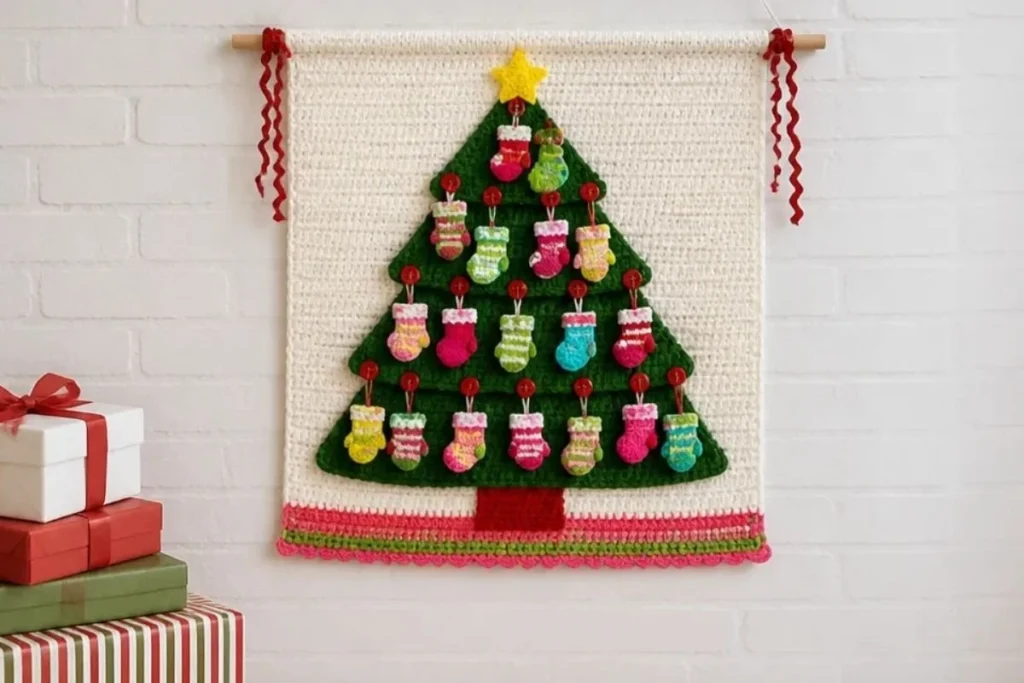
A handmade tree wall hanging brings color, texture, and holiday charm to a room without taking up floor space. This DIY Crochet Christmas Tree Wall Hanging Tutorial combines a crocheted backdrop, a layered evergreen tree, a bright star, 12 stockings, and 12 mittens that hang from red buttons. The project is especially enjoyable for crocheters who like detailed seasonal décor, color changes, and sewing pieces together. Display it over a mantel, in a child’s room, or as a reusable advent-style decoration. For another textile wall-art idea, compare it with this crochet flower wall hanging pattern.
Why You’ll Love This Crochet Project
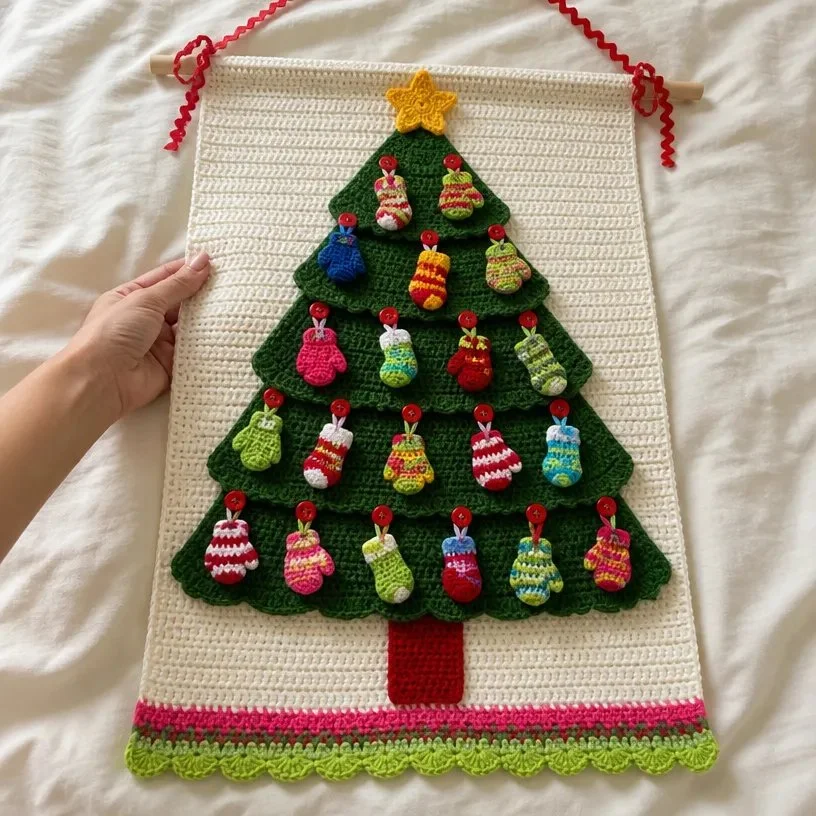
- It creates a complete seasonal display. The finished piece combines a textured background with a dimensional tree and colorful hanging ornaments.
- It uses a satisfying mix of techniques. You will practice single crochet, double crochet, slip stitches, increases, decreases, front-loop work, back-loop work, and small three-dimensional shapes.
- The components are made separately. Working on the backdrop, tree sections, star, stockings, and mittens one at a time makes the larger project easier to organize.
- It is reusable holiday décor. Once assembled, the wall hanging can be brought out year after year and styled in different rooms.
- It offers plenty of color variety. The prescribed palette includes bright pink, spring green, cherry red, yellow, turquoise, and mistletoe green.
My Crochet Flower Tip: Label each color by its letter designation before beginning. This is particularly helpful when switching between the backdrop, tree sections, stockings, and mittens.
Before You Start Crocheting
The wall hanging consists of a crocheted backdrop with a lower scalloped edging, three green tree sections, a red tree base, a yellow star, 12 stockings, and 12 mittens. The backdrop is worked with two strands of Soft White held together, while the tree sections use two strands of Holiday Green/Green.
The project is assembled from the background outward. First make the backdrop and edging, then crochet the three tree sections, base, and star. The stockings and mittens are worked in the round, with a hanging loop added to each piece. During finishing, the tree sections overlap slightly, creating a tiered shape.
The pattern uses a larger 6 mm [US J-10] hook for the backdrop and tree sections and a smaller 4.25 mm [US G-6] hook for the tree base, star, stockings, and mittens. A stitch marker is useful because the small accessory pieces are worked continuously in rounds.
Abbreviations and terminology
- ch: chain
- sc: single crochet
- dc: double crochet
- hdc: half double crochet
- tr: treble crochet
- sl st: slip stitch
- st/sts: stitch/stitches
- sc2tog: single crochet two together
- sc5tog: single crochet five together
- fan: work the fan stitch as indicated by the pattern source
- Join with sc: Place a slip knot on hook, insert hook in indicated stitch, yarn over and draw up a loop, yarn over and draw through both loops on hook.
Materials You’ll Need
Yarn
- RED HEART® Super Saver® (Art. 300)
- 4 skeins, color 316 Soft White A
- 1 skein, color 718 Shocking Pink B
- 1 skein, color 672 Spring Green C
- 1 skein, color 319 Cherry Red E
- 1 skein, color 324 Bright Yellow F
- 1 skein, color 512 Turqua G
- 1 skein, color 979 Mistletoe H
- RED HEART® Holiday® (Art. 759)
- 2 balls, color 6060 Green/Green D
Tools and notions
- Susan Bates® crochet hooks: 4.25 mm [US G-6] and 6 mm [US J-10]
- Yarn needle
- Stitch marker
- 24 red ½” (12 mm) buttons
- 30” wooded rod
- 36” (94 cm) of rick rack
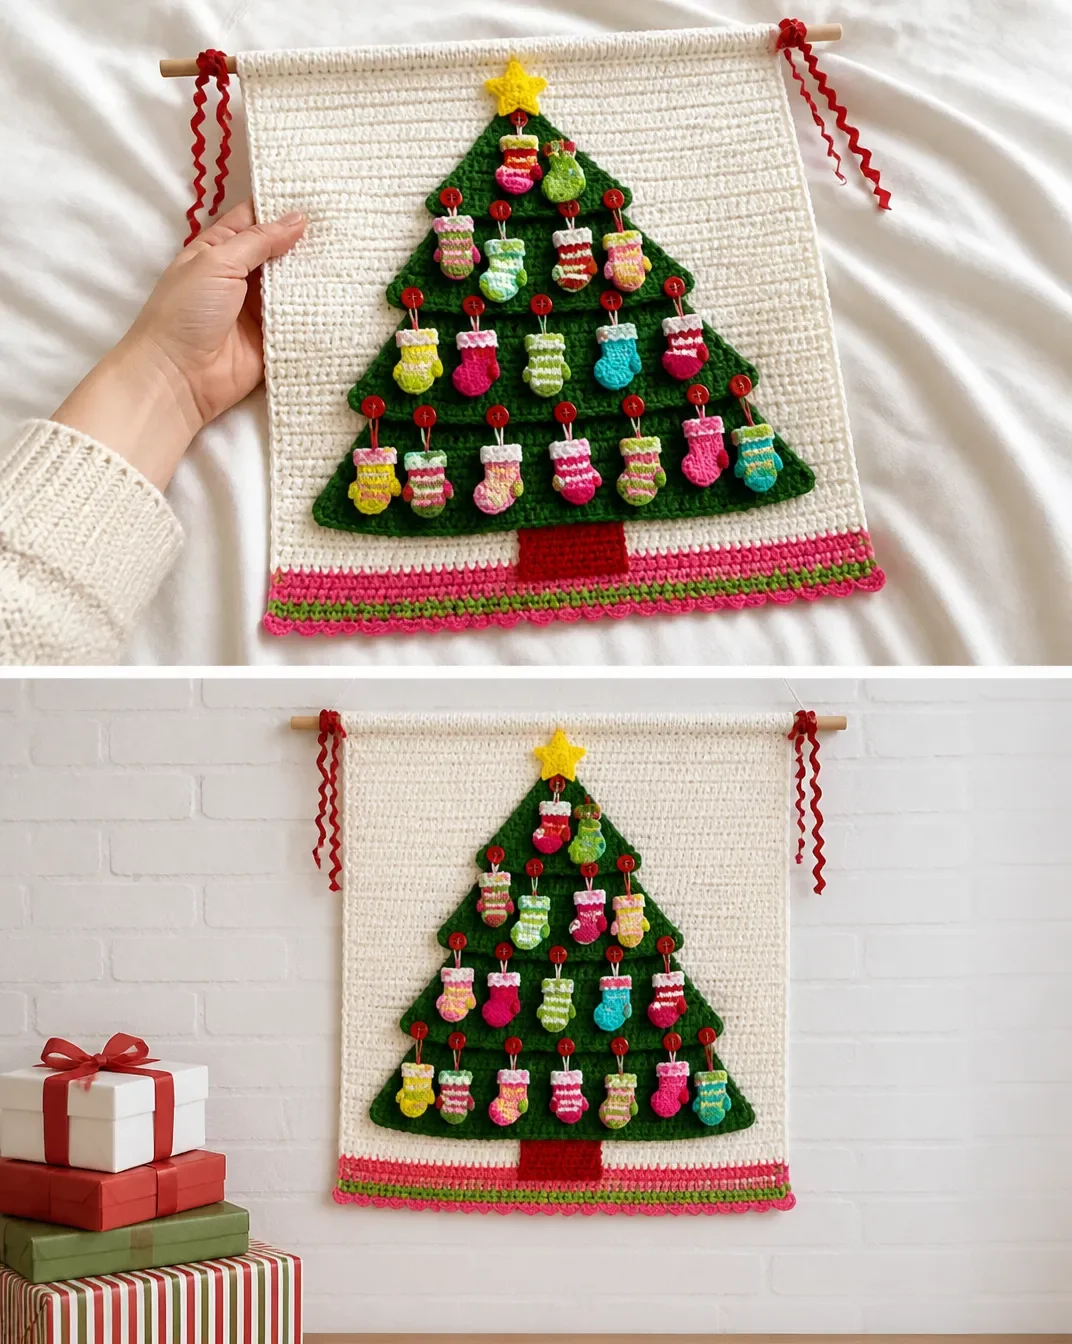
Complete Crochet Tutorial
Keep the color letters beside you as you work. The instructions below retain the original sequence and stitch counts.
Special technique
Join with sc: Place a slip knot on hook, insert hook in indicated stitch, yarn over and draw up a loop, yarn over and draw through both loops on hook.
Wall hanging: backdrop
With larger hook and 2 strands of A held together, ch 62.
Row 1 (wrong side): Sc in 2nd ch from hook and each ch across, turn 61 sc.
Row 2 (right side): Ch 3 (counts as first dc here and throughout), dc in each st, turn 62 dc.
Row 3: Ch 1, skip first st, *dc in next st, slip st in next st; repeat from * across working last slip st in top of beginning ch, turn.
Row 4: Ch 3, dc in each st across, turn.
Rows 5–58: Repeat last 2 rows 27 times.
Row 59: Repeat Row 3. Fasten off, leaving a long tail for sewing.
Lower edging
Row 1 (right side): With right side of Row 1 facing and working in opposite side of foundation ch, join 2 strands of B with sc in first ch, sc in each ch across, turn 61 sts.
Row 2: Ch 3, dc in each st across; change to C, turn.
Row 3: Ch 1, sc in each st across; change to B, turn.
Row 4: Repeat Row 2.
Row 5: Ch 1, sc in first st, *skip next 2 sts, fan in next st, skip next 2 sts, sc in next st; repeat from * across. Fasten off.
Tree: bottom section
With larger hook and 2 strands of D held together, ch 25.
Row 1 (wrong side): Sc in 2nd ch from hook and each ch across, turn 24 sc.
Row 2: Ch 3, 2 dc in next st, *dc in next st, 2 dc in next st; repeat from * across, turn 36 dc.
Rows 3–7: Ch 3, dc in each st across, turn.
Rows 8–11: Ch 3, dc in first st (base of ch 3), dc in each st to beginning ch, 2 dc in top of beginning ch, turn 44 dc.
Row 12: Ch 1, sc in first st, *skip next 2 sts, fan in next st, skip next 2 sts, sc in next st; repeat from * across. Fasten off, leaving a long tail for sewing.
Tree: middle section
With larger hook and 2 strands of D held together, ch 19.
Rows 1–4: Repeat Rows 1–4 of bottom section 27 dc.
Rows 5–12: Repeat Row 8 of bottom section 43 dc.
Row 13: Repeat Row 12 of bottom section. Fasten off, leaving a long tail for sewing.
Tree: top section
With larger hook and 2 strands of D held together, ch 4.
Row 1 (right side): Work 5 dc in 4th ch from hook (beginning ch counts as first dc), turn 6 dc.
Row 2: Ch 3, dc in each st across, turn.
Row 3: Ch 3, dc in next st, 2 dc in next 2 sts, dc in last 2 sts, turn 8 dc.
Row 4: Ch 3, dc in each st across, turn.
Row 5: Ch 3, dc in next 2 sts, 2 dc in next 2 sts, dc in last 3 sts, turn 10 dc.
Row 6: Ch 3, dc in next 3 sts, 2 dc in next 2 sts, dc in last 4 sts, turn 12 dc.
Row 7: Ch 3, dc in next 4 sts, 2 dc in next 2 sts, dc in last 5 sts, turn 14 dc.
Row 8: Ch 3, dc in each st across, turn.
Rows 9–15: Repeat Row 8 of bottom section 28 dc.
Row 16: Repeat Row 12 of bottom section. Fasten off, leaving a long tail for sewing.
Tree base
With smaller hook and E, ch 17.
Row 1 (right side): Sc in 2nd ch from hook and in each ch across, turn 16 sc.
Rows 2–22: Ch 1, working in back loops only, sc in each st, turn.
Fasten off, leaving a long tail for sewing.
Star
With smaller hook and F, ch 2.
Round 1 (right side): Work 5 sc in 2nd ch from hook 5 sc. Do not join.
Round 2: Work 2 sc in each st; join with slip st in first sc 10 sc.
Round 3: Ch 3, dc in same st as join, 2 dc in each remaining st around; join with slip st in first sc 20 sc.
Round 4: *Ch 6, slip st in 2nd ch from hook, sc in next ch, hdc in next ch, dc in next ch, tr in last ch, skip next 3 sts, slip st in next st; repeat from * 4 times; join with slip st in first ch of beginning ch. Fasten off, leaving a long tail for sewing.
Stockings
Make 12 stockings. Make 2 stockings in each of the following color sequences:
- Stocking 1: 8 rounds with B, 4 rounds with G
- Stocking 2: 8 rounds with G, 4 rounds with B
- Stocking 3: All rounds with H
- Stocking 4: 9 rounds with C, 3 rounds with A
- Stocking 5: 5 rounds with E, 3 rounds with C, 4 rounds with A
- Stocking 6: [2 rounds with C, 1 round with E] 3 times, 3 rounds with E
With smaller hook, ch 6.
Round 1 (right side): Sc in 2nd ch from hook and in next 3 ch, 3 sc in last ch; working in opposite side of foundation ch, skip first ch, sc in next 3 ch, 2 sc in last ch 12 sc. Do not join. Place marker for beginning of round and move marker up as each round is completed.
Round 2: Work 2 sc in first st, sc in next 3 sts, 2 sc in next 3 sts, sc in next 3 sts, 2 sc in last 2 sts 18 sc.
Rounds 3 and 4: Sc in each st around.
Round 5: Sc in first 3 sts, [sc2tog] 6 times, sc in last 3 sts 12 sc.
Rounds 6–11: Sc in each st around.
Round 12: Working in front loops only, loosely slip st in each st around, (slip st, ch 6, slip st) in first slip st (hanging loop made). Fasten off tightly.
Mittens
Make 12 mittens. Make 2 mittens in each of the following color sequences:
- Mitten 1: All rounds with H
- Mitten 2: [2 rounds with E, 2 rounds with A] 3 times
- Mitten 3: 4 rounds with C, 1 round with B, 1 round with C, 1 round with B, 5 rounds with C
- Mitten 4: 4 rounds with G, 3 rounds with C, 5 rounds with G
- Mitten 5: 5 rounds with E, 3 rounds with C, 4 rounds with A
- Mitten 6: 4 rounds with B, 1 round with A, 1 round with [next 2 sts with B, next st with A] around, 1 round with [next st with B, next 2 sts with A] around, 5 rounds with B
With smaller hook, ch 2.
Round 1 (right side): Work 6 sc in 2nd ch from hook 6 sc. Do not join. Place marker for beginning of round and move marker up as each round is completed.
Round 2: Work 2 sc in each st around 12 sc.
Round 3: Sc in each st around.
Round 4: *Sc in next 3 sts, 2 sc in next st; repeat from * twice 15 sc.
Rounds 5–7: Sc in each st around.
Round 8: Sc in next 7 sts, 5 dc in front loop of next st, sc in next 7 sts 14 sc and 5 dc.
Round 9: Sc in next 7 sts; working in back loops only, sc5tog (thumb made), sc in next 7 sts 15 sc.
Round 10: Sc in each st around.
Round 11: *Sc in next 3 sts, sc2tog; repeat from * twice 12 sc.
Round 12: Repeat Round 12 of stocking.
Finishing
- Fold last 3 rows of backdrop to wrong side and sew across long edge to form a rod pocket.
- Use photograph as a guide for placement of all pieces. Weave in ends.
- Arrange stockings and mittens on tree sections as follows: 9 pieces on each of bottom and middle sections and 6 pieces on top section.
- Pin a safety pin or marker where each button will be sewn. Sew all buttons in place.
- With rows positioned vertically, center lower edge of tree base on Row 2 of backdrop and sew in place. Slightly overlap bottom section of tree on top edge of tree base, pin in place and sew. Repeat to attach middle and top sections, overlapping previously sewn section.
- Sew star on top section. Hang stockings and mittens on buttons. Weave in any remaining ends.
- Insert wooded rod and tie on rick rack for hanging.
Ways to Display Your Finished Crochet
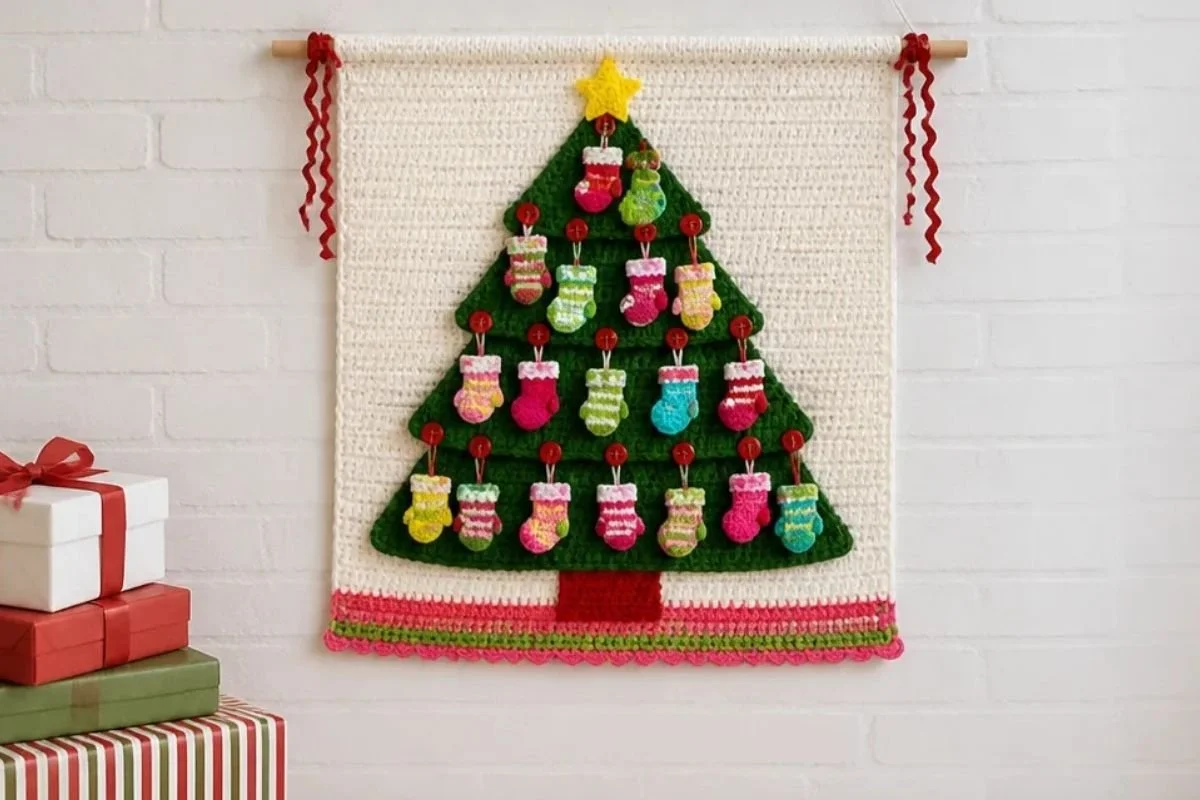
- Hang it above a mantel, entry table, or sideboard where the layered tree can be seen clearly.
- Use it as a cheerful seasonal decoration in a child’s bedroom or playroom.
- Display it as part of a holiday gallery wall alongside framed prints and handmade ornaments.
- Give it as a handmade housewarming or holiday gift, especially to someone who enjoys traditional Christmas colors.
- Use the buttons and hanging accessories as a playful countdown-style display, while keeping the arrangement decorative rather than assigning dates.
- Pair it with other colorful crochet motifs, such as the squares in this easy daisy granny square tutorial, for a coordinated handmade holiday corner.
Caring for Your Crochet Project
Dust the wall hanging gently with a soft brush or use a vacuum cleaner on its lowest setting with a fabric-covered nozzle held just above the surface. Avoid pulling on the stockings, mittens, buttons, rick rack, or layered tree sections.
For small marks, spot-clean carefully with a slightly damp cloth and mild treatment appropriate for the yarn. Do not soak the wall hanging unless the yarn manufacturer’s care instructions specifically support that method. The wooden rod, buttons, and assembled layers make gentle surface care the safest approach.
Store the piece flat or loosely rolled with the crocheted surface protected by clean tissue paper. Keep it dry and away from direct heat, damp storage areas, and sharp objects that could catch the textured edging or hanging loops.
Tips for Better Results
- Hold paired strands evenly. When working with two strands of A or D, keep both strands under consistent tension so the backdrop and tree sections do not become uneven.
- Mark continuous rounds. Move the stitch marker after every completed round in the stockings and mittens to keep the beginning of the round easy to identify.
- Watch the working loops. The tree base uses back loops only, the stocking cuff uses front loops only, and the mitten thumb uses back loops only. These placements create the intended texture and shaping.
- Count after increases and decreases. Confirm the stated counts at the end of shaping rows, especially the 36 dc and 44 dc stages of the bottom tree section and the 27 dc and 43 dc stages of the middle section.
- Leave long sewing tails. The tree sections, star, and base are sewn to other pieces, so avoid trimming the specified long tails before assembly.
- Plan the accessory layout before sewing buttons. Arrange all 24 stockings and mittens first, with 9 pieces on each of the bottom and middle sections and 6 on the top section. Then mark button positions.
- Secure ends carefully. Because the wall hanging is handled when accessories are attached and removed, weave in ends securely without creating bulky knots on the front.
For another structured, colorful crochet project to place near seasonal décor, the 3D flower granny square color chart can provide useful inspiration for coordinating shades.
Creative Ways to Customize Your Project
These ideas are optional and should not replace the approved instructions:
- Substitute a different coordinated palette while keeping the color-letter sequence the same. Changing colors will alter appearance but not construction.
- Use traditional red, white, and green for a classic holiday look, or choose jewel tones for a richer display.
- Arrange the stockings and mittens in alternating color groups for a more orderly appearance, or mix them for a playful effect.
- Sew the buttons in a symmetrical layout if you prefer a formal design, while preserving the required number of accessories on each tree section.
- If substituting yarn, choose a similar yarn type and make a sample first. A different yarn thickness or hook size can change the texture, proportions, sewing alignment, and amount of yarn needed.
- A different rod or hanging trim may be used only as an optional styling change; it can affect the finished display width and support.
Frequently Asked Questions
Is this wall hanging suitable for a beginner?
It is approachable for a crocheter who knows basic stitches and is ready to follow detailed shaping and assembly instructions. The project includes many separate components, color changes, continuous rounds, and sewing.
Which hook sizes are used?
Use the 6 mm [US J-10] hook for the backdrop and tree sections. Use the 4.25 mm [US G-6] hook for the tree base, star, stockings, and mittens.
How many stockings and mittens are made?
Make 12 stockings and 12 mittens. The finishing instructions place 9 pieces on each of the bottom and middle tree sections and 6 pieces on the top section.
How are the stockings and mittens attached?
The accessories receive hanging loops in Round 12. During finishing, sew 24 red buttons to the tree sections, then hang the stockings and mittens from those buttons.
Why are two strands held together for some sections?
The backdrop and tree sections are worked with two strands held together as specified. This gives those structural pieces the required body for sewing and hanging. Using one strand instead would change the fabric and proportions.
Where does the star go?
Sew the completed yellow star onto the top tree section after the three tree sections have been attached.
Can the colors be changed?
Yes, color changes are an optional styling choice. Keep track of the sequence for each stocking and mitten, and remember that different yarns or color combinations may change the visual balance of the finished tree.
How should the finished piece be stored?
Store it dry and protected from dust, preferably flat or loosely rolled with clean tissue paper. Avoid crushing the tree layers, hanging loops, buttons, or rick rack.
Conclusion
This crochet Christmas tree wall hanging combines textured crochet, bright accessories, and layered construction in one cheerful seasonal project. Follow the stitch counts and assembly order carefully, then personalize the display with your preferred arrangement or palette. For more holiday tree inspiration after finishing this design, browse these free crochet Christmas tree patterns.