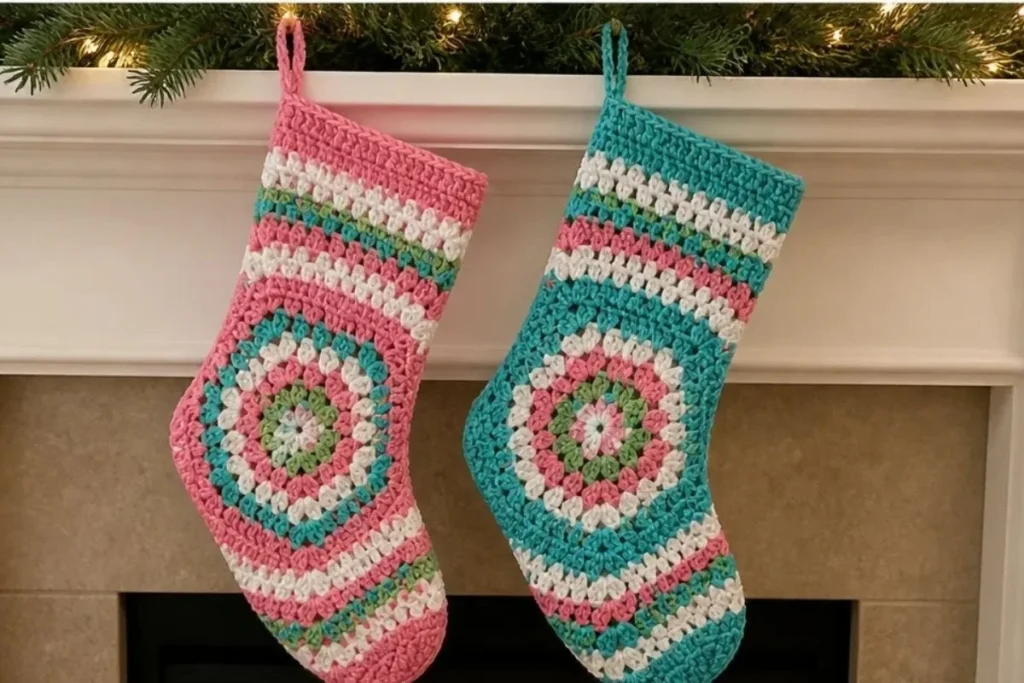
A hexagon-based design gives this Hexi Crochet Christmas Stocking Pattern for Holiday Decor a cheerful, geometric look while keeping the construction approachable. Colorful granny-style rounds create a festive stocking that works beautifully on a mantel, staircase, bedpost, or holiday display. The project is also a thoughtful handmade gift for anyone who enjoys traditional crochet and bright seasonal color. For another small seasonal crochet idea, compare the decorative details in these crochet blooms for hair.
Why You’ll Love This Crochet Project
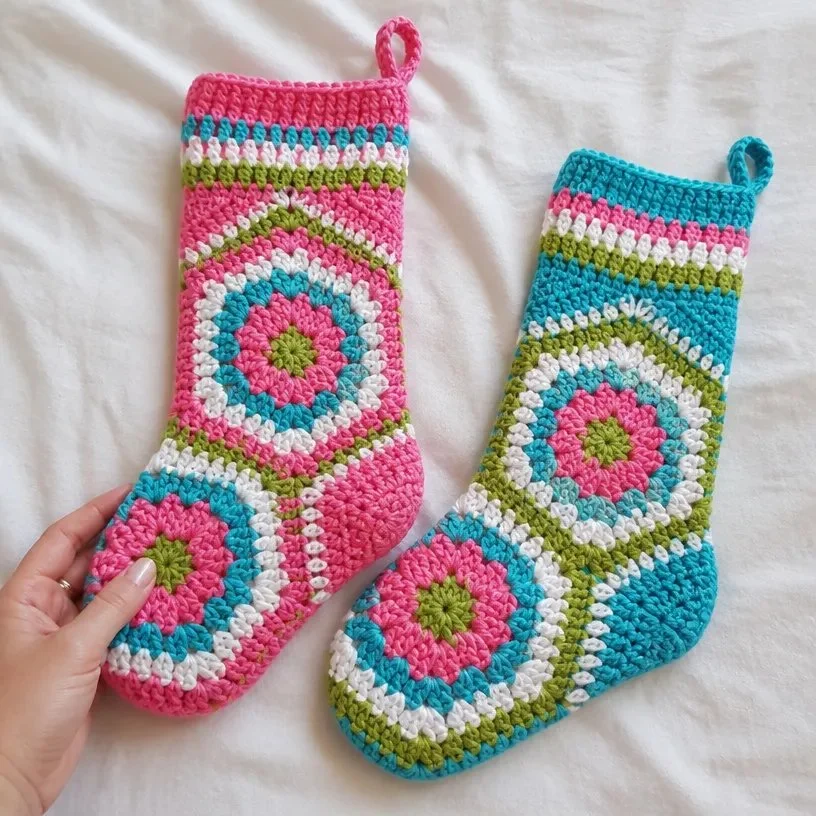
- It combines classic and modern style. The six-sided motif has the familiar charm of a granny design, while the shaped toe and striped color changes make the finished stocking distinctive.
- It practices useful techniques. You will work chain spaces, clusters of double crochet, joined rounds, marked corners, a decrease, rows, seaming, and reverse single crochet.
- It makes attractive holiday decor. The bright Turqua, Pretty n’ Pink, Spring Green, and Soft White palette adds a playful accent to traditional Christmas displays.
- It offers two color arrangements. Version 1 and Version 2 use the same general construction with different color placements and small changes in which shades are used for the sides and hanging loop.
- It has gift-making potential. Once you understand the sequence, the pattern is well suited to making coordinated stockings for family members or friends.
My Crochet Flower Tip: Place a stitch marker in every specified corner space as soon as the pattern calls for it. The markers make the toe shaping and later side construction much easier to identify.
Before You Start Crocheting
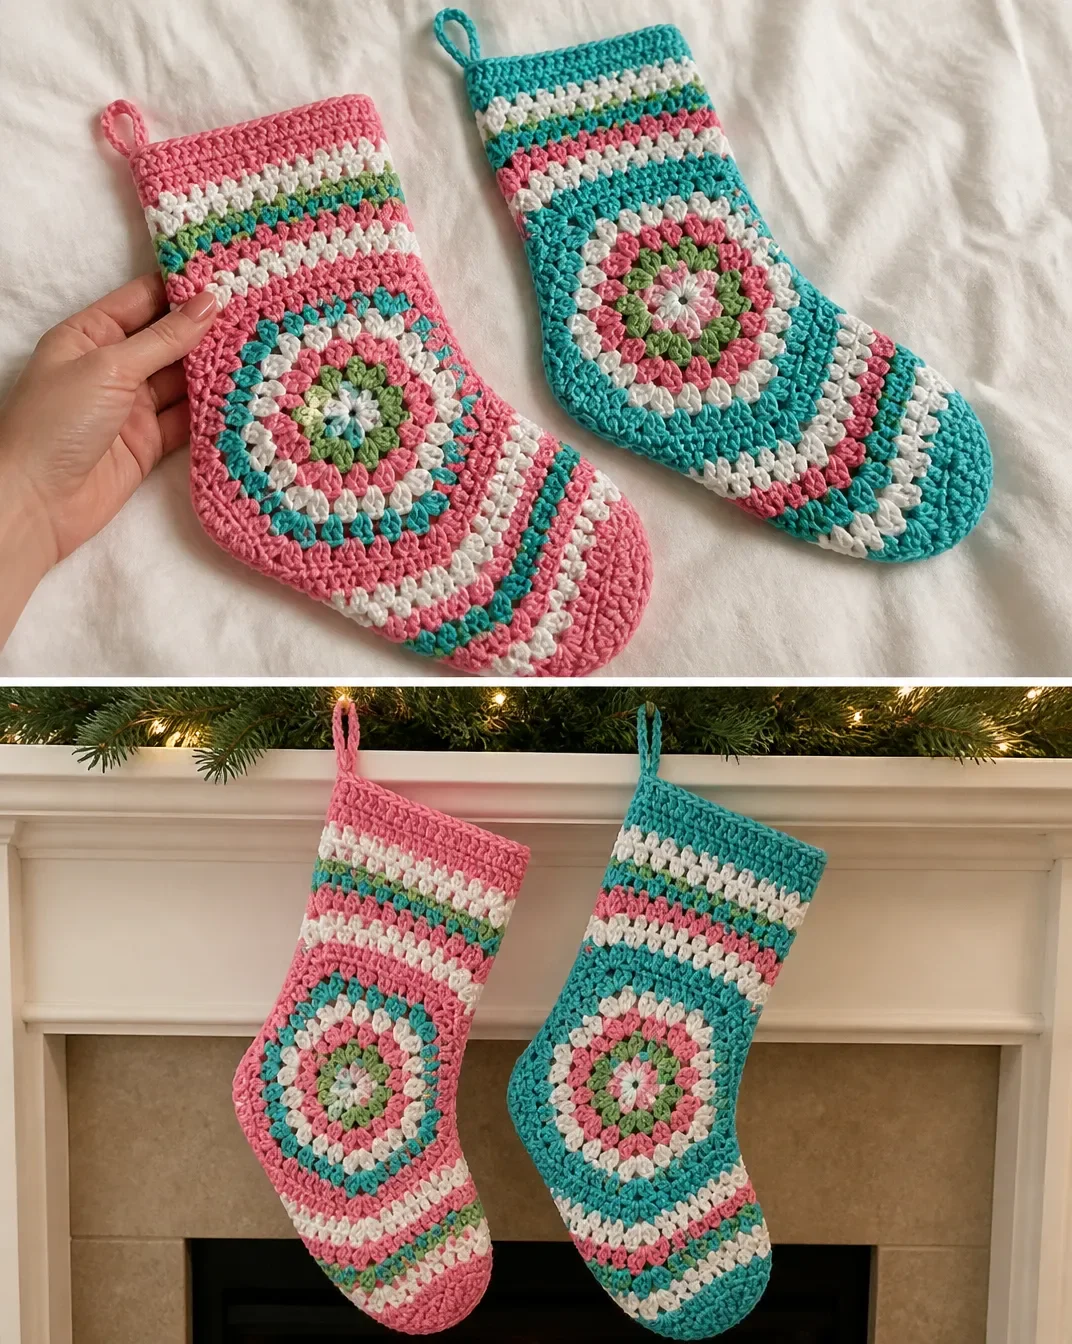
This project consists of one large hexagon that is shaped into a stocking. You will first crochet the hexagon in joined rounds, changing colors as directed. After the tenth round, two corners are shaped with dc3tog decreases to create the toe. Rows are then worked across part of the hexagon to form the stocking sides, followed by a separate top edge.
The project uses US crochet terminology. The approved pattern does not provide a finished measurement or gauge value, so use the recommended hook or adjust hook size as needed to obtain the intended fabric and proportions.
Helpful Abbreviations
- ch: chain
- dc: double crochet
- dc3tog: double crochet three together
- sl st: slip stitch
- sp: space
- sps: spaces
- rnd: round
- RS: right side
- WS: wrong side
- PM: place marker
- rem: remaining
- rep: repeat
- sc: single crochet
Materials You’ll Need
Version 1
- Red Heart® Super Saver™ (7 oz/198 g; 364 yds/333 m):
- Contrast A Turqua (0512): 1 ball or 94 yds/85.5 m
- Contrast B Pretty n’ Pink (0722): 1 ball or 24 yds/22 m
- Contrast C Spring Green (0672): 1 ball or 32 yds/29 m
- Contrast D Soft White (0316): 1 ball or 24 yds/22 m
Version 2
- Red Heart® Super Saver™ (7 oz/198 g; 364 yds/333 m):
- Contrast A Turqua (0512): 1 ball or 32 yds/29 m
- Contrast B Spring Green (0672): 1 ball or 32 yds/29 m
- Contrast C Pretty n’ Pink (0722): 1 ball or 80 yds/73 m
- Contrast D Soft White (0316): 1 ball or 80 yds/73 m
Tools
- U.S. H/8 (5 mm) Susan Bates® Silvalume® crochet hook or size needed to obtain gauge
- Susan Bates® stitch markers
- Susan Bates® steel yarn needle
Complete Crochet Pattern Instructions
Choose either Version 1 or Version 2 before beginning. Follow the color assignments carefully because the two versions differ in their round-by-round color sequence and finishing color.
Version 1 Hexagon
With C, ch 4. Join with sl st to first ch to form ring.
1st rnd: Ch 3 (counts as dc at beg of this and subsequent rnds). 2 dc in ring. (Ch 2. 3 dc) 5 times in ring. Ch 2. Join with sl st to top of ch 3.
Completes: 6 groups of 3 dc and 6 ch-2 sps.
Break C.
2nd rnd: Join B with sl st in first ch-2 sp. Ch 3. (2 dc. Ch 2. 3 dc) in same sp as last sl st.
Skip next 3 dc. (3 dc. Ch 2. 3 dc) in next ch-2 sp. Rep from * 4 times more. Join with sl st to top of ch 3.
Break B.
3rd rnd: Join D with sl st in first ch-2 sp. Ch 3. (2 dc. Ch 2. 3 dc) in same sp as last sl st.
Skip next 3 dc. 3 dc in sp between next 2 groups of 3-dc. Skip next 3 dc. (3 dc. Ch 2. 3 dc) in next corner ch-2 sp. Rep from * 4 times more. Skip next 3 dc. 3 dc in sp between next 2 groups of 3-dc. Skip last 3 dc. Join with sl st to top of ch 3.
Break D.
4th rnd: Join C with sl st in first ch-2 sp. Ch 3. (2 dc. Ch 2. 3 dc) in same sp as last sl st.
(Skip next 3 dc 3 dc in sp between next 2 groups of 3-dc) twice. Skip next 3 dc. (3 dc. Ch 2. 3 dc) in next corner ch-2 sp. Rep from * 4 times more. (Skip next 3 dc 3 dc in sp between next 2 groups of 3-dc) twice. Skip last 3 dc. Join with sl st to top of ch 3.
Break C.
5th rnd: Join A with sl st in first ch-2 sp. Ch 3. (2 dc. Ch 2. 3 dc) in same sp as last sl st.
[Skip next 3 dc. 3 dc in sp between next 2 groups of 3-dc. Rep from * to * to next corner ch-2 sp. Skip next 3 dc. (3 dc. Ch 2. 3 dc) in next corner ch-2 sp] 5 times. Rep from * to * to end of rnd. Skip last 3 dc. Join with sl st to top of ch 3.
6th and 7th rnds: Sl st in each of next 2 dc and next ch-2 sp. Ch 3. (2 dc. Ch 2. 3 dc) in same sp as last sl st.
[Skip next 3 dc. 3 dc in sp between next 2 groups of 3-dc. Rep from * to * to next corner ch-2 sp. Skip next 3 dc. (3 dc. Ch 2. 3 dc) in next corner ch-2 sp] 5 times. Rep from * to * to end of rnd. Skip last 3 dc. Join with sl st to top of ch 3.
Break A at end of 7th rnd.
8th rnd: With C, as 5th rnd. Break C.
9th rnd: Join D with sl st in first ch-2 sp. Ch 3. (2 dc. Ch 2. 3 dc) in same sp as last sl st.
(Skip next 3 dc. 3 dc in sp between next 2 groups of 3-dc) 7 times. Skip next 3 dc. (3 dc. Ch 2. 3 dc) in next corner ch-2 sp – PM in ch-2 sp just worked. Rep from * once more. (Skip next 3 dc. 3 dc in sp between next 2 groups of 3-dc) 7 times. Skip next 3 dc. (3 dc. Ch 2. 3 dc) in next corner ch-2 sp. Rep from twice more. (Skip next 3 dc. 3 dc in sp between next 2 groups of 3-dc) 7 times. Skip last 3 dc. Join with sl st to top of ch 3.
Break D.
Version 1 Toe Shaping and Marker Placement
Shape toe 10th rnd: Join B with sl st in first ch-2 sp. Ch 3. (2 dc. Ch 2. 3 dc) in same sp as last sl st.
(Skip next 3 dc. 3 dc in sp between next 2 groups of 3-dc) 8 times. (3 dc. Ch 2. 3 dc) in next marked corner ch-2 sp.
(Dc3tog in sp between next 2 groups of 3 dc) 8 times. (3 dc. Ch 2. 3 dc) in next marked corner ch-2 sp.
(Skip next 3 dc. 3 dc in sp between next 2 groups of 3-dc) 8 times. Skip next 3 dc. (3 dc. Ch 2. 3 dc) in next corner ch-2 sp. Rep from * twice more. (Skip next 3 dc. 3 dc in sp between next 2 groups of 3-dc) 8 times. Skip last 3 dc. Join with sl st to top of ch 3.
Break B.
PM in 4th corner ch-2 sp of 10th rnd.
Version 1 Stocking Sides
1st row: With RS of Hexagon facing, join C with sl st in marked 4th corner ch-2 sp. Ch 3. 2 dc in same sp.
(3 dc in sp between next 2 groups of 3-dc) 9 times. (3 dc. Ch 2. 3 dc) in next corner ch-2 sp. Rep from * once more. (3 dc in sp between next 2 groups of 3-dc) 9 times. 3 dc in next corner ch-2 sp.
Break C. Leave rem sts unworked.
2nd row (RS): Join A with sl st in top of ch 3 at beg of 1st row. Ch 3.
(3 dc in sp between next 2 groups of 3-dc) 10 times. (3 dc. Ch 2. 3 dc) in next corner ch-2 sp. Rep from * once more. (3 dc in sp between next 2 groups of 3-dc) 10 times. Skip next 2 dc. 1 dc in last dc.
Break A.
PM in each of the two ch-2 corner sps of last row.
Version 1 Stocking Top Edge
1st row: With RS of Stocking facing, join A with sl st in first marked corner ch-2 sp. Ch 3. 2 dc in same sp.
(3 dc in sp between next 2 groups of 3-dc) 11 times. 3 dc in second marked corner ch-2 sp. Turn.
2nd row (WS): Ch 3. (3 dc in sp between next 2 groups of 3-dc) 12 times. Skip next 2 dc. 1 dc in top of ch 3. Turn.
3rd row: Ch 3. 1 dc in each dc to end of row. Do not turn.
4th row: Ch 1. Working from left to right instead of from right to left, as usual, work 1 reverse sc in each dc to end of row. Fasten off.
Version 1 Finishing and Assembly
Fold Stocking with sides, bottom and toe edges aligned (see photo). Using matching shade, join sides, bottom edge and toe seams.
Hanging Loop: Using 2 strands of A held tog, join with sl st to top edge at side seam. Ch 24. Join with sl st in seam. Fasten off.
Version 2 Hexagon
With C, ch 4. Join with sl st to first ch to form ring.
1st rnd: Ch 3 (counts as dc at beg of this and subsequent rnds). 2 dc in ring. (Ch 2. 3 dc) 5 times in ring. Ch 2. Join with sl st to top of ch 3.
Completes: 6 groups of 3 dc and 6 ch-2 sps.
Break C.
2nd rnd: Join B with sl st in first ch-2 sp. Ch 3. (2 dc. Ch 2. 3 dc) in same sp as last sl st.
Skip next 3 dc. (3 dc. Ch 2. 3 dc) in next ch-2 sp. Rep from * 4 times more. Join with sl st to top of ch 3.
Break B.
3rd rnd: Join D with sl st in first ch-2 sp. Ch 3. (2 dc. Ch 2. 3 dc) in same sp as last sl st.
Skip next 3 dc. 3 dc in sp between next 2 groups of 3-dc. Skip next 3 dc. (3 dc. Ch 2. 3 dc) in next corner ch-2 sp. Rep from * 4 times more. Skip next 3 dc. 3 dc in sp between next 2 groups of 3-dc. Skip last 3 dc. Join with sl st to top of ch 3.
4th rnd: Sl st in each of next 2 dc and first ch-2 sp. Ch 3. (2 dc. Ch 2. 3 dc) in same sp as last sl st.
(Skip next 3 dc. 3 dc in sp between next 2 groups of 3-dc) twice. Skip next 3 dc. (3 dc. Ch 2. 3 dc) in next corner ch-2 sp. Rep from * 4 times more. (Skip next 3 dc. 3 dc in sp between next 2 groups of 3-dc) twice. Skip last 3 dc. Join with sl st to top of ch 3.
Break D.
5th rnd: Join A with sl st in first ch-2 sp. Ch 3. (2 dc. Ch 2. 3 dc) in same sp as last sl st.
[Skip next 3 dc. 3 dc in sp between next 2 groups of 3-dc. Rep from * to * to next corner ch-2 sp. Skip next 3 dc. (3 dc. Ch 2. 3 dc) in next corner ch-2 sp] 5 times. Rep from * to * to end of rnd. Skip last 3 dc. Join with sl st to top of ch 3.
6th rnd: Sl st in each of next 2 dc and next ch-2 sp. Ch 3. (2 dc. Ch 2. 3 dc) in same sp as last sl st.
[Skip next 3 dc. 3 dc in sp between next 2 groups of 3-dc. Rep from * to * to next corner ch-2 sp. Skip next 3 dc. (3 dc. Ch 2. 3 dc) in next corner ch-2 sp] 5 times. Rep from * to * to end of rnd. Skip last 3 dc. Join with sl st to top of ch 3.
Break A.
7th rnd: Join C with sl st in first ch-2 sp. Ch 3. (2 dc. Ch 2. 3 dc) in same sp as last sl st.
[Skip next 3 dc. 3 dc in sp between next 2 groups of 3-dc. Rep from * to * to next corner ch-2 sp. Skip next 3 dc. (3 dc. Ch 2. 3 dc) in next corner ch-2 sp] 5 times. Rep from * to * to end of rnd. Skip last 3 dc. Join with sl st to top of ch 3.
Break C.
8th rnd: With D, as 7th rnd.
9th rnd: Sl st in each of next 2 dc and first ch-2 sp. Ch 3. (2 dc. Ch 2. 3 dc) in same sp as last sl st.
*(Skip next 3 dc. 3 dc in sp between next 2 groups of 3-dc) 7 times. Skip next 3 dc. (3 dc. Ch 2. 3 dc) in next corner ch-2 sp – PM in ch-2 sp just worked. Rep from * once more. (Skip next 3 dc. 3 dc in sp between next 2 groups of 3-dc) 7 times. Skip next 3 dc. (3 dc. Ch 2. 3 dc) in next corner ch-2 sp. Rep from twice more. (Skip next 3 dc. 3 dc in sp between next 2 groups of 3-dc) 7 times. Skip last 3 dc. Join with sl st to top of ch 3.
Break D.
Version 2 Toe Shaping and Marker Placement
Shape toe 10th rnd: Join B with sl st in first ch-2 sp. Ch 3. (2 dc. Ch 2. 3 dc) in same sp as last sl st.
(Skip next 3 dc. 3 dc in sp between next 2 groups of 3-dc) 8 times.
(3 dc. Ch 2. 3 dc) in next marked corner ch-2 sp.
(Dc3tog in sp between next 2 groups of 3 dc) 8 times.
(3 dc. Ch 2. 3 dc) in next marked corner ch-2 sp.
(Skip next 3 dc. 3 dc in sp between next 2 groups of 3-dc) 8 times. Skip next 3 dc. (3 dc. Ch 2. 3 dc) in next corner ch-2 sp. Rep from * twice more. (Skip next 3 dc. 3 dc in sp between next 2 groups of 3-dc) 8 times. Skip last 3 dc. Join with sl st to top of ch 3.
Break B.
PM in 4th corner ch-2 sp of 10th rnd.
Version 2 Stocking Sides
1st row: With RS of Hexagon facing, join D with sl st in marked 4th corner ch-2 sp. Ch 3. 2 dc in same sp.
(3 dc in sp between next 2 groups of 3-dc) 9 times. (3 dc. Ch 2. 3 dc) in next corner ch-2 sp. Rep from * once more. (3 dc in sp between next 2 groups of 3-dc) 9 times. 3 dc in next corner ch-2 sp.
Break D. Leave rem sts unworked.
2nd row (RS): Join C with sl st in top of ch 3 at beg of 1st row. Ch 3.
(3 dc in sp between next 2 groups of 3-dc) 10 times. (3 dc. Ch 2. 3 dc) in next corner ch-2 sp. Rep from * once more. (3 dc in sp between next 2 groups of 3-dc) 10 times. Skip next 2 dc. 1 dc in last dc.
Break C.
PM in each of the two ch-2 corner sps of last row.
Version 2 Stocking Top Edge
With C, work as for Version 1.
Version 2 Finishing and Assembly
Finishing: Work as for Version 1.
Hanging Loop: With C, work as for Version 1.
Finished Project Inspiration
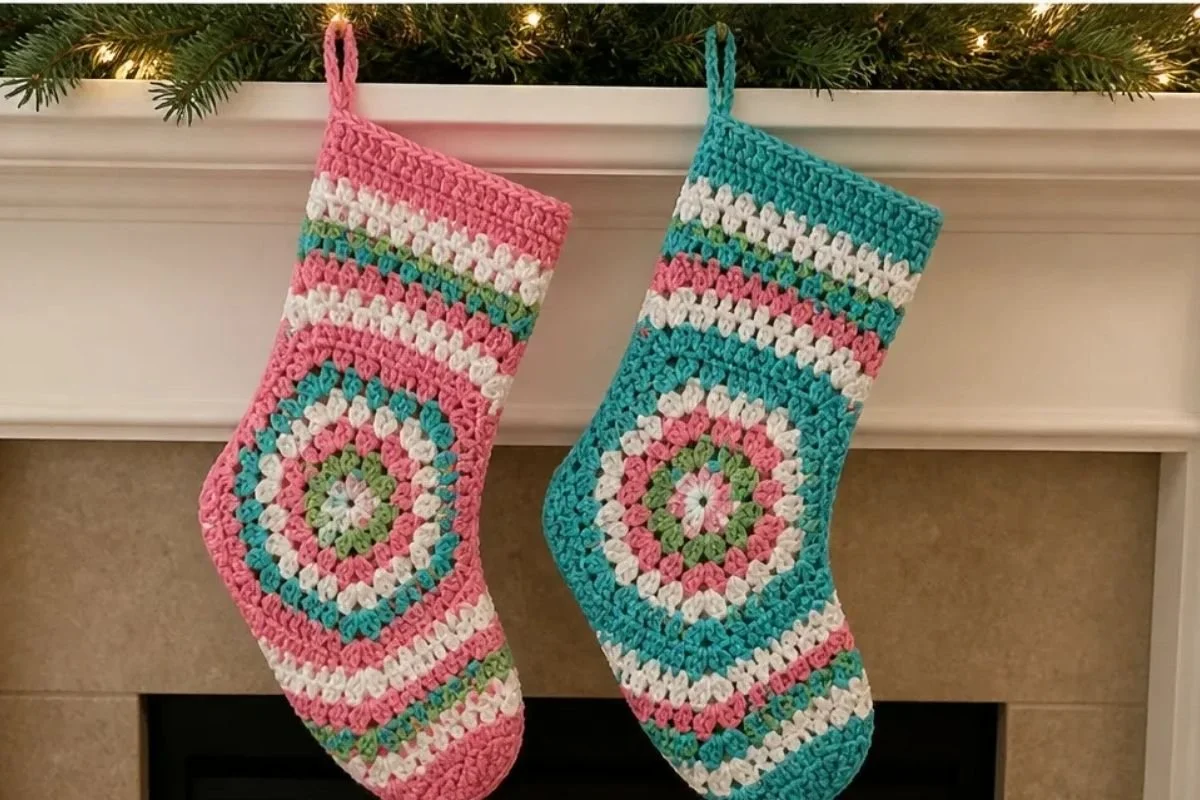
This stocking can be used in several seasonal displays:
- Hang it from a mantel, staircase railing, wall hook, or decorative ladder.
- Use several stockings in coordinated color arrangements for a family holiday display.
- Place the stocking beside a guest-room door as a festive welcome accent.
- Fill it with lightweight wrapped treats, small gifts, or handwritten notes.
- Display it with greenery, ornaments, or other handmade crochet decorations.
- Give it as a reusable holiday gift that can be brought out year after year.
For a more dimensional crochet motif to use alongside seasonal decor, a 3D flower granny square can provide a complementary handmade accent.
Caring for Your Crochet Project
- Dust the stocking gently with a soft brush or use a vacuum attachment held slightly away from the fabric.
- For small marks, spot-clean carefully rather than saturating the entire stocking.
- Avoid excessive heat, which can distort the yarn and affect the stocking’s shape.
- Store the stocking clean and completely dry in a cool, dry place.
- Fold it loosely or lay it flat instead of compressing it under heavy decorations.
- Protect the hanging loop and reverse single crochet edging from snagging when storing seasonal items.
- Keep filled stockings supported so the seams and hanging loop are not placed under unnecessary strain.
Tips for Better Results
- Keep the hexagon flat. Each corner uses a ch-2 space, while the spaces between clusters receive 3 dc. If these locations are confused, the motif may ripple or lose its shape.
- Track each color change. Break the specified color at the end of a round and join the next shade in the first ch-2 space as instructed.
- Use the markers before shaping. The ninth round places markers in corner spaces, and the tenth round depends on those marked corners for the toe.
- Read the decrease carefully. The dc3tog section is worked in the space between the next 2 groups of 3 dc, not in a corner space.
- Keep the right side visible. The stocking sides and top edge specify RS and WS placement, so orient the hexagon before joining yarn.
- Leave the remaining stitches unworked. This is essential after the first stocking-side row because the stocking shape is formed from only part of the hexagon.
- Match seams by color. Using the matching shade for the side, bottom, and toe seams helps the assembly blend into the color bands.
- Work the reverse single crochet slowly. The fourth top-edge row is worked from left to right instead of the usual right-to-left direction, creating a firm decorative finish.
Color and Styling Variations
These ideas are optional and do not change the approved pattern instructions:
- Reverse the visual emphasis by making Turqua the dominant shade and using Soft White for fewer accent rounds.
- Try a traditional palette of red, green, cream, and gold if you choose substitute colors.
- Use one stocking version for adults and the alternate version for children while keeping the set coordinated.
- Pair the finished stocking with a neutral wreath, wood-tone ornaments, or natural greenery.
- Make a matching seasonal display by repeating the same color order across several stockings.
- If substituting yarn, choose a comparable yarn carefully. A different yarn weight, fiber, or hook size can change gauge, fabric density, finished proportions, and yarn requirements.
Related handmade decor can also include a crochet bouquet wrap pattern when creating a broader handmade celebration display.
Frequently Asked Questions
Is this stocking beginner-friendly?
The pattern uses familiar stitches such as chains, slip stitches, and double crochet, but beginners should be comfortable reading repeated round instructions, changing colors, placing markers, and working a dc3tog decrease.
What yarn is recommended?
The approved pattern uses Red Heart® Super Saver™ (7 oz/198 g; 364 yds/333 m) in the listed Version 1 or Version 2 quantities and colors.
Which hook size should I use?
Use a U.S. H/8 (5 mm) Susan Bates® Silvalume® crochet hook or the size needed to obtain gauge.
What is the difference between Version 1 and Version 2?
The versions use different yarn quantities and color assignments. They also vary in the color used for some hexagon rounds, stocking-side rows, and the hanging loop. The Version 2 top edge and finishing refer back to Version 1 instructions where specified.
How are the stocking sides formed?
After the tenth round, yarn is joined at the marked fourth corner ch-2 space. Two rows are worked across part of the hexagon, and the remaining stitches are left unworked after the first side row.
How is the toe shaped?
The tenth round uses dc3tog decreases in the spaces between groups of 3 dc across one section of the hexagon. The marked corner spaces guide the placement of the shaping.
How is the stocking assembled?
Fold the stocking with the sides, bottom, and toe edges aligned. Using matching shade, join the side, bottom edge, and toe seams.
Can I change the colors?
Yes. Color changes are an optional styling choice, but changing yarn or color quantities may affect the final appearance. Changing yarn weight or hook size may also affect gauge, dimensions, texture, and yarn requirements.
How is the hanging loop made?
For Version 1, use 2 strands of A held together, join with a slip stitch to the top edge at the side seam, chain 24, join with a slip stitch in the seam, and fasten off. Version 2 uses C as directed.
Conclusion
This hexi crochet Christmas stocking combines colorful granny-style rounds with practical shaping and a neat finished edge. It is an inviting project for seasonal decorating, handmade gifting, and building a coordinated holiday collection. Follow the markers and color changes carefully, then personalize future stockings with your favorite palette. For another hexagon stocking idea, see this granny crochet stocking pattern.