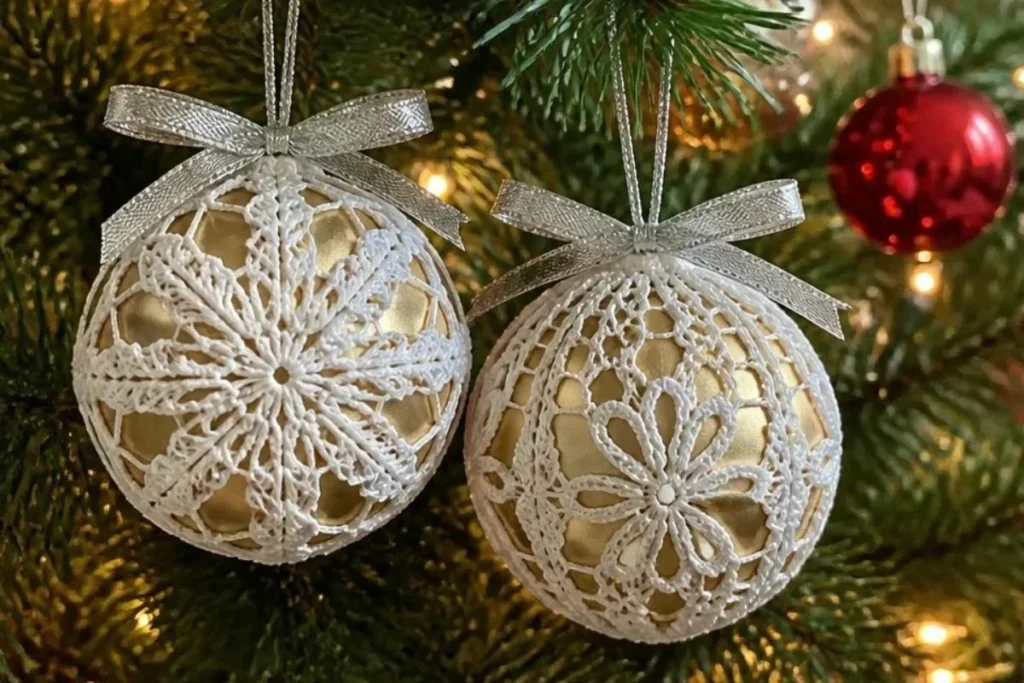
Lacy crochet Christmas ornaments bring delicate threadwork, sculptural texture, and handmade charm to a holiday tree. This pattern includes two designs: a dramatic cluster-stitch ornament and a lighter daisy-chain ornament. Both are shaped over a 3-inch ball, stiffened, and finished with a satin ball inside for a polished look. The fine lace effect also pairs beautifully with other handmade decorations, such as a three-dimensional floral crochet design. These ornaments are enjoyable for crocheters who like intricate stitches and make thoughtful gifts or keepsakes.
Why You’ll Love This Crochet Project
This lacy crochet Christmas ornaments pattern offers several creative benefits:
- Two distinct designs: Make the cluster-stitch ornament, the daisy-chain ornament, or both for variety.
- Elegant seasonal décor: White thread creates a snow-inspired appearance that complements nearly any holiday color scheme.
- Practice with advanced techniques: The pattern uses clusters, picots, long treble treble crochet work, and chain-based shaping.
- Useful handmade gifts: A finished ornament is lightweight, easy to wrap, and suitable for holiday exchanges.
- Reusable decoration: Once shaped and dried, the ornament can become part of your seasonal collection for years to come.
My Crochet Flower Tip: Keep the thread tension even, especially in the long chain sections. Consistent chains help the finished lace spread smoothly over the forming ball.
What to Know Before You Begin
You will crochet one ornament design at a time, fasten off, and weave in the ends before moving to finishing. Ornament A begins with a 36-chain ring and forms six elaborate spokes. Ornament B begins with six single crochet stitches worked into a chain ring and creates six daisy-chain spokes.
The crochet pieces are not placed directly on the satin balls while wet. Instead, a 3-inch Styrofoam ball covered with plastic wrap is used as a temporary form. The crochet is saturated with fabric stiffener and shaped around the ball. After it dries rigidly, the form is removed and replaced with the 3-inch satin Christmas ball.
The instructions use US crochet terminology. Helpful abbreviations include:
- ch: chain
- sc: single crochet
- dc: double crochet
- slip st: slip stitch
- trtr: treble treble crochet
- Cl: cluster
- picot: a small decorative loop formed with chains and a slip stitch
The pattern does not provide a separate skill rating, so work slowly and use stitch markers or a row counter if keeping track of repeats is helpful.
Materials You’ll Need
- AUNT LYDIA’S® Classic Crochet Thread, Size 10: 1 ball White
- Crochet hook: 1.5mm [US 7]
- 3-inch diameter Styrofoam ball, for forming the crochet piece
- 3-inch satin Christmas ball, for the final ornament
- Plastic wrap
- Fabric stiffener
- 7/8-inch ribbon
- Ornament hanger
- Thread needle
The Styrofoam ball provides the shape during stiffening, while the satin ball becomes the permanent interior. Plastic wrap prevents the stiffened thread from adhering to the forming ball.
Step-by-Step Crochet Instructions
The following instructions preserve both ornament designs and the complete finishing process.
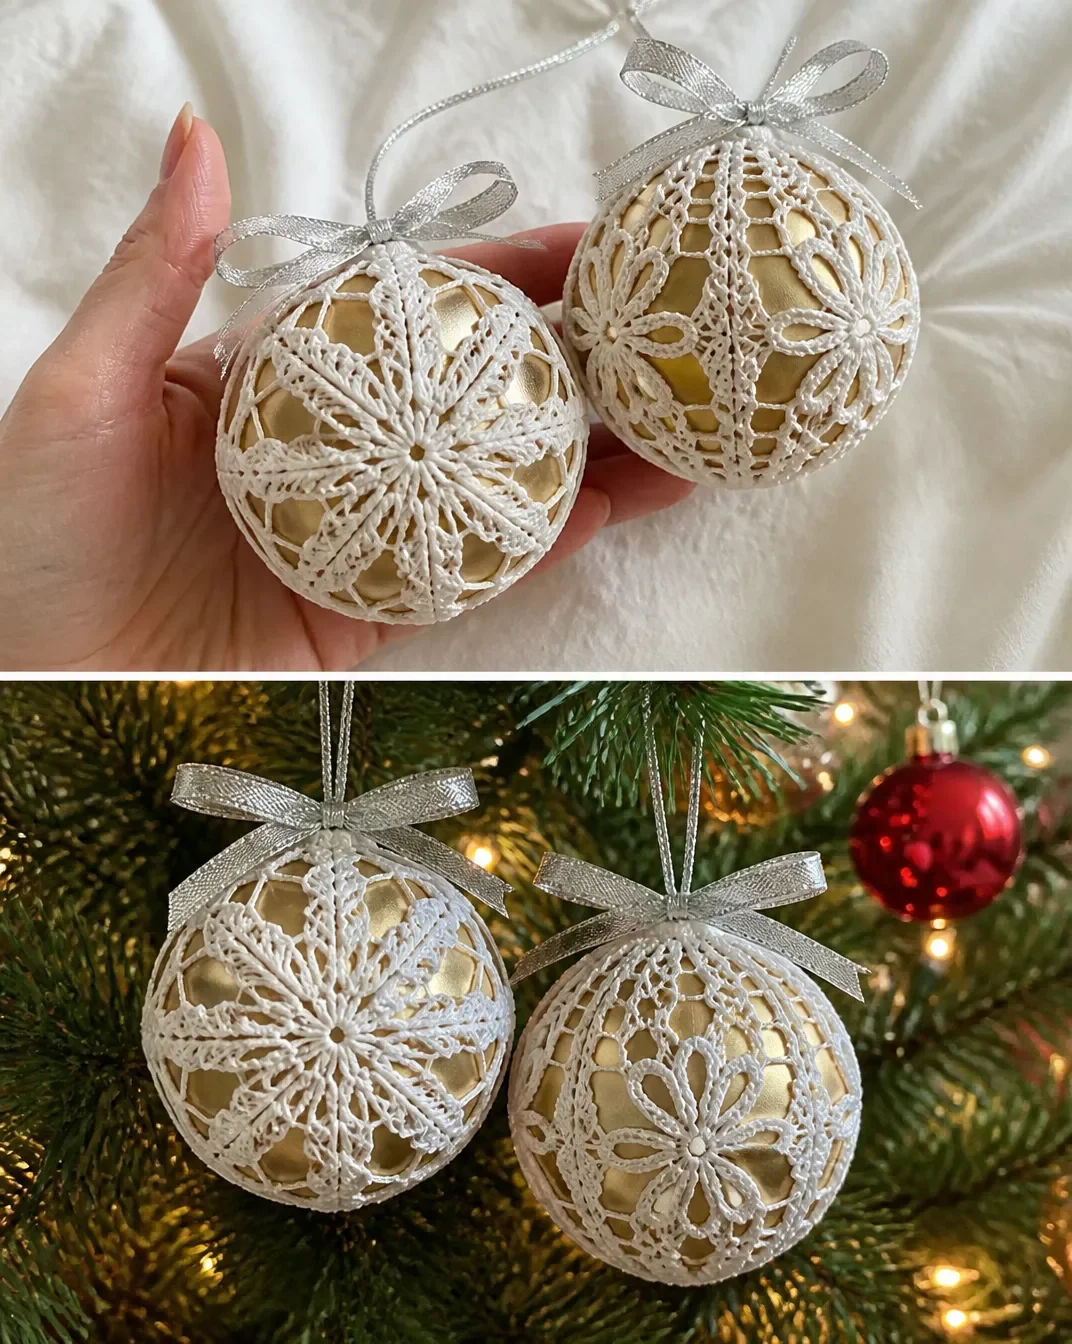
Ornament A: Cluster Stitch Ornament
Shown at lower left of photo.
Round 1
Ch 36; join with slip st in first ch to form a ring.
Ch 1, sc in same ch as join and in each remaining ch around; join with slip st in first sc 36 sc.
Round 2: Spoke Round
*Ch 6, 3-trtr-Cl in same st as last slip st made, ch 10, [yarn over] 6 times (7 loops on hook), 4-trtr-Cl in same st, [yarn over and draw through 2 loops on hook] 6 times (1 loop remains on hook); ch 6, slip st in 6th ch from hook (picot made), ch 17, incomplete-3-trtr-Cl in 7th ch from hook (4 loops on hook), [yarn over] 10 times (14 loops on hook), insert hook in base of picot and draw up a loop (15 loops on hook), [yarn over and draw through 2 loops on hook] 10 times (long trtr made – 5 loops remain on hook), incomplete-3-trtr-Cl in 6th bar of long trtr (8 loops on hook), yarn over and draw through all 8 loops on hook, [ch 4, sc in 2nd ch from hook and in next 2 ch] twice, (slip st, ch 6, 3-trtr-Cl) in top of last cluster made, ch 10, slip st in base of picot, ch 6, slip st in 6th ch from hook (picot made), ch 10, (3-trtr-Cl, ch 6 slip st) in same sc as first 2 clusters (spoke completed), ch 10, slip st in base of picot, ch 6, slip st in 6th ch from hook (picot made), ch 10, (3-trtr-Cl, ch 6 slip st) in same sc as first 2 clusters (spoke completed), slip st in next 6 sc of ring; repeat from * around; join with slip st in same st as first cluster 6 spokes.
Fasten off and weave in ends.
Ornament B: Daisy Chain Stitch Ornament
Shown at upper right of photo.
Round 1
Ch 2, 6 sc in 2nd ch from hook; join with slip st in first sc 6 sc.
Round 2: Spoke Round
Ch 3 (counts as dc), 2 dc in same sc as join, *ch 15, make daisy, ch 25, sc in 11th ch from hook and in next 14 ch, make daisy, sc in last 15 ch (spoke completed)**, 3 dc in next sc; repeat from * around ending last repeat at **; join with slip st in top of beginning ch-3 6 spokes.
Fasten off and weave in ends.
Finishing for All Ornaments
- Cover the 3-inch Styrofoam ball with plastic wrap.
- Saturate the crochet in stiffener and shape it around the ball.
- Allow it to dry.
- When the piece is rigid, remove the Styrofoam ball and insert the satin ball.
- Tie or sew the loops together at the top.
- Using ribbon, tie a bow at the top of the ornament and attach an ornament hanger.
Shape the lace carefully while the stiffener is still workable. Make sure the spoke sections are distributed evenly around the ball before leaving the ornament to dry.
Ways to Display Your Finished Crochet
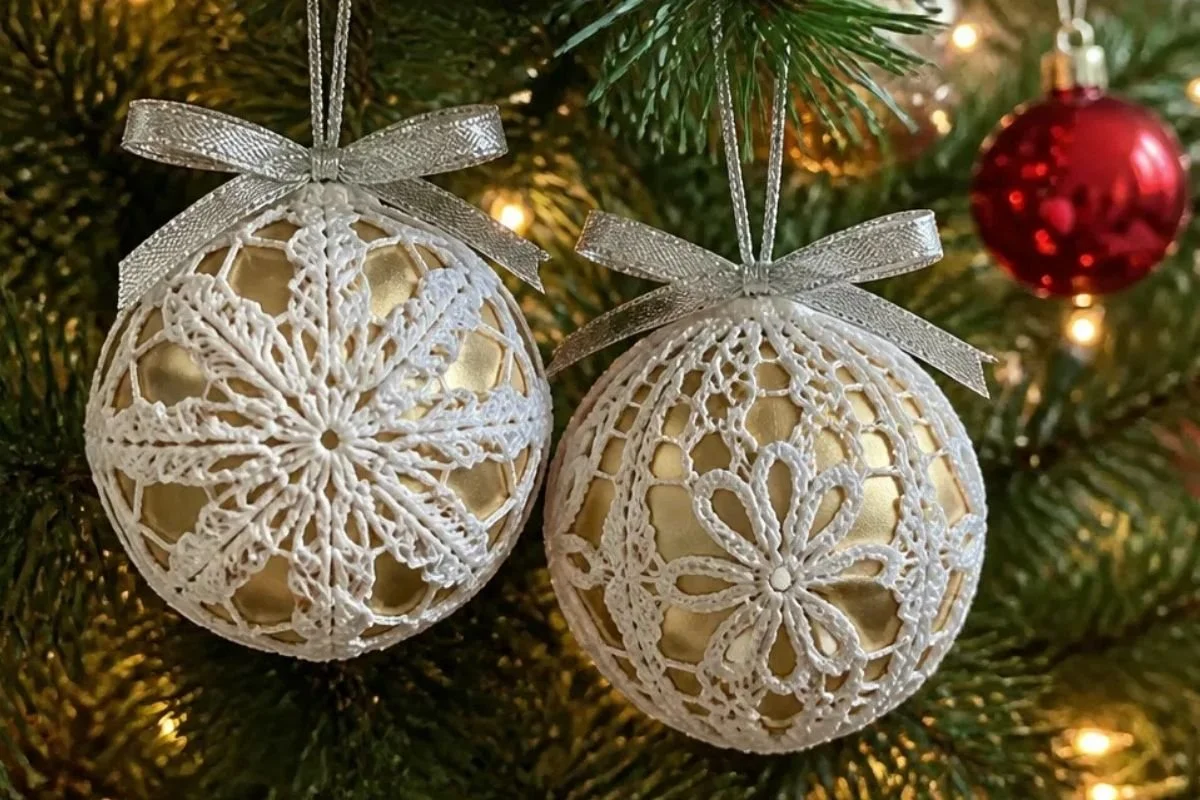
- Hang one ornament near a window where its openwork can catch the light.
- Use both designs together on a tree for contrast between the dense cluster motif and airy daisy chain.
- Give a finished ornament as a handmade holiday gift, especially when paired with coordinating ribbon.
- Place several ornaments in a decorative bowl or shallow tray as a tabletop seasonal display.
- Tie an ornament to a wrapped present as a reusable gift topper.
- Combine white ornaments with silver, icy blue, or deep red satin decorations for a coordinated holiday palette.
For another seasonal display idea, the finished ornaments can be styled alongside a handmade crochet flower wreath when transitioning decorations between holidays.
Caring for Your Crochet Project
Dust the ornament gently with a soft, dry brush or a clean, delicate cloth. Avoid soaking the finished piece, since water may soften or disturb the fabric stiffener and affect the ornament’s shape.
Keep the ornament away from excessive heat, open flames, and damp storage areas. When the season ends, wrap it loosely in acid-free tissue paper or soft fabric and place it in a sturdy container. Do not compress the spokes, picots, or daisy sections under heavy decorations.
If a small area becomes dusty, use light dabbing rather than rubbing. Handle the ribbon and ornament hanger carefully when taking the piece out of storage.
Tips for Better Results
- Use the specified fine hook and thread together. The 1.5mm [US 7] hook is matched to the delicate size 10 crochet thread and helps preserve the lace-like structure.
- Read each cluster instruction completely before working it. Ornament A contains several loop-building sequences, so pausing at each parenthetical instruction can prevent missed yarn overs.
- Mark the first stitch of the ring. This is especially useful when working the six spokes and joining back into the correct location.
- Count the spokes as you work. Ornament A and Ornament B each finish with 6 spokes; checking after every repeat makes uneven spacing easier to catch.
- Keep chain tension relaxed. Tight chains can pull the spoke sections inward and make shaping over the ball more difficult.
- Shape before the stiffener sets. Spread the lace evenly around the plastic-wrapped Styrofoam ball, then check the top loops and spoke placement.
- Weave in ends before stiffening. Secure and hide the thread tails while the crochet is flexible.
- Let the ornament become rigid before removing the form. Taking out the Styrofoam ball too early may cause the crochet to lose its rounded shape.
For a decorative gift-making project using small crochet motifs, you can also explore these crochet appliqué ideas for coordinating handmade accessories.
Creative Ways to Customize Your Project
The approved pattern uses one ball of white AUNT LYDIA’S® Classic Crochet Thread, Size 10, but the completed ornaments can be styled in several optional ways:
- Change the ribbon: Use silver, gold, velvet red, or icy blue ribbon while keeping the crochet white.
- Coordinate the satin ball: Match the interior satin ball to the ribbon or use a contrasting jewel tone.
- Make a mixed collection: Alternate Ornament A and Ornament B across the tree so the two lace patterns are easy to distinguish.
- Create seasonal palettes: White and silver suit a snow-themed display, while white and red create a classic holiday combination.
- Use another thread color: A different color may change the visual character of the lace but does not alter the approved stitch instructions.
- Substitute yarn cautiously: Changing yarn weight or hook size may affect the crochet piece’s size, texture, stiffness, and fit over the 3-inch ball. Test any substitution before making the final ornament.
Keep the 3-inch forming ball and 3-inch satin ball together if you want the original shaping relationship to remain consistent.
Frequently Asked Questions
Are there two ornament patterns included?
Yes. Ornament A is the cluster-stitch ornament, and Ornament B is the daisy-chain stitch ornament. Each design is worked separately and finishes with 6 spokes.
What yarn is recommended?
Use one ball of AUNT LYDIA’S® Classic Crochet Thread, Size 10, in White. The fine thread creates the open, lacy appearance shown by the designs.
What hook size should I use?
Use a 1.5mm [US 7] crochet hook, as specified in the pattern.
What are the balls used for?
The 3-inch diameter Styrofoam ball is a temporary forming tool. It is covered with plastic wrap so the stiffened crochet can be shaped around it. Once the crochet is rigid, remove the Styrofoam ball and insert the 3-inch satin Christmas ball.
Can I make only one of the two designs?
Yes. Ornament A and Ornament B are separate designs, so you may make either one or create a collection using both.
How do I keep the ornament round while it dries?
Shape the saturated crochet evenly around the plastic-wrapped Styrofoam ball. Adjust the spokes, picots, and chain sections before the stiffener dries, and leave the piece in place until it is rigid.
Can I change the crochet thread color?
Yes, color is an optional styling change. A different thread color may alter the finished appearance, but the approved pattern uses White.
How should I care for the finished ornament?
Dust it gently and store it dry in a protective container. Avoid soaking, crushing, or exposing it to excessive heat, because the stiffened lace needs to retain its shape.
Conclusion
These lacy crochet Christmas ornaments combine fine threadwork with simple seasonal finishing for an elegant handmade decoration. Choose the ornate cluster design, the airy daisy-chain design, or make both for a coordinated collection. Add ribbon in your favorite holiday color, display the finished pieces carefully, and consider exploring another delicate seasonal project such as this lace crochet snowflake ornament pattern.