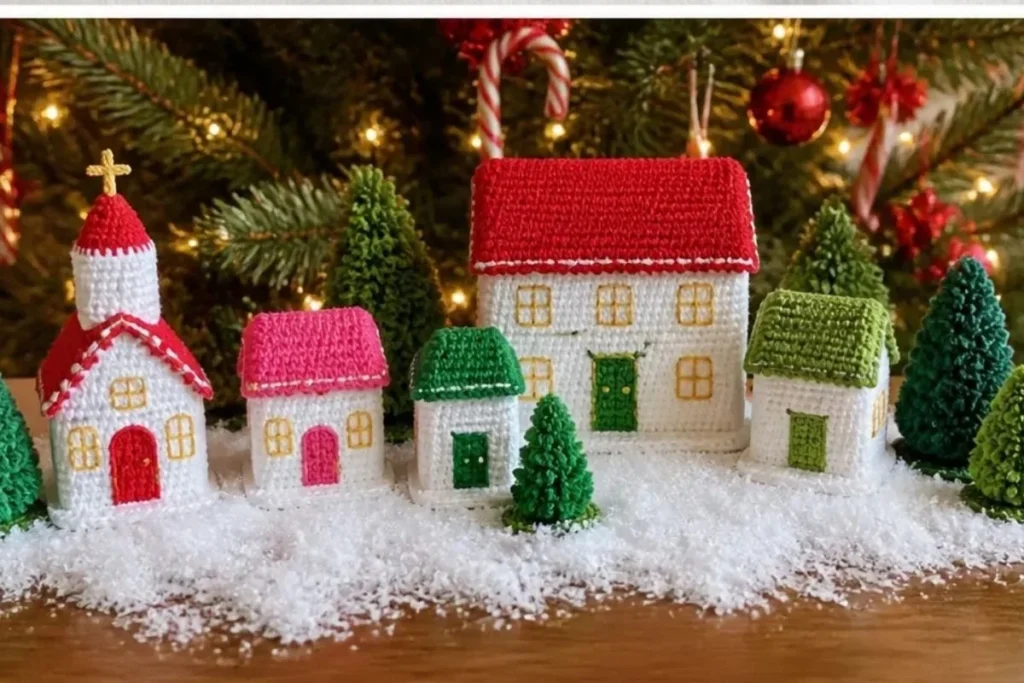
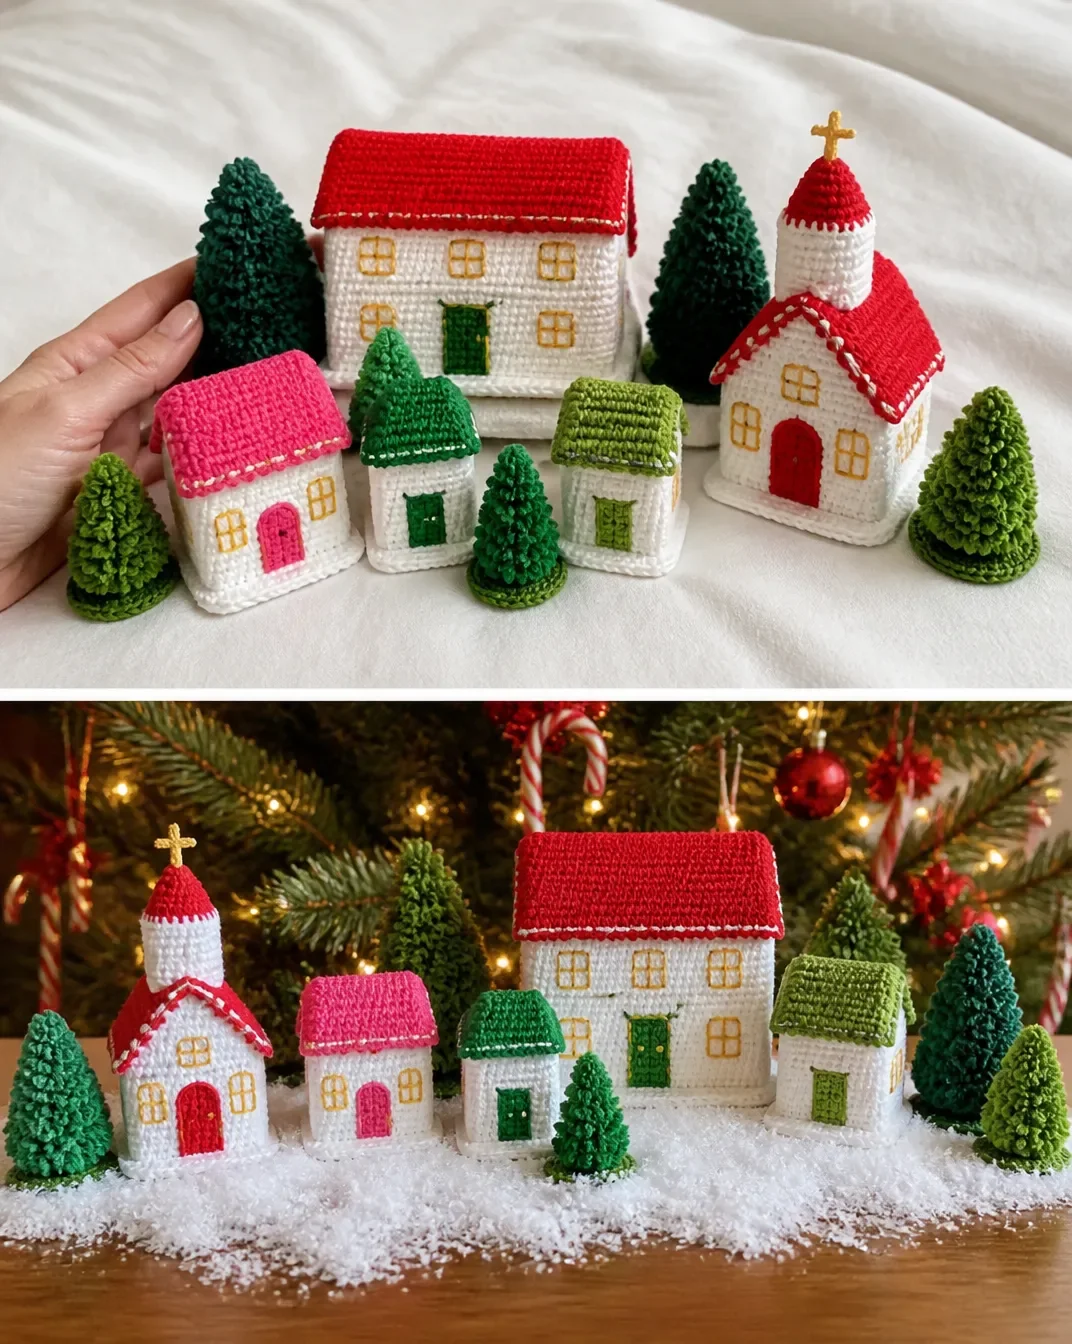
A festive crochet village brings miniature holiday architecture to life with colorful roofs, snowy walls, tiny windows, a church steeple, and pompom trees. This Festive Crochet Village Pattern for Christmas Decor creates three small buildings, one larger building, a church, and five trees for a charming mantel, shelf, or table display. The easy skill level makes it approachable for newer crocheters who want to practice shaping, seaming, appliqué, and simple three-dimensional construction. For another small seasonal crochet accent, you might also enjoy these crochet blooms for hair as part of a handmade gift collection.
Why You’ll Love This Crochet Project
This crochet Christmas village has several features that make it especially enjoyable:
- It creates a complete display. Rather than making one isolated ornament, you crochet buildings, a church, and trees that work together as a coordinated village.
- It practices useful beginner techniques. The pattern uses single crochet, single crochet decreases, slip-stitch joins, whipstitching, light stuffing, and simple color changes.
- The pieces are small and manageable. Each building is made from separate walls, a floor, and a roof, so you can work in short sessions.
- The color arrangement feels festive. Soft White walls contrast with Cherry Red, Shocking Pink, and green roofs, doors, and trees.
- It makes a thoughtful handmade gift. The finished village can be displayed year after year or packaged as a seasonal decoration.
My Crochet Flower Tip: Keep completed pieces in labeled groups for each building. This prevents the similar white wall pieces from becoming mixed together during assembly.
What to Know Before You Begin
The finished set includes three small buildings, one large building, one church with a steeple and cross, and five trees. The buildings are constructed from flat crocheted pieces that are joined into lightly stuffed forms. Windows and doors are sewn on afterward, while the roofs are joined separately before being attached to the walls.
The supplied skill level is EASY. The approximate finished sizes are:
- Small building: about 3½ inches (9 cm) tall
- Large building: about 5 inches (12.5 cm) tall
- Church with steeple: about 7 inches (18 cm) tall
- Tree: about 3½ inches (9 cm) tall
The main shaping technique is sc2tog, which means: draw up a loop in the next stitch twice, yarn over, and draw through all 3 loops on the hook.
Materials You’ll Need
Yarn
Use RED HEART® Super Saver®, one skein each of:
- 316 Soft White A
- 320 Cornmeal B
- 319 Cherry Red C
- 718 Shocking Pink D
- 368 Paddy Green E
- 672 Spring Green F
Tools and Other Supplies
- Susan Bates® crochet hook: 3.75 mm [US F-5]
- Stitch marker
- Hot glue gun and glue sticks, for trees only
- Pompom maker, optional, for trees only
- Polyester fiberfill
- Yarn needle
Complete Crochet Instructions
Work the pieces in the order given. The quantities in each heading are important because several components are repeated for the complete village.
Small Building
Make 3 small buildings.
Side Wall
Make 6, or 2 for each building.
With A, ch 9.
- Row 1: Sc in 2nd ch from hook and in each ch across, turn 8 sc.
- Rows 2–6: Ch 1, turn, sc in each st across, turn.
- Row 7: Ch 1, sc2tog, sc in next 4 sts, sc2tog, turn 6 sc.
- Row 8: Ch 1, sc2tog, sc in next 2 sts, sc2tog, turn 4 sc.
- Row 9: Ch 1, [sc2tog] twice, turn 2 sc.
- Row 10: Ch 1, sc2tog, turn 1 sc.
Border Round: Ch 1, skip the sc2tog, sc in end of first 4 rows across side edge, ch 2, sc in end of last 6 rows, ch 2; sc in each ch across opposite side of foundation ch, ch 2; sc in end of first 6 rows across next side edge, ch 2, sc in end of last 4 rows, ch 2; join with slip st in first sc 28 sc and 5 ch-2 spaces.
Fasten off.
Front Wall
Make 3, or 1 for each building.
With A, ch 15.
- Row 1: Sc in 2nd ch from hook and in each ch across, turn 14 sc.
- Rows 2–6: Ch 1, sc in each st across, turn.
Border Round: Ch 1, sc in each st across, ch 2; sc in end of each row across side edge, ch 2; sc in each ch across opposite side of foundation ch, ch 2; sc in end of each row across next side edge, ch 2; join with slip st in first sc 40 sc and 4 ch-2 spaces.
Fasten off.
Back Wall
Make 3, or 1 for each building.
Work same as Front Wall.
Floor
Make 3, or 1 for each building.
With A, ch 15.
- Row 1: Sc in 2nd ch from hook and in each ch across, turn 14 sc.
- Rows 2–8: Ch 1, sc in each st across, turn.
Border Round: Ch 1, sc in each st across, ch 2; sc in end of each row across side edge, ch 2; sc in each ch across opposite side of foundation ch, ch 2; sc in end of each row across next side edge, ch 2; join with slip st in first sc 44 sc and 4 ch-2 spaces.
Fasten off.
Roof Pieces
Make 6: 2 each with D, E, and F. Three roofs are made, with two roof pieces of the same color for each roof.
Ch 15.
- Row 1: Sc in 2nd ch from hook and in each ch across, turn 14 sc.
- Rows 2–4: Ch 1, sc in each st across, turn.
Border Round: Ch 1, sc in each st across, ch 2; sc in end of each row across side edge, ch 2; sc in each ch across opposite side of foundation ch, ch 2; sc in end of each row across next side edge, ch 2; join with slip st in first sc 36 sc and 4 ch-2 spaces.
Fasten off.
Join Two Roof Pieces: Hold two roof pieces of the same color together with rows and stitches matching. Working through both thicknesses and working into the 14 sts across the top edge of the pieces, join matching yarn with sc in first st of top edge, sc in next 13 sts.
Fasten off.
Large Building
Make 1 large building.
Side Walls
Make 2.
With A, ch 9.
- Row 1: Sc in 2nd ch from hook and in each ch across, turn 8 sc.
- Rows 2–12: Ch 1, turn, sc in each st across, turn.
- Row 13: Ch 1, sc2tog, sc in next 4 sts, sc2tog, turn 6 sc.
- Row 14: Ch 1, sc2tog, sc in next 2 sts, sc2tog, turn 4 sc.
- Row 15: Ch 1, [sc2tog] twice, turn 2 sc.
- Row 16: Ch 1, sc2tog, turn 1 sc.
Border Round: Ch 1, skip the sc2tog, sc in end of first 4 rows across side edge, ch 2, sc in end of last 12 rows, ch 2; sc in each ch across opposite side of foundation ch, ch 2; sc in end of first 12 rows across next side edge, ch 2, sc in end of last 4 rows, ch 2; join with slip st in first sc 40 sc and 5 ch-2 spaces.
Fasten off.
Front Wall
Make 1.
With A, ch 15.
- Row 1: Sc in 2nd ch from hook and in each ch across, turn 14 sc.
- Rows 2–12: Ch 1, sc in each st across, turn.
Border Round: Ch 1, sc in each st across, ch 2; sc in end of each row across side edge, ch 2; sc in each ch across opposite side of foundation ch, ch 2; sc in end of each row across next side edge, ch 2; join with slip st in first sc 52 sc and 4 ch-2 spaces.
Fasten off.
Back Wall
Make 1.
Work same as Front Wall.
Floor
Make 1.
Work same as Floor for Small Building.
Roof Pieces
Make 2.
With C, work and join same as Roof Pieces for Small Building.
Church
Side Walls
Make 2.
Work same as Front Wall for Small Building.
Front Wall
Make 1.
Work same as Side Wall for Small Building.
Back Wall
Make 1.
Work same as Side Wall for Small Building.
Floor
Make 1.
Work same as Floor for Small Building.
Roof Pieces
Make 2.
With C, work and join same as Roof Pieces for Small Building.
Steeple
Make 1.
With A, ch 2.
- Round 1: Work 6 sc in 2nd ch from hook; join with slip st in first sc 6 sc.
- Rounds 2 and 3: Ch 1, sc in each st around; join with slip st in first sc.
- Round 4: Ch 1, [2 sc in next sc, sc in next 2 sc] twice; join with slip st in first sc 8 sc.
- Rounds 5 and 6: Ch 1, sc in each st around; join with slip st in first sc.
- Round 7: Ch 1, sc in next st, (hdc, dc) in next st, (dc, hdc) in next st, sc in next 2 sts, (hdc, dc) in next st, (dc, hdc) in next st, sc in next st; join with slip st in first sc 12 sts.
- Round 8: Ch 1, sc in next st, hdc in next st, 2 dc in each of next 2 sts, hdc in next st, sc in next 2 sts, hdc in next st, 2 dc in each of next 2 sts, hdc in next st, sc in next st; join with slip st in first sc 16 sts.
Fasten off.
Cross
Make 1.
With B, ch 6, place a marker in the 3rd ch from hook, slip st in 2nd ch from hook, slip st in marked ch, ch 3, slip st in 2nd ch from hook, slip st in next ch, slip st in marked ch, ch 2, slip st in 2nd ch from hook, slip st in marked ch, slip st in remaining 3 ch.
Fasten off.
Windows
Make 42: 7 for each small building, 15 for the large building, and 6 for the church.
With B, ch 4.
- Row 1: Sc in 2nd ch from hook and in each ch across, turn 3 sc.
- Row 2: Ch 1, sc in each st across.
Fasten off.
Doors
Make 5: 2 with C and 1 each with D, E, and F.
The C-colored doors are for one small building and the church. The D-colored door is for one small building, the E-colored door is for the large building, and the F-colored door is for one small building.
Ch 4.
- Row 1: Sc in 2nd ch from hook and in each ch across, turn 3 sc.
- Rows 2–5: Ch 1, sc in each st across.
Fasten off.
Trees
Make 5: 3 with E and 2 with F.
Tree Bases
Make 5: 3 with E and 2 with F.
Ch 2.
- Round 1: Work 6 sc in 2nd ch from hook; join with slip st in first sc 6 sc.
- Round 2: Ch 1, 2 sc in each st around; join with slip st in first sc 12 sc.
- Round 3: Ch 1, [sc in next st, 2 sc in next st] 6 times; join with slip st in first sc 18 sc.
- Round 4: Ch 1, [sc in next 2 sts, 2 sc in next st] 6 times 24 sc.
Fasten off.
Pompoms
Make 25: 15 with E and 10 with F. Five pompoms are used for each of the five trees.
Use a pompom maker to make small pompoms, or make them by hand:
- Cut a length of yarn about 6 inches (15 cm) long and set it aside.
- Wrap yarn around two fingers 30 times.
- Carefully slip the wraps from your fingers and tie the 6-inch (15 cm) length tightly around the center of the wraps.
- Cut the ends of the wraps and shake to fluff the pompom.
- Do not trim the pompom until after the tree is assembled.
Assembly and Finishing
Small Building Assembly
- Hold Floor and Front Wall together with stitches of the lower long edge matching. Working through both thicknesses, join A with slip st in first st of long edge, slip st in each st across to join.
- Join Side Walls and Back Wall to Floor in the same manner as Front Wall was joined to Floor.
- Join the four corners of the Walls in the same manner.
- Whipstitch Door close to one end of Front Wall.
- Whipstitch two Windows to the remaining part of Front Wall. Whipstitch three Windows evenly spaced across Back Wall. Whipstitch one Window to each of the two Side Walls.
- With the same color as Door, embroider an outline around each Window.
- Stuff the piece lightly. It is better to under stuff than over stuff.
- Place Roof on top of Building with stitches matching. Working through both thicknesses, inserting the hook through the Wall stitch first and then into the corresponding Roof stitch, join same-color yarn as Roof with sc in any stitch, sc in each stitch all the way around, working (2 sc, ch 1, 2 sc) at each of the four corners.
Large Building Assembly
1–3. Work same as steps 1–3 of Small Building Assembly. 4. Whipstitch Door to the center of Front Wall. 5. Whipstitch one Window on each side of Door of Front Wall. Whipstitch three Windows evenly spaced above the Door and the other two Windows of Front Wall. Whipstitch six Windows, in two rows of three Windows each, evenly spaced across Back Wall. Whipstitch two Windows, one above the other, to each of the two Side Walls. 6–8. Work same as steps 6–8 of Small Building Assembly.
Church Assembly
1–3. Work same as steps 1–3 of Small Building Assembly. 4. Whipstitch Door to the center of Front Wall. 5. Whipstitch three Windows evenly spaced across each of the two Side Walls. 6–8. Work same as steps 6–8 of Small Building Assembly. 9. Lightly stuff Steeple. Whipstitch Steeple to Roof near the front of Church. 10. Whipstitch Cross to the top of Steeple.
Tree Assembly
- Hot glue three Pompoms onto Base. Let glue set and cool.
- Hot glue one Pompom on top and at the center of the first three Pompoms. Let glue set and cool.
- Hot glue one more Pompom on top of the last Pompom that was glued in place. Let glue set and cool.
- Trim Pompoms to shape Tree.
- Weave in any remaining ends.
Finished Project Inspiration
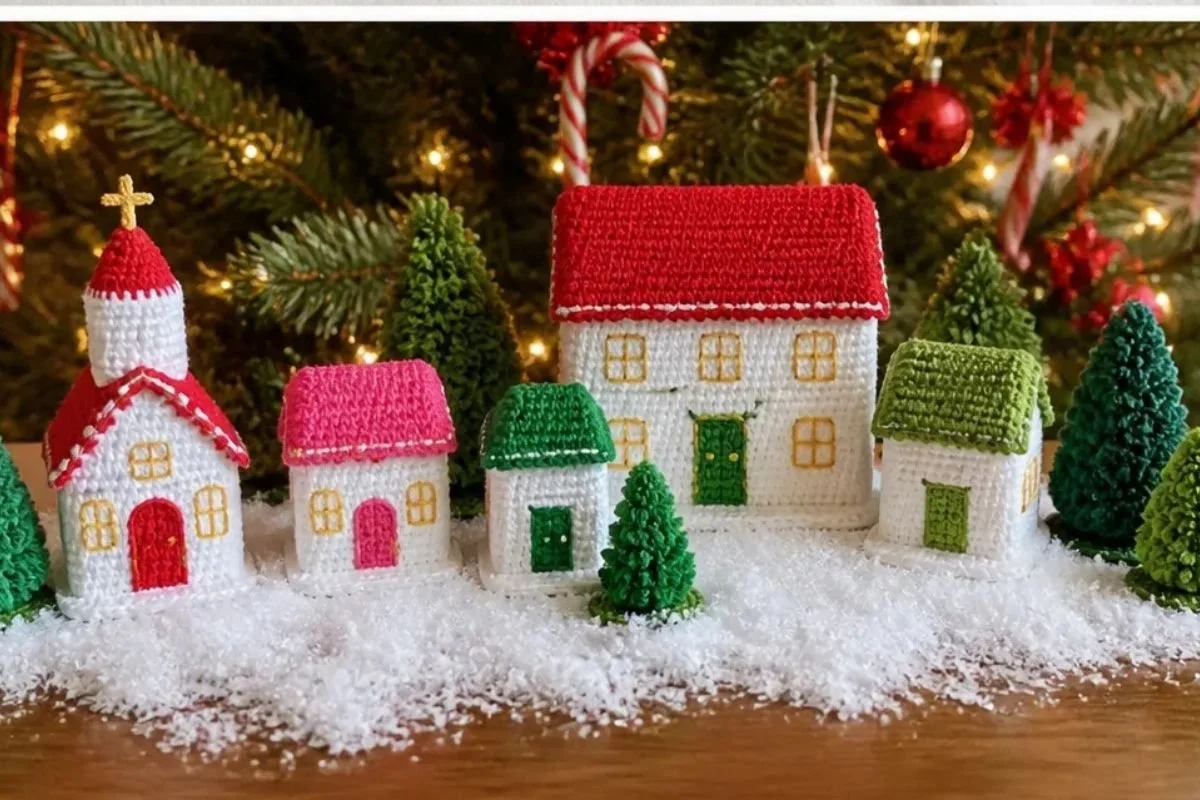
- Arrange the buildings in a staggered village scene, placing the church toward the back so its steeple is visible.
- Create a Christmas mantel display with the village centered between greenery, candles, or other seasonal decorations.
- Use a shallow tray to make the pieces easy to move and to give the village a defined footprint.
- Place the buildings and trees on a holiday table as a miniature centerpiece.
- Package one small building with a tree as a handmade seasonal gift.
- Add the village to a bookshelf or entryway console where the different building heights can be appreciated.
For another colorful handmade display concept, a 3D flower granny square color chart can inspire coordinated holiday palettes for other crochet decorations.
Caring for Your Crochet Project
Dust the village gently with a soft brush, microfiber cloth, or a cool-air handheld vacuum used at a distance. Pay special attention to the windows, embroidered outlines, steeple, cross, and pompom trees.
For small marks, use careful spot cleaning rather than soaking the buildings. The pieces contain polyester fiberfill, and the trees are assembled with hot glue, so avoid machine washing, vigorous scrubbing, and immersion in water. Keep the village away from excessive heat, open flames, and hot lights.
Store the pieces in a dry container with enough room to prevent crushing the roofs and pompoms. Wrap delicate trees loosely in tissue paper, and avoid placing heavy decorations on top of the church steeple or stuffed buildings.
Tips for Better Results
- Count every shaped row. The side walls rely on a sequence of decreases, so check for 6, 4, 2, and 1 stitch at the specified points.
- Keep border corners clear. The ch-2 spaces create the corners needed for joining the flat pieces into buildings.
- Match pieces before seaming. Place the floor, front wall, side walls, and back wall together so their stitch counts and edges line up before joining.
- Stuff lightly. Overstuffing can distort the walls and make the roof difficult to attach. The pattern specifically recommends under stuffing rather than over stuffing.
- Organize windows by building. Set aside 7 windows for each small building, 15 for the large building, and 6 for the church.
- Use the correct yarn color for each door. The color placement distinguishes the buildings and follows the pattern’s intended festive arrangement.
- Wait for glue to cool completely. When making the trees, let each glued layer set before adding the next pompom.
- Trim trees gradually. Shape the pompoms after assembly so the three-dimensional form remains balanced.
Additional handmade accessories, such as a crochet bouquet wrap, can also complement a gift presentation without changing the approved village pattern.
Creative Ways to Customize Your Project
The approved instructions use the specified RED HEART® Super Saver® colors, but you can make optional styling changes after deciding how you want the finished display to look.
- Use a limited palette of Soft White, Cherry Red, and green for a traditional Christmas village.
- Choose one roof color for all three small buildings if you prefer a more coordinated architectural display.
- Use contrasting door colors to make each small building visually distinct.
- Arrange the green pompom trees in different positions around the buildings rather than placing them in identical rows.
- Display the village on a white, green, or natural wood-colored base to change the overall mood.
- Add other handmade seasonal decorations nearby, keeping enough space around the buildings so the windows and roof colors remain visible.
Changing yarn or hook size is optional, but it can affect stitch tension, finished dimensions, roof fit, stuffing requirements, and the proportions between buildings and trees.
Frequently Asked Questions
Is this crochet Christmas village suitable for beginners?
Yes. The supplied skill level is EASY. Beginners should be comfortable with single crochet, chains, slip stitches, decreases, whipstitching, and working in joined rounds.
What hook size does the pattern use?
Use a Susan Bates® crochet hook measuring 3.75 mm, or US F-5.
How many buildings are included?
The complete project includes three small buildings, one large building, and one church. It also includes five trees.
How many windows are needed?
Make 42 windows total: 7 for each small building, 15 for the large building, and 6 for the church.
Can the yarn colors be changed?
Yes, color changes are an optional variation. Keep track of the letter assignments if you change colors, because the pattern uses A through F for walls, roofs, doors, windows, trees, and the cross.
How are the buildings assembled?
The floor is joined to the front wall first, followed by the side walls and back wall. The wall corners are then joined, doors and windows are whipstitched in place, the building is lightly stuffed, and the roof is attached with single crochet.
How are the trees made?
Each tree has a crocheted circular base and five small pompoms. Three pompoms are glued onto the base, one is placed above them, and one is added on top. The assembled tree is trimmed to shape.
How should the finished village be cleaned?
Dust it gently and use careful spot cleaning for small marks. Avoid soaking, machine washing, and excessive heat, especially because the trees use hot glue and the buildings are lightly stuffed.
Conclusion
This festive crochet village combines simple stitches with thoughtful shaping and colorful finishing details. The buildings, church, steeple, windows, doors, and pompom trees create a display with plenty of character for a holiday mantel or table. Once your village is complete, you can explore more seasonal inspiration through this Christmas village crochet pattern collection and continue building a handmade holiday scene.