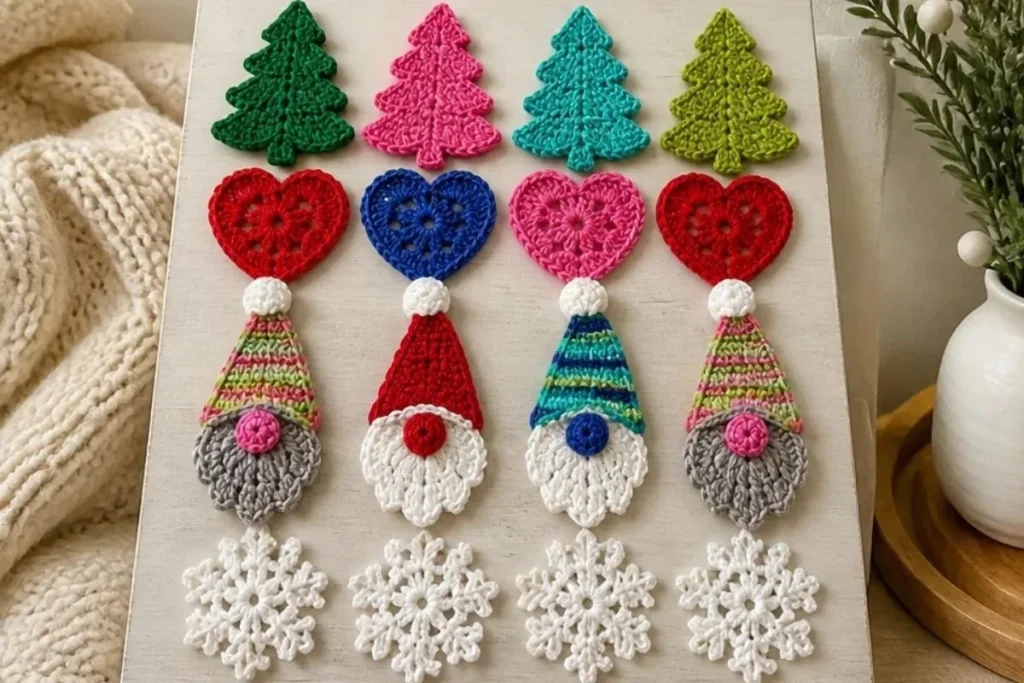
Christmas crochet appliques are a cheerful way to add handmade personality to holiday projects. This Ho Ho Holiday Santas pattern includes four festive motifs: a shaped Christmas tree, a granny square heart, a snowflake, and a charming gnome with a striped or solid hat. Use them on gift bags, stockings, cards, wreaths, garments, or seasonal wall décor. Crocheters who enjoy small, clearly shaped projects may also like these crochet flower appliques for year-round embellishing.
Why You’ll Love This Crochet Project
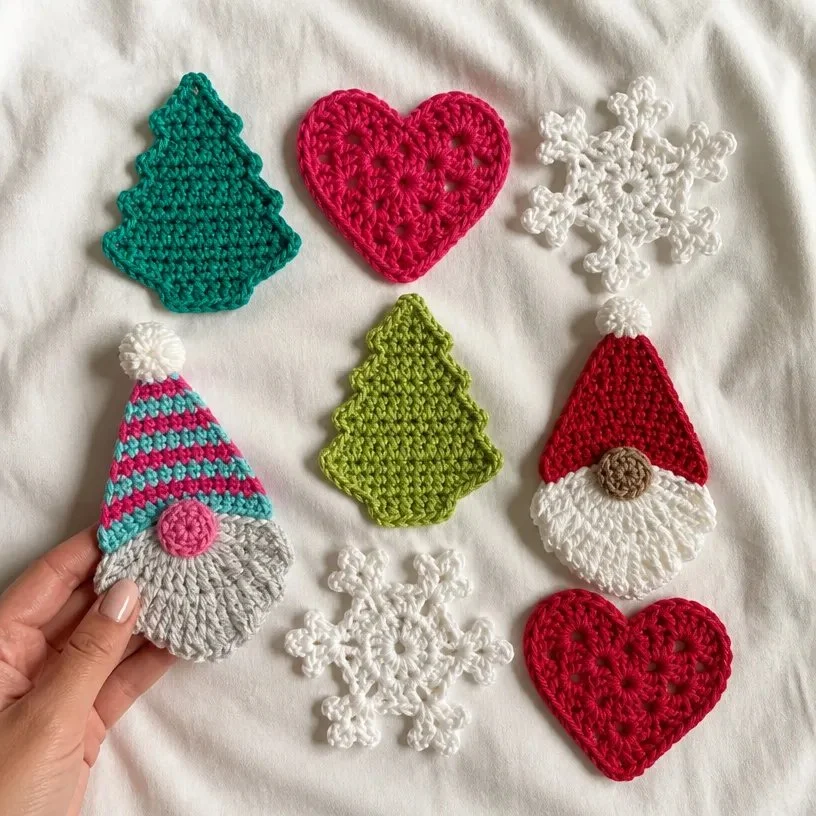
- Four decorative motifs in one pattern: Make a tree, heart, snowflake, and gnome to create a coordinated holiday collection.
- Useful shaping practice: The tree uses short rows and decreases, while the heart and gnome introduce granny-square construction.
- Flexible color planning: Choose traditional red and white, bright jewel tones, or a playful pink-and-green palette.
- Gift-friendly scale: The finished motifs are large enough to notice but small enough for quick seasonal decorating.
- Versatile finishing: Sew them onto fabric items, use them as ornaments, or arrange them as part of a holiday display.
My Crochet Flower Tip: Block or gently shape each motif before attaching it. Even small appliques look more polished when their edges are smooth and their points are clearly defined. You may also find Crochet Bloomin Shoe Appliques Pattern useful.
Before You Start Crocheting
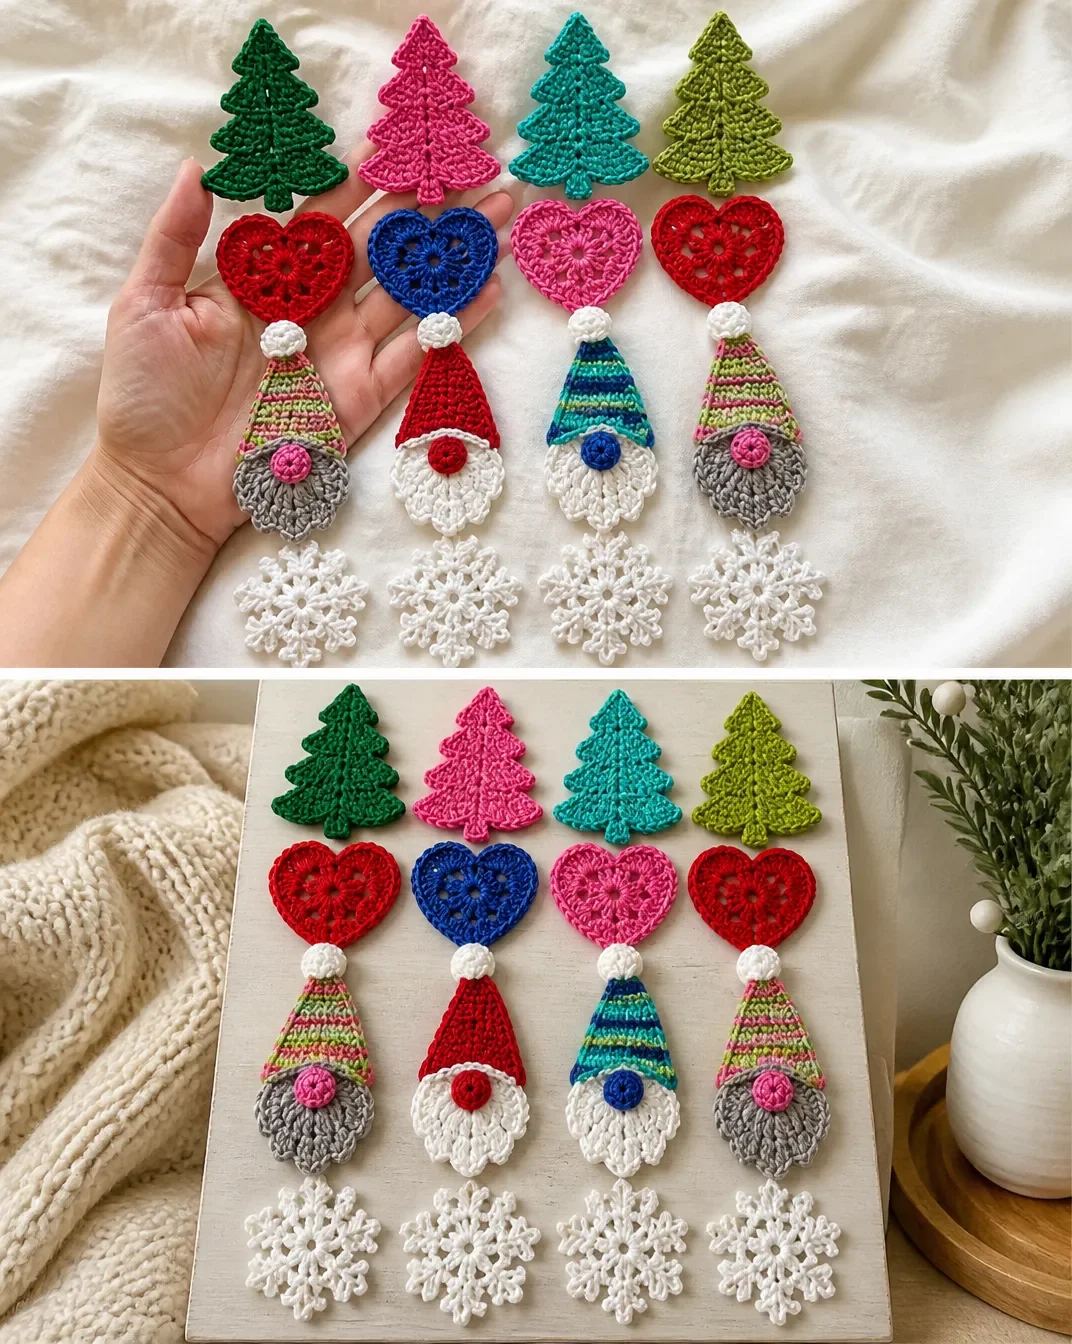
The pattern makes four separate appliques:
- Tree: approximately 5″ x 6″ [12.5 x 15 cm]
- Heart: approximately 5″ x 5″ [12.5 x 12.5 cm]
- Snowflake: approximately 4″ x 4″ [10 x 10 cm]
- Gnome: approximately 4″ x 8″ [10 cm x 20.5 cm]
The tree is crocheted in two connected sides. The heart and gnome beard begin with granny-square-style rounds worked into a magic loop. The gnome is completed with a row-worked hat, a separate nose, and a pom-pom. The snowflake is built from a 12-single-crochet center followed by chain spaces and pointed motifs.
The supplied pattern uses a size U.S. H/8 (5 mm) Susan Bates® Silvalume® crochet hook, or the size needed to obtain gauge.
Stitch Key
The diagrams use these symbols and abbreviations:
- ch: chain
- sl st: slip stitch
- sc: single crochet
- dc: double crochet
- tr: treble crochet
The pattern diagrams also show working in the back loop only and the magic loop.
Materials You’ll Need
Yarn
- Red Heart® Super Saver® Super Craft Kit™: set includes 12 balls, 1.7 oz/50 g each; 21 oz/600 g total
- Yardage in kit: 93 yds/85 m each ball; 1116 yds/1020 m total
- The following yardages are per single applique; the kit will make multiples.
Tree approximately 5″ x 6″ [12.5 x 15 cm]
- Jade, Shocking Pink, or Spring Green: 1 ball or 17 yds/15.5 m
Heart approximately 5″ x 5″ [12.5 x 12.5 cm]
- Cherry Red, Royal, or Shocking Pink: 1 ball or 15 yds/4.5 m
Snowflake approximately 4″ x 4″ [10 x 10 cm]
- Soft White: 1 ball or 10 yds/9 m
Gnome approximately 4″ x 8″ [10 cm x 20.5 cm]
- Beard: Soft White or Gray Heather 1 ball or 8 yds/7.5 m
- Striped hat, Contrast A: Jade or Spring Green 1 ball or 6 yds/5.5 m
- Striped hat, Contrast B: Shocking Pink or Royal 1 ball or 6 yds/5.5 m
- Solid hat: Cherry Red 1 ball or 6 yds/5.5 m
- Nose, Contrast C: Cherry Red, Shocking Pink, or Caffé Late 1 ball or 6 yds/5.5 m
- Pom-pom: Soft White
Tools and Notions
- Size U.S. H/8 (5 mm) Susan Bates® Silvalume® crochet hook, or size needed to obtain gauge
- Susan Bates® yarn needle
Complete Crochet Instructions
Work each applique according to the instructions below. Keep track of row and round counts, especially in the tree and gnome sections.
Tree
Right Side of Tree
With Jade, Shocking Pink, or Spring Green, ch 7.
- 1st row: Ch 1. 1 sc in 2nd ch from hook and each ch to end of chain. Turn. 6 sc.
- 2nd and 3rd rows: Ch 1. 1 sc in each sc to end of row. Turn.
- 4th row: Ch 6. Working in back of chain, 1 sc in 2nd ch from hook and each of next 4 ch. 1 sc in each of next 3 sc. Turn. Leave rem 3 sts unworked.
- 5th row: Ch 1. 1 sc in each of next 6 sc. Sc2tog. Turn. 7 sts.
- 6th row: Ch 1. Sc2tog. 1 sc in each of next 5 sc. Turn. 6 sts.
- 7th row: Ch 1. 1 sc in each of next 4 sc. Sc2tog. Turn. 5 sts.
- 8th row: Ch 1. Sc2tog. 1 sc in each of next 3 sc. Turn. 4 sts.
- 9th row: Ch 1. 1 sc in each of next 4 sts. Turn.
- 10th row: Ch 4. 1 sc in 2nd ch from hook and each of next 2 ch. 1 sc in each of next 4 sc. Turn. 7 sc.
- 11th row: Ch 1. 1 sc in each of next 5 sc. Sc2tog. Turn. 6 sts.
- 12th row: Ch 1. Sc2tog. 1 sc in each of next 4 sc. Turn. 5 sts.
- 13th row: Ch 1. 1 sc in each of next 3 sc. Sc2tog. Turn. 4 sts.
- 14th row: Ch 1. Sc2tog. 1 sc in each of next 2 sc. Turn. 3 sts.
- 15th row: Ch 1. 1 sc in each of next 3 sc. Turn.
- 16th row: Ch 3. 1 sc in 2nd ch from hook and next ch. 1 sc in each of next 3 sc. Turn. 5 sc.
- 17th row: Ch 1. 1 sc in each of next 3 sc. Sc2tog. Turn. 4 sts.
- 18th row: Ch 1. Sc2tog. 1 sc in each of next 2 sc. Turn. 3 sts.
- 19th row: Ch 1. 1 sc in next sc. Sc2tog. Turn. 2 sts.
- 20th row: Ch 1. Sc2tog.
Fasten off, leaving a 16″ [40.6 cm] tail.
Left Side of Tree
With RS facing, join yarn with sl st at last unworked sc of 3rd row.
- 1st row: Ch 6. Working in back of chain, 1 sc in 2nd ch from hook and each of next 4 ch. 1 sc in each of next 3 sc. Sl st to corresponding sc of 4th row of Right Side Of Tree. Turn.
- 2nd row: Ch 1. 1 sc in each of next 6 sc. Sc2tog. Turn. 7 sts.
- 3rd row: Ch 1. Sc2tog. 1 sc in each of next 5 sc. Sl st to corresponding sc of 6th row of Right Side Of Tree. Turn. 6 sts.
- 4th row: Ch 1. 1 sc in each of next 4 sc. Sc2tog. Turn. 5 sts.
- 5th row: Ch 1. Sc2tog. 1 sc in each of next 3 sc. Sl st to corresponding sc of 8th row of Right Side Of Tree. Turn. 4 sts.
- 6th row: Ch 1. 1 sc in each of next 4 sts. Turn.
- 7th row: Ch 4. 1 sc in 2nd ch from hook and each of next 2 ch. 1 sc in each of next 4 sc. Sl st to corresponding sc of 10th row of Right Side Of Tree. Turn. 7 sc.
- 8th row: Ch 1. 1 sc in each of next 5 sc. Sc2tog. Turn. 6 sts.
- 9th row: Ch 1. Sc2tog. 1 sc in each of next 4 sc. Sl st to corresponding sc of 12th row of Right Side Of Tree. Turn. 5 sts.
- 10th row: Ch 1. 1 sc in each of next 3 sc. Sc2tog. Turn. 4 sts.
- 11th row: Ch 1. Sc2tog. 1 sc in each of next 2 sc. Sl st to corresponding sc of 14th row of Right Side Of Tree. Turn. 3 sts.
- 12th row: Ch 1. 1 sc in each of next 3 sc. Turn.
- 13th row: Ch 3. 1 sc in 2nd ch from hook and next ch. 1 sc in each of next 3 sc. Sl st to corresponding sc of 16th row of Right Side Of Tree. Turn. 5 sc.
- 14th row: Ch 1. 1 sc in each of next 3 sc. Sc2tog. Turn. 4 sts.
- 15th row: Ch 1. Sc2tog. 1 sc in each of next 2 sc. Sl st to corresponding sc of 18th row of Right Side Of Tree. Turn. 3 sts.
- 16th row: Ch 1. 1 sc in next sc. Sc2tog. Turn. 2 sts.
- 17th row: Ch 1. Sc2tog. Sl st to top of Right Side Of Tree. Fasten off.
Granny Square Heart
Magic Loop Setup and Rounds
- 1st rnd: Ch 3. 3 dc in magic loop. (Ch 2. 4 dc) 3 times in magic loop. Ch 2. Join. Pull tail to tighten, closing center hole.
- 2nd rnd: Sl st through back loop only in each dc to corner ch-2 sp. Ch 3. (3 dc. Ch 2. 4 dc) in same sp as last sl st. [(Ch 2. 4 dc) twice in next ch-2 sp] 3 times. Ch 2. Join.
- 3rd rnd: Ch 1. 1 sc in same sp as sl st. 1 sc in each of next 3 dc. 3 sc in next ch-2 sp. 1 sc in each of next 4 dc. 2 sc in next ch-2 sp. 1 sc in each of next 4 dc. Sl st in next ch-2 sp. (Skip next 4 dc. 12 tr in next ch-2 sp. Skip next 4 dc. Sl st in next ch-2 sp) twice. 1 sc in each of next 4 dc. 2 sc in next ch-2 sp. Join with sl st to first sc. Fasten off.
Gnome
Beard
With MC, make Magic Loop. Video here.
- 1st rnd: Ch 3. 3 dc in magic loop. (Ch 2. 4 dc) 3 times in magic loop. Ch 2. Join. Pull tail to tighten, closing center hole.
- 2nd rnd: Sl st through back loop only in each dc to corner ch-2 sp. Ch 3. 3 dc in same sp as last sl st. Skip next 4 dc. 12 tr in next ch-2 sp. Skip next 4 dc. 4 dc in next ch-2 sp. Join A.
Do not fasten off.
Hat
Work the hat in rows.
- 1st row: With A, ch 10. Skip next (4 dc, ch-2, 4 dc). Join with sl st to first dc of 2nd rnd. Turn. Cont working in rows.
- 2nd row: Ch 2. 15 dc in ch-10 sp. Join B. Break A. Turn. 15 dc.
- 3rd row: With B, ch 2. Dc2tog. 1 dc in each of next 11 dc. Dc2tog. Join A. Break B. Turn. 13 sts.
- 4th row: With A, ch 2. Dc2tog. 1 dc in each of next 9 dc. Dc2tog. Join B. Break A. Turn. 11 sts.
- 5th row: With B, ch 2. Dc2tog. 1 dc in each of next 7 dc. Dc2tog. Join A. Break B. Turn. 9 sts.
- 6th row: With A, ch 2. Dc2tog. 1 dc in each of next 5 dc. Dc2tog. Join B. Break A. Turn. 7 sts.
- 7th row: With B, ch 2. Dc2tog. 1 dc in each of next 3 dc. Dc2tog. Join A. Break B. Turn. 5 sts.
- 8th row: With A, ch 2. Skip first st Dc3tog. Ch 2. Sl st to top of last st. Fasten off.
Nose
With C, make Magic Loop.
- 1st rnd: Ch 1. 10 sc in magic loop. Join with sl st to first sc. Fasten off, leaving a generous tail to sew nose on and pull through loop. Center nose below hat on top of the two 4-dc in 1st rnd of Granny Square. Stitch into place. Weave in ends.
Pom-Pom
With Soft White, make Magic Loop.
- 1st rnd: Ch 3. 11 dc in magic loop. Join with sl st to top of ch-3. Fasten off, leaving a generous tail to sew pom-pom on and pull through loop. Stitch to tip of hat, weave in ends.
Snowflake
Setup and First Round
With Soft White, make Magic Loop.
- 1st rnd: Ch 1. 12 sc in magic loop. Join with sl st to first sc. 12 sc.
Second Round
- 2nd rnd: Ch 5. Skip first 2 sc. Sl st in next sc.
(Ch 5. Skip next sc. Sl st in next sc) 5 times.
Ch 5. Skip last sc. Join with sl st to first st of 1st rnd. 6 ch-5 sps.
Third Round
- 3rd rnd: (Sl st. Ch 1. 2 sc. Ch 3. 1 sc. Ch 5. 1 sc. Ch 3. 2 sc) all in first ch-5 sp.
*(2 sc. Ch 3. 1 sc. Ch 5. 1 sc. Ch 3. 2 sc) all in next ch-5 sp. Rep from * around. Join with sl st to first sc. Fasten off. Weave in ends.
Handmade Gift and Decoration Ideas
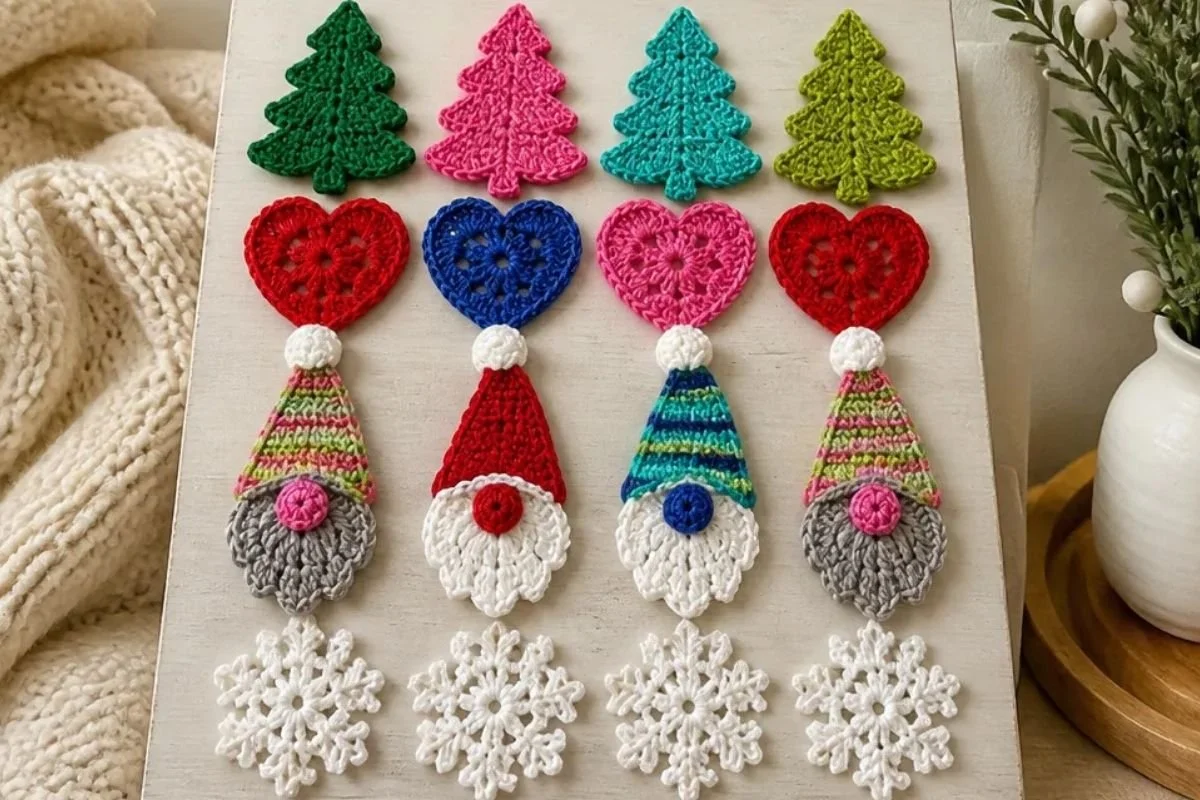
- Sew the tree and heart onto gift bags, fabric stockings, or holiday cards.
- Use the snowflake as a tree ornament by adding a small hanging loop with the same yarn.
- Arrange the gnome, tree, heart, and snowflake together on a seasonal wall hanging or banner.
- Attach one motif to a wrapped present as a reusable gift topper.
- Stitch several appliques onto a plain winter sweater, scarf, or jacket, following the care needs of the finished fabric item.
- Pair the holiday motifs with other handmade accessories, such as a crochet Grinch hat, for a playful seasonal set.
Caring for Your Crochet Project
- Remove dust with a soft brush, lint roller, or gentle vacuum attachment.
- Spot-clean carefully rather than soaking the appliques.
- Avoid excessive heat, which can distort the stitches and change the shape.
- Store the motifs flat in a dry container when they are not being displayed.
- Keep the gnome’s pom-pom and snowflake points from catching on rough surfaces.
- Before attaching an applique to clothing or fabric, consider the washing instructions for the finished item and the yarn manufacturer’s care instructions.
Tips for Better Results
- Check the stitch count after shaping rows. The tree changes frequently, so confirming the stated count helps preserve its stepped silhouette.
- Keep the tree’s two sides aligned. The left side joins to corresponding rows on the right side; use the row numbers as a guide.
- Work the heart’s second round through the back loop only. This placement is part of the approved construction and helps define the round.
- Tighten every magic loop carefully. Pull the starting tail to close the center hole, then secure the end during finishing.
- Mark color changes in the gnome hat. The striped hat alternates A and B, and each row has a specific stitch count.
- Leave generous sewing tails where instructed. The nose and pom-pom require enough yarn to attach them securely and pull through the loop.
- Shape the snowflake points gently. Arrange the six chain-space sections evenly before securing the final ends.
- Weave in ends on the wrong side whenever possible. This keeps the visible surface neat and prevents loose tails from showing through.
Creative Ways to Customize Your Project
The approved pattern already allows several color choices. For the tree, use Jade, Shocking Pink, or Spring Green. For the heart, choose Cherry Red, Royal, or Shocking Pink. The snowflake remains Soft White, while the gnome can use Soft White or Gray Heather for the beard and either a striped or solid hat.
For optional styling changes:
- Use traditional red, white, and green for a classic Christmas palette.
- Combine Shocking Pink, Royal, and Soft White for a brighter modern display.
- Make several trees in different approved colors for a colorful garland.
- Use a Soft White snowflake beside a Cherry Red heart for a simple two-color arrangement.
- Choose the striped gnome hat for extra contrast or the Cherry Red solid hat for a more traditional look.
If you substitute yarn or change the hook size, the stitch tension, texture, yarn requirements, and finished dimensions may change. Treat those adjustments as optional modifications rather than changes to the approved instructions.
Frequently Asked Questions
Is this Christmas crochet appliques pattern suitable for a beginner?
It includes beginner-accessible single crochet, double crochet, treble crochet, chain spaces, decreases, slip stitches, and magic loops. The tree’s shaping and the gnome’s color changes require careful counting.
What hook size does the pattern use?
Use a size U.S. H/8 (5 mm) Susan Bates® Silvalume® crochet hook, or the size needed to obtain gauge.
How many motifs does the pattern include?
The pattern includes one tree, one granny square heart, one gnome, and one snowflake. You may repeat any component to create a larger coordinated display.
Can I change the colors?
Yes. The supplied choices include Jade, Shocking Pink, Spring Green, Cherry Red, Royal, Soft White, Gray Heather, and Caffé Late. Keep the color roles clear when making the gnome’s hat, nose, beard, and pom-pom.
Does the gnome have to use a striped hat?
No. The pattern provides both a striped hat using Contrast A and Contrast B and a solid Cherry Red hat.
How is the gnome assembled?
The beard is worked first, followed by the hat. Make the nose separately, center it below the hat over the two 4-dc groups in the first granny-square round, and stitch it into place. Make the Soft White pom-pom separately and stitch it to the hat tip.
How should I keep the appliques neat?
Tighten magic loops, maintain even tension, count stitches after each shaping row, and weave in all ends securely. Gentle shaping before display can also help define the tree, heart, snowflake, and gnome.
Can I use a different yarn?
A different yarn may work, but it can alter gauge, texture, dimensions, and yarn requirements. For the closest result, use the specified Red Heart® Super Saver® Super Craft Kit™ and the recommended hook size.
Conclusion
These Christmas crochet appliques combine simple holiday shapes with engaging details, from the tree’s stepped shaping to the gnome’s striped hat and pom-pom. Display them on gifts, clothing, cards, or seasonal décor, or make multiples in different color combinations. For another festive project to pair with these motifs, explore this free crochet Christmas tree and Santa hat pattern.