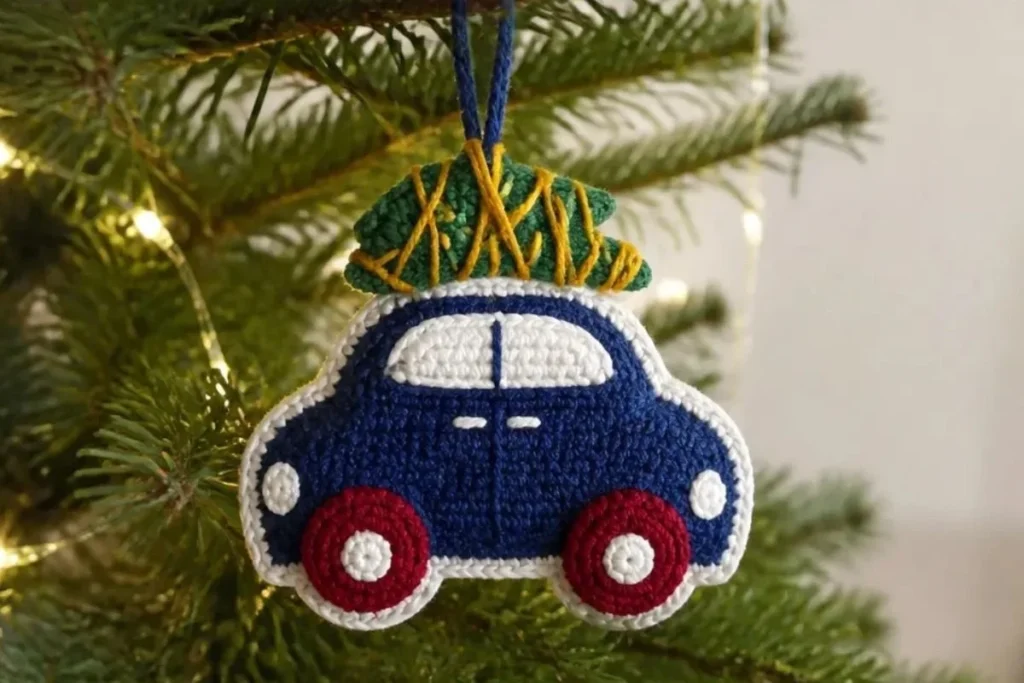
A charming little car carrying a Christmas tree makes this Crochet Christmas Ornament Pattern: Home for the Holidays a festive addition to any tree. The ornament combines cozy holiday colors with simple single crochet shaping, embroidered details, and a hanging loop. It is a practical project for crocheters who enjoy small decorative makes, and it can also become a thoughtful handmade gift. For another small seasonal accessory, compare the design ideas in these crochet blooms for hair.
Why You’ll Love This Crochet Project
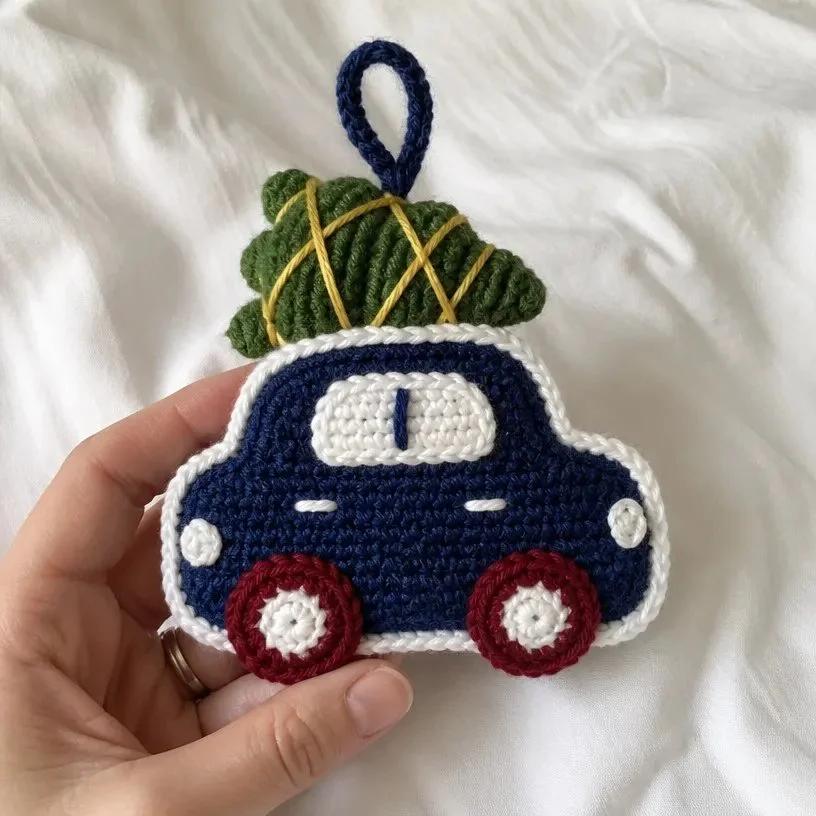
- It uses approachable techniques. The ornament is built with single crochet, decreases, simple shaping, sewing, and embroidery.
- The design is instantly seasonal. A car, wheels, window, lights, door details, and evergreen tree create a recognizable holiday scene.
- It makes a thoughtful handmade gift. Finished ornaments are easy to package with a card, add to a gift basket, or give as a keepsake.
- It offers useful color practice. Navy, white, green, burgundy, and gold create a classic winter palette while giving each detail a clear purpose.
- It is easy to display. The finished hanging loop allows the ornament to go directly onto a Christmas tree, wreath, garland, or seasonal branch arrangement.
My Crochet Flower Tip: Keep a small yarn needle nearby while crocheting. Because this design includes several embroidered and sewn details, finishing each component as you go can make assembly more organized.
Before You Start Crocheting
This ornament is made from two crocheted car body pieces. The pieces are held with wrong sides together and joined with a single-crochet edging in Soft White. A separate window, two wheels, and a small back-loop-only tree are then sewn to the car body.
The construction sequence is:
- Crochet two car body pieces in Soft Navy.
- Join and edge the body in Soft White.
- Make and attach the window.
- Crochet and attach two wheels.
- Make the tree in Hunter Green and sew it to the car.
- Add the gold tree decoration, lights, and door details.
- Make and attach the hanging loop.
The pattern uses US crochet terminology. Helpful abbreviations include:
- ch: chain
- sc: single crochet
- sl st: slip stitch
- sc2tog: single crochet 2 together
- sc3tog: single crochet 3 together
- RS: right side
- WS: wrong side
- rnd: round
Materials You’ll Need
- Red Heart® Super Saver® (7 oz/198 g; 364 yds/333 m), base yarn
- Contrast A Soft Navy (0387): 1 ball
- Contrast B Soft White (0316): 1 ball
- Contrast C Hunter Green (0389): 1 ball
- Contrast D Burgundy (0376): 1 ball
- Contrast E Gold (0321): 1 ball
- Size U.S. H/8 (5 mm) crochet hook, or size needed to obtain gauge
- Yarn needle
Contrast A forms the car body and hanging loop. Contrast B is used for the edging, window, and light embroidery. Contrast C creates the tree, Contrast D forms the wheel accents, and Contrast E decorates the tree.
Step-by-Step Crochet Instructions
Stitch Key
Satin Stitch
- = single crochet 2 together (sc2tog)
- = worked in back loop only
Car Body Make 2
With A, ch 17.
- 1st row (RS): 1 sc in 2nd ch from hook. 1 sc in each ch to end of chain. Turn. 16 sc.
- 2nd row: Ch 1. 1 sc in each sc to end of row. Turn. 16 sc.
- 3rd row: Ch 1. Sc2tog. 1 sc in each sc to last 2 sc. Sc2tog. Turn. 14 sc.
- 4th row: As 3rd row. 12 sc.
- 5th row: Ch 1. Sc2tog. 1 sc in each of next 7 sc. Turn. 8 sc.
- 6th row: Ch 1. 1 sc in each sc to end of row. Turn. 8 sc.
- 7th row: Ch 1. Sc2tog. 1 sc in each sc to last 2 sc. Sc2tog. Fasten off.
Edging Join Car Body
Holding WS tog, join B with sl st at any point around Car Body. Working through both thicknesses, proceed as follows:
1st rnd: Ch 1. Work sc evenly around Car Body. Join. Fasten off.
Working through both layers keeps the ornament firm and gives the outer edge a neat, finished appearance.
Window
With B, ch 8.
- 1st row: 1 sc in 2nd ch from hook. 1 sc in each ch to end of chain. Turn. 7 sc.
- 2nd row: Ch 1. Sc2tog. 1 sc in each sc to last 2 sc. Sc2tog. 5 sc. Fasten off.
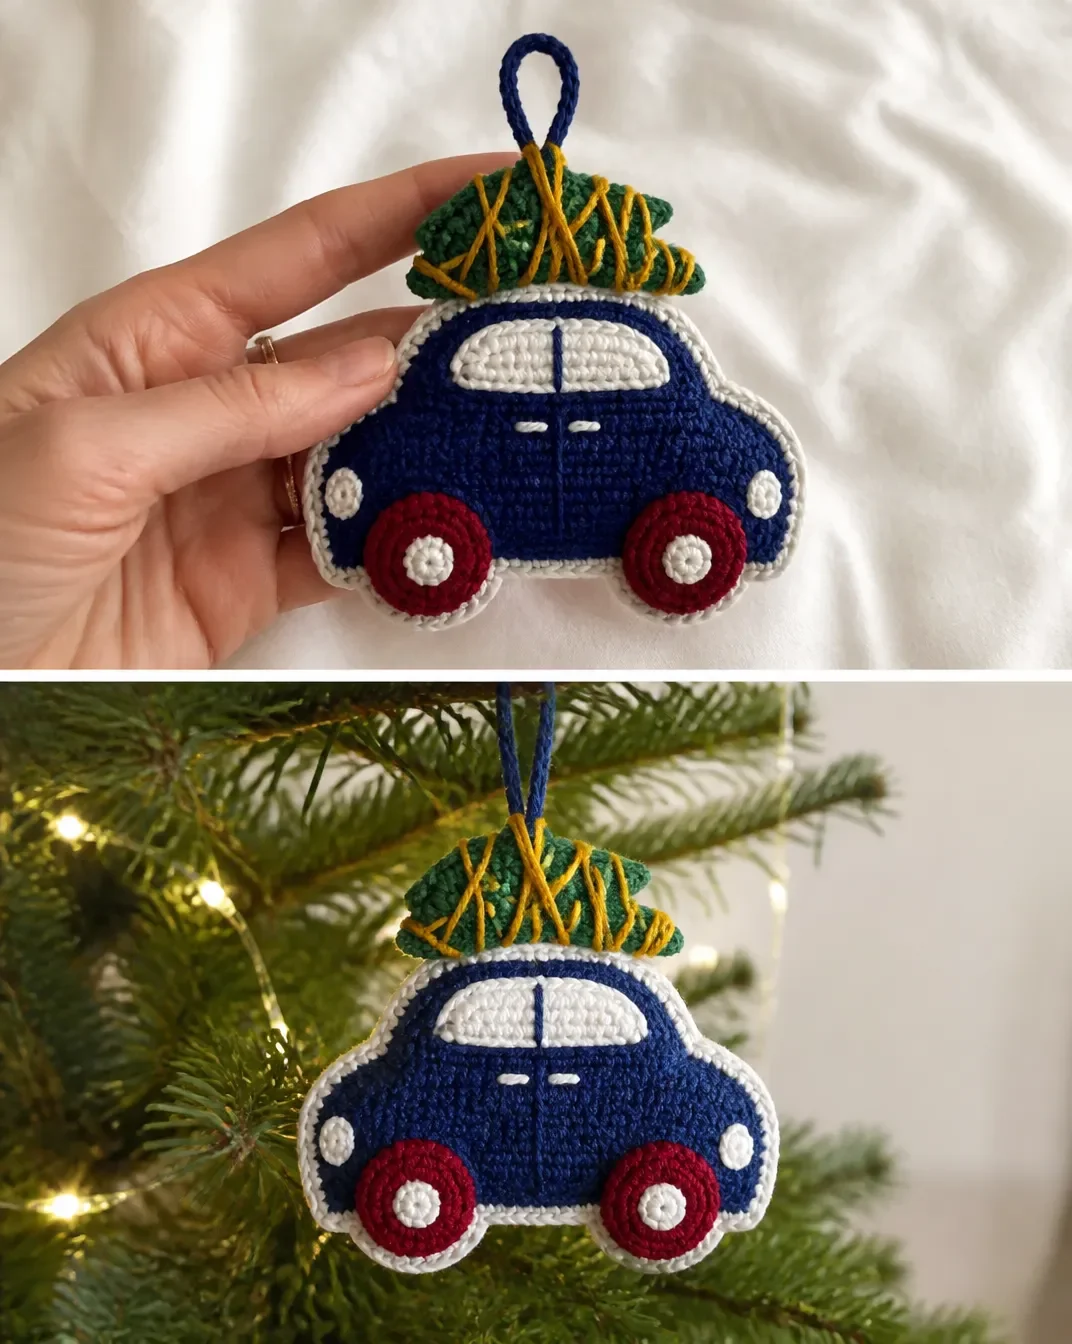
Sew Window to Car Body as shown in photo.
Using A, embroider line in middle of Window.
Wheels Make 2
With B, ch 2.
- 1st rnd: 6 sc in 2nd ch from hook. Break B. Join with D. 6 sc.
- 2nd rnd: With D, ch 1. 2 sc in each sc around. Join. Fasten off.
Sew Wheels to Car Body as shown in photo.
Tree
With C, ch 10.
- 1st row: 1 sc in 2nd ch from hook. 1 sc in each ch to end of chain. Turn. 9 sc.
- 2nd row: Ch 1. Working in back loops only, 1 sc in each of next 3 sc. Sc3tog. 1 sc in each sc to end of row. Turn. 7 sc.
- 3rd and alt rows: Ch 1. Working in back loops only, 1 sc in each st to end of row. Turn.
- 4th row: Ch 1. Working in back loops only, 1 sc in each of next 2 sc. Sc3tog. 1 sc in each sc to end of row. Turn. 5 sc.
- 6th row: Ch 1. Working in back loops only, 1 sc in next sc. Sc3tog. 1 sc in last sc. Turn. 3 sc.
- 8th row: Ch 1. Working in back loops only, Sc3tog. Fasten off.
Sew Tree to top of Car Body as shown in photo.
Using a length of E, wrap and embroider yarn around Tree as shown in photo.
Car Lights and Door Details
Using B, embroider Car Lights with satin st as shown in photo.
Using same length, embroider door details.
The embroidered details are small, so use short, controlled stitches and refer to the photo placement while working.
Hanging Loop
With A, ch 12.
Fasten off.
Sew Hanging Loop to Car Body as shown in photo.
Ways to Display Your Finished Crochet
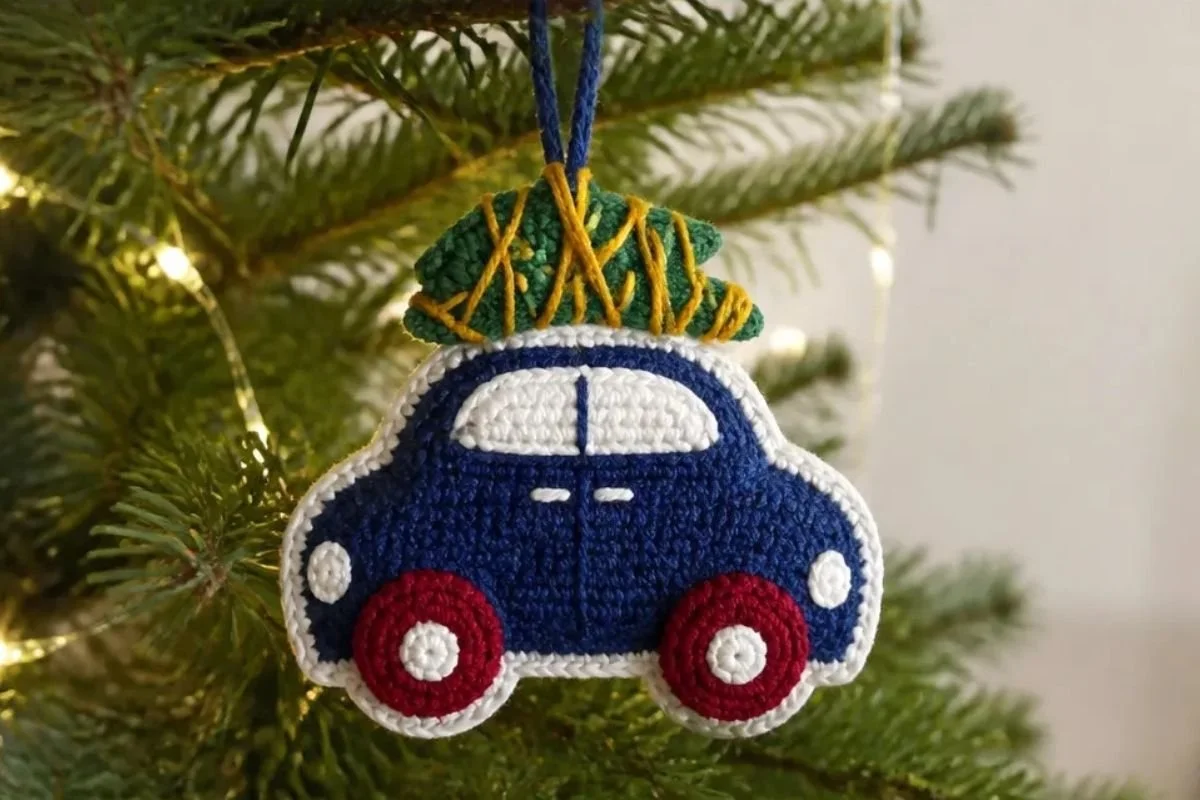
- Hang the ornament near the front of the Christmas tree where the car silhouette and tree detail can be seen clearly.
- Add several handmade ornaments to a seasonal garland over a mantel, shelf, or doorway.
- Attach one to a wrapped present as a reusable gift tag or keepsake.
- Place the ornament in a holiday gift basket with cocoa, cookies, or other handmade decorations.
- Use it as part of a winter-themed tabletop display alongside greenery, pinecones, and wrapped gifts.
- Make several in coordinated colors for a handmade ornament collection.
For a more formal handmade display, the ornament can be paired with other textile decorations; a crochet bridal bouquet wrap offers additional inspiration for combining yarn colors and decorative finishing.
Caring for Your Crochet Project
Dust the ornament gently with a soft, dry cloth or a clean, soft brush. Pay particular attention to the embroidered tree decoration, lights, and door details so they do not catch or pull.
For a small mark, use careful spot cleaning with minimal moisture rather than soaking the ornament. Allow it to dry completely in its natural shape before storing it.
Store the ornament flat or in a protective box between seasons. Avoid placing heavy decorations on top of it, and keep it away from excessive heat, direct moisture, and sharp hooks that could snag the yarn or hanging loop.
Tips for Better Results
- Count after every shaping row. The car body decreases quickly, so verify the stitch count at the end of each row: 16, 14, 12, 8, 8, and then the final decrease row.
- Keep the two car pieces consistent. Use the same tension for both pieces so their edges line up smoothly when held WS tog.
- Work through both thicknesses for the edging. This joins the car body securely and prevents the two layers from shifting.
- Mark back-loop-only rows on the tree. The tree shaping depends on working in back loops only, so check your placement before beginning each row.
- Join the wheel colors neatly. Break B and join with D exactly as instructed so the wheel has a defined center and outer accent.
- Use the photo for placement. The window, wheels, tree, lights, door details, and hanging loop all depend on their position on the car body.
- Secure embroidery ends carefully. Weave or sew the ends into the wrong side of the ornament so the front remains tidy.
- Avoid over-tightening sewn parts. Attach the window, wheels, and tree firmly but allow the fabric to lie flat without puckering.
Color and Styling Variations
The approved pattern uses Soft Navy, Soft White, Hunter Green, Burgundy, and Gold. Optional color changes can give the ornament a different seasonal mood without changing its construction.
- Use a deep forest or traditional red for the car body.
- Replace the gold tree decoration with silver for a cooler winter palette.
- Try cream instead of Soft White for a vintage-inspired appearance.
- Use a brighter green for a playful, colorful Christmas display.
- Make a coordinated set with different car body colors while keeping the windows, wheels, and trees consistent.
- Pair several ornaments with handmade botanical accents, such as a felted chrysanthemum pin, in a seasonal arrangement.
If you substitute yarn, choose a comparable yarn carefully. A different yarn weight or hook size may change the dimensions, stitch definition, firmness, and amount of yarn required. Make substitutions consistently across all components so the finished pieces remain proportional.
Frequently Asked Questions
Is this ornament suitable for a beginner?
It is suitable for a beginner who is comfortable with single crochet, basic decreases, fastening off, sewing crocheted pieces together, and simple embroidery. The car body and small components require careful stitch counting.
What yarn colors are used?
The pattern uses Contrast A Soft Navy, Contrast B Soft White, Contrast C Hunter Green, Contrast D Burgundy, and Contrast E Gold from Red Heart® Super Saver®. Each contrast has a specific role in the car, tree, wheel, and decorative details.
What hook size should I use?
Use a size U.S. H/8 (5 mm) crochet hook, or the size needed to obtain gauge.
How many car body pieces are made?
The Car Body is made twice. The two pieces are held with wrong sides together and joined around the edge with Soft White single crochet.
How many wheels are included?
Make two wheels. Each begins with Soft White and is joined with Burgundy for the second round.
Why is the tree worked in back loops only?
The tree instructions specify back-loop-only single crochet to create the stated texture and shaping. Work carefully in the designated loop throughout the listed tree rows.
Can I change the colors?
Yes. Color changes are an optional styling choice, but keep the construction instructions unchanged unless you are intentionally adjusting the design. Different yarns or hook sizes may affect the finished proportions.
How is the ornament hung?
The hanging loop is made with Contrast A by chaining 12, fastening off, and sewing the loop to the Car Body as shown in the photo.
How should I clean the finished ornament?
Dust it gently and spot-clean carefully when needed. Avoid soaking, excessive moisture, and rough handling of the embroidered or sewn details.
Conclusion
This Home for the Holidays ornament combines simple crochet shaping with colorful embroidery and a cheerful Christmas scene. The car, tree, wheels, and hanging loop make it a memorable handmade decoration for your own tree or a thoughtful seasonal gift. For more festive project inspiration, browse these free crochet Christmas ornament patterns.